![]()
![]()
![]()
![]()
![]()
|
|
|
|
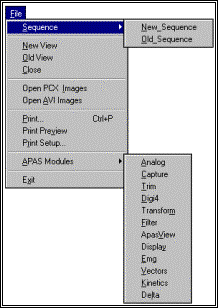
Lesson 2 - The Digitizing ProcessINTRODUCTION Digitizing is the first step for analysis after the recorded images have been captured and stored on the hard disk of the computer. The APAS 4 SCREEN DIGITIZING APPLICATION (DIGI4) software is a Windows based program for digitizing images to be analyzed using the Ariel Performance Analysis System (APAS). Once
the Sequence information has been provided and one or more Views have been
created for each camera recording in the sequence, the digitizing process can
proceed. Beginning with the Fixed Point, each point should be digitized using
the mouse. The next point to be
digitized will be labeled in the View Window Status Bar.
When the current image is finished and the Status Bar indicates COMPLETE,
the image can be advanced by pressing the Right mouse button.
Continue this process until all the images in the image file have been
digitized. Each
View represents a digitized image from a particular camera view and as such
consists of two-dimensional coordinates. When
all views have been digitized, the Transform module combines them to form a true
three-dimensional image sequence. If only one view is digitized and transformed, the resulting
image sequence will be two-dimensional. The
digitizing process can be broken down into two general steps:
Control (or Calibration) and Body Joints.
Each step requires digitizing the Fixed Point.
There is no specific order to accomplish these two steps, however, it is
recommended that the user digitize the Control Points first. FIXED/PANNING POINTWith
every digitized image, there is one additional point that must be digitized
first; the Fixed Point (or Panning Point for Panning Camera views).
This is a point selected somewhere in the background of the film or video
image. The point must be stationary
(thus the name fixed point) and should be clearly visible in every frame.
Do not select a point that will be obscured by the subject during the
activity. The purpose of this point
is to provide a fixed reference against which all the other points in the image
are measured. This same point must
also be visible in the image with the control points. Position
the cursor to the selected fixed point and click the left mouse button.
A small box appears on the graphic display to mark the location of the
Fixed Point. The digitizing module
expects the Fixed Points from subsequent images to fall within this box which
represents the normal variation due to field interlace or vibration. Digitizing
a Fixed Point outside of this box will be considered an error by the computer.
In this manner, the system prevents inadvertent digitizing of incorrect
fixed point information. IMORTANT
INFORMATION ABOUT THE FIXED POINT 1.
The
Fixed Point must be the exact same point for the calibration and body joint
images �within� a single camera view. 2.
The
Fixed Point must be the exact same point �within� a view but can be
different �between� views. In
other words, Camera #1 must have the same fixed point in the calibration and
data images while Camera #2 can use a different fixed point. PANNING CAMERAS When
digitizing Panning Camera views, the Fixed Point will be replaced by the Panning
Point. Only one panning point
needs to be digitized in each image. As
the camera view is panned, the panning point will most likely need to be
adjusted as initial panning points move out of the image.
Panning points are specified using the PAN
POINT command in the CONTROL
menu. BODY JOINTSThe
term �Body Joint� is used in
this discussion, however, it should be noted that the digitized points do not
have to be on the human body. These
can represent any digitized points of interest as defined in the Sequence
Information menu. Digitizing
the actual body joints for the first image may now proceed. .
The next point to be digitized will be labeled in the View Window Status
Bar. Position the video cursor to
that joint and click the left mouse button.
The digitized point will appear on the graphic display.
Continue to position the video cursor to each point and click the mouse.
As this is done, not only will the point locations appear on the graphic
display, but a stick figure image of the subject will be constructed as
additional points are added. After
the last point in the image has been digitized, the word COMPLETE will appear in
place of the current joint name on the View Window Status Bar.
Attempts to digitize additional points will elicit a beep to signal that
an error has been made. If
a mistake is made while digitizing, either by digitizing the wrong joint or
positioning the cursor improperly, corrections of one or more digitized points
may be made by pressing the middle button on the mouse or selecting the Erase
icon from the toolbar. Each time
this function is selected, the last point will be removed or un-digitized from
the current image. Thus, to remove
the last three points, this function would be selected three times.
After removing the incorrect points, the correct points are then
digitized to complete the frame. Once
all desired images are completed, press the advance icon in the toolbar to
proceed to the next image. The
system is now ready for the second image to be digitized, with an additional
feature of the digitizing module immediately apparent.
The video cursor is now pre-positioned for each point to be digitized.
This is because the digitizing module learns to identify the body joints
as they are digitized. The more
frames digitized, the better the learning process will be.
However, the human eye is still superior to the computer in locating body
joints, so use the initial cursor location as an approximation and make fine
adjustments manually to achieve the best level of accuracy for digitizing.
As digitizing proceeds, only small adjustments should be needed, thus
repositioning greatly speeds the digitizing process.
Digitize the fixed point and all the body joints for the second image
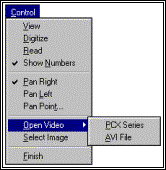
just as with the first image, then select Advance. CONTROL (CALIBRATION) POINTSThere
is one additional operation that must be performed for each view that is
digitized. In addition to
digitizing the subject, the control points used to calibrate the image space
must also be digitized once for each camera view.
Although this discussion is being presented at the end of the digitizing
process, it is usually a good idea to digitize the control points FIRST, so that
they are not forgotten. This is
also required for Real-Time 3D Integration.
It is possible, however, to digitize control points at any time, from the
first digitized image to the last. STATIONARY CAMERASControl
Points for stationary cameras are digitized using the following steps: 1.
Follow
the steps listed in the �Creating A New Digitizing View File� section above. 2.
If
multiple views are open simultaneously, click the left mouse button on the name
located in the top section of the desired View Window to make this window
active. Be careful not to click the
mouse in the image portion of the window. If
this is done, the computer will think you are attempting to digitize this view.
Select the ERASE icon to remove any accidental digitizing. 3.
Select
the DIGITIZE command from the CONTROL
menu. The current video image will be removed from the active view
window. 4.
Select
the OPEN VIDEO command from the CONTROL
menu a second time. Then select AVI FILE. A menu will be
displayed to allow the user to select the AVI File for Control Points.
Click once on the desired file and a small preview window will display
the image. Select the OPEN
button to accept the file. NOTE:
Be sure to select a view file from the SAME camera or the wrong control
point information will be read 5.
A
panel of numbered images will be presented to allow the selection of the desired
image for digitizing. If you do not
see the desired image, select the NEXT
or + button to advance the images in
sets or one at a time. Double-clicking
on an image will toggle between an expanded and compressed image size.
Select the desired image with a left click of the mouse.
Then select OK to proceed. The
Digitizing module now allows the digitizing of Control points in a manner
similar to digitizing an image of the subject�s activity. First digitize the
Fixed Point. It is important to
select the same fixed point as used for the activity itself. Next digitize each of the control points in the exact order
that they were defined (the order that coordinate locations were entered) when
this sequence was created. It is
highly recommended to make a sketch or drawing of the control points from each
camera view and to number them so that they are not entered incorrectly during
digitizing. Save these drawings if
there will be additional sequences using the same control points.
As the control points are digitized, they will appear on the graphic
display as numbered points. When
all the points have been digitized, compare the display with the drawing to
ensure that the points have been digitized correctly.
Repeat the steps listed above to digitize the control points for all
desired views in the sequence. WARNING When
all the control points have been digitized correctly, follow the steps listed
below to return to digitizing body joints. 1.
Select
the FINISH command from the CONTROL
menu. 2.
At
this point, it is possible to continue digitizing images in the sequence or, if
digitizing is complete for each camera view, to leave the digitizing module. PANNING CAMERASDigitizing
the Control Points for Panning cameras is similar to stationary cameras except
that Panning cameras require two sets of control points, with Panning points in
between. Refer to the figure below.
The
Left and Right Control fixtures require a minimum of 8 points each (though 14 or
more are highly recommended). All
points should have Cartesian coordinates measured relative to a single origin,
though each set of control points will be digitized separately.
As with stationary cameras, the coordinate axes are based on the
right-hand-rule. It
does not matter if one digitizes the Left or Right set of control points first,
though it is recommended to establish a �standard� order for digitizing so
that essential items will not be forgotten.
This discussion will present the Left set of control points first. Control
Points for Panning cameras are digitized using the following steps: 1.
Creating
A New Digitizing View File and be certain to set the View Type to Panning
in the View Information menu. This
will identify the view as a panning camera view 2.
If
multiple views are open simultaneously, click the left mouse button on the name
located in the top section of the desired Panning View Window to make this
window active. Be careful not to
click the mouse in the image portion of the window.
If this is done, the computer will think you are attempting to digitize
this view. Select the ERASE icon to
remove any accidental digitizing. 3.
Select
the DIGITIZE command from the CONTROL
menu. The current video image will be removed from the active view
window. 4.
Select
the PAN LEFT command from the CONTROL
menu. This designates that the Left Control Points will be
digitized. The current selection is
designated by the checkmark next to the command. If this is already checked, proceed to the following step. 5.
Select
the OPEN VIDEO command from the CONTROL
menu and select AVI
FILE. A menu will be displayed to
allow the user to select the AVI File for the panning Control Points.
Click once on the desired file and a small preview window will display
the image. Select the OPEN
button to accept the file. NOTE:
Be sure to select a view file from the SAME camera or the wrong control
point information will be read 6.
A
panel of numbered images will be presented to allow the selection of the desired
image for digitizing. If you do not
see the desired image, select the NEXT
or + button to advance the images in
sets or one at a time. Double-clicking
on an image will toggle between an expanded and compressed image size.
Select the desired image with a left click of the mouse.
Then select OK to proceed. 7.
The
Digitizing module now allows the digitizing of Control points in a manner
similar to digitizing an image of the subject�s activity.
Digitize each of the control points in the exact order that they were
defined (the order that coordinate locations were entered) when this sequence
was created. It is highly
recommended to make a sketch or drawing of the control points from each camera
view and to number them so that they are not entered incorrectly during
digitizing. Save these drawings if
there will be additional sequences using the same control points. As the control points are digitized, they will appear on the
graphic display as numbered points. When
all the Left Control points have been digitized, compare the display with the
drawing to ensure that the points have been digitized correctly. 8.
Select
the FINISH command from the CONTROL
menu to save the Left Control Data. (NOTE: The steps listed above are now repeated for the Right control
points). 9.
Select
the DIGITIZE command from the CONTROL
menu. 10.
Select
the PAN RIGHT command from the CONTROL
menu. This designates that the Right Control Points will be
digitized. 11.
Select
the OPEN VIDEO command from the CONTROL
menu and select AVI
FILE. A menu will be displayed to
allow the user to select the AVI File for the panning Control Points.
Click once on the desired file and a small preview window will display
the image. Select the OPEN
button to accept the file. NOTE:
Be sure to select a view file from the SAME camera or the wrong control
point information will be read 12.
A
panel of numbered images will be presented to allow the selection of the desired
image for digitizing. If you do not
see the desired image, select the NEXT
or + button to advance the images in
sets or one at a time. Double-clicking
on an image will toggle between an expanded and compressed image size.
Select the desired image with a left click of the mouse.
Then select OK to proceed. 13.
The
Digitizing module now allows the digitizing of Control points in a manner
similar to digitizing an image of the subject�s activity.
Digitize each of the Right control points in the exact order that they
were defined (the order that coordinate locations were entered) when this
sequence was created. When all the
Right Control points have been digitized, compare the display with the drawing
to ensure that the points have been digitized correctly. 14.
Select
the FINISH command from the CONTROL
menu to save the Right Control Data. WARNING At
this point, it is possible to continue digitizing images in the sequence or, if
digitizing is complete for each camera view, to leave the digitizing module. DIGITIZING OPTIONSThere
are a number of optional features available in the Digitizing Module that have
been designed to augment or enhance the digitizing process.
Several other options require a more detailed discussion and have been
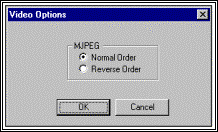
listed under individual headings (Automatic Digitizing, Panning Cameras etc.). IMAGE ORDERThe
VIDEO command is used to specify the display order for the odd and even
video fields. Depending on the hardware and software combinations used for
recording and displaying the AVI files, it is possible for the order of the
displayed fields to be reversed. For
this reason, the Ariel DIGITIZE program provides the option to specify the order
for displaying the AVI files. If it
appears that the images are �jerky� or are being displayed in a �zigzag�
manner, the field order probably needs to be reversed.
The order can be changed using the following steps. 1.
Select
the VIDEO command from the IMAGES
menu. 2.
Specify
Normal or Reverse Order by clicking next to the desired option.
The current setting is designated by the mark to the left.
OPENING MULTIPLE VIEW FILES1.
Select New View from the File
menu. 2.
Enter the View Information 3.
Open the corresponding image file. 4.
Begin the Digitizing process. In
the Digitizing phase of the analysis, certain joints may often be obscured from
a particular view. This situation
often meant that the joint had to be �estimated� with limited information.
The DIGI4 program allows up to four views to be opened and digitized
either simultaneously or individually. This
is a useful feature in cases of obscured joints.
While one view may have a joint that is not visible, other views will
show the same joint from a different perspective.
This allows a more educated estimate to be made for digitizing the joint
in the view where the joint is obscured. LOCKING MULTIPLE IMAGES1.
Select the LOCK command from the IMAGES
menu. When
two ore more images are opened simultaneously it is often helpful to have the
images advance and/or reverse at the same rate. The Advance, Reverse, First, Last and Select commands in the
Images menu affect all View Windows when the LOCK function is turned on.
When the LOCK function is turned off these commands only affect the
active window. The current status
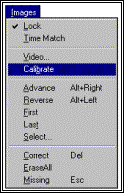
of the LOCK function is shown in the Status bar. CORRECTING DIGITIZED POINTSPoints
that are digitized incorrectly can be corrected by one of three methods: 1.
Selecting the Correct command in the Images
menu. Each time the Correct command
is selected, the cursor will reverse one point. 2.
The middle button on the three button mouse can also be utilized for
correcting points. Each time the
middle button is pressed, the cursor will reverse one point. 3.
Selecting the Erase All command in the Images
menu. When the Erase All command is
selected, all digitized points in the current image will be erased. ENTERING MISSING POINTSPoints that are unable to be digitized should be entered as Missing by selecting the Missing command from the Images menu. An example of this function would be the case of a baseball batter hitting a ball. If the ball is digitized as one of the points it may move beyond the boundary of the image. In this case the ball would be entered as Missing when it is no longer visible. This command is useful for points that are missing in only a few images. For points not visible for extended periods, please refer to the help section on INVISIBLE POINTS. Lesson 1 illustrates how to input all the necessary parameters. These parameters are required by the digitizing process. The program need to know the sequence of digitizing. Need to know the coordinates of the Calibration Frame. Other parameters such as the body's weight and height allow calculation of the Center Of Mass and used with the Gait program to calculate the Inverse Dynamics Kinetic measurement. After inputting all these parameters, the digitizing process start. The Digitizing process can be done manually or automatically. For automatic digitizing, where the program find the coordinates, you need to put markers on the different body's joints. You can use different markers sets as defined in our Gait System. At the simplest procedure, you just establish one marker per body's joint. This is shown in Figure 2-1.
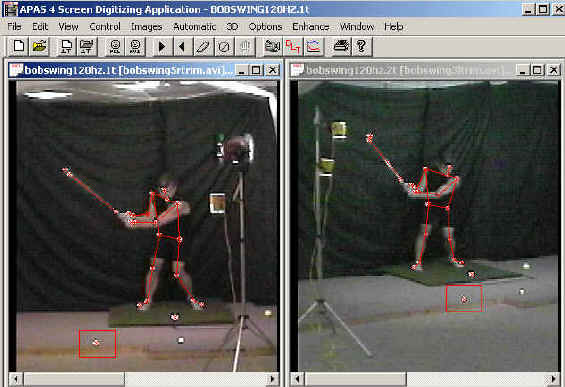
In Figure 2-1 one can observe the markers on each of the body's joints. This is the simplest marker set and the least accurate. However, it can be used as a reference to manual digitizing. In most cases in a live competition such as in the Olympics or in a Golf Tournament, it would not be possible to put markers on the performers and then the only way to digitize the data is by manual method. In order to digitize the data, manually or automatically, it is necessary to define a "fix point" for the first point to be digitized. Then you need to follow the sequence that you define in the sequence information. Figure 2-2 illustrates the sequence to be digitize.
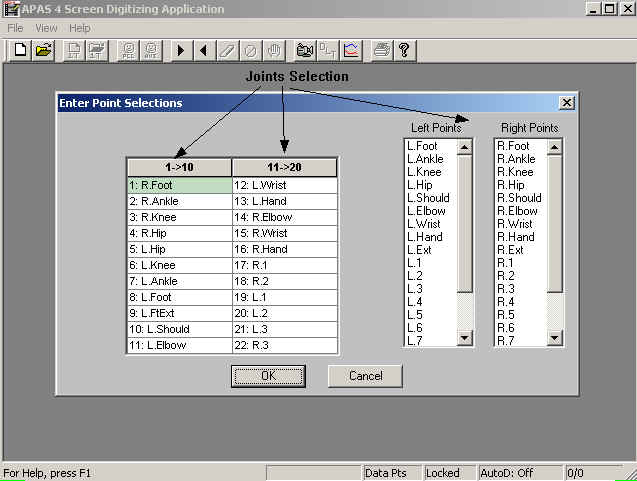
From Figure 2-2 one can see the sequence to be digitized. 1: Right Foot; 2: Right Ankle; 3: Right Knee; etc. Don't forget that the first point to digitize is the Fixed Point. This fixed point does not need to be the same in all the views. The
Next Video Show the process of digitizing. (Click here) As one can see the resolution is not good since I had to compress this video file for your convenient to be able to upload it faster. In normal situation the digital video data is extremely crisp and high quality. JVC HIGH_SPEED CAMCORDERWhen
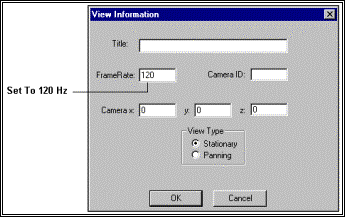
digitizing AVI files captured from the JVC 120 Hz Camcorders, there are a few
extra points that must be emphasized. The
exact same steps are followed as described in the section �Creating A New
Digitizing View File� with the following exceptions. 1.
The
Frame Rate must be set to 120 or 240 (depending on the high-speed mode used for
recording) in the View Information menu.
2.
Make
certain that the SPEED field is labeled as 120 or 240.
If not, the file should be opened in TRIM module and specified as either
120 Hz or 240 Hz. Then select the
Save Trimming option without actually trimming the file.
3.
Select the CALIBRATE command from the IMAGES
menu to display the Calibrate JVC 120Hz Offset menu. It is recommended to select the AUTO button to automatically determine the image offset.
Select the OK button to return to the digitizing screen.
The
JVC high-speed camcorder is capable of recording at a rate of either 120 or 240
images per second by splitting the image to approximately one-half or
one-quarter normal screen size. When
the recording is played back on any standard video player, 2 images will be
simultaneously displayed in the 120 Hz mode (2X High Density Mode) while 4
images will be simultaneously displayed in the 240 Hz mode (4X High Density
Mode). These images are 1/120th
second apart and 1/240th second apart respectively. In
theory, the expected split would occur at the horizontal and vertical middle of
the screen. This equates to
horizontal line 360 and vertical line 240 since there are 720 lines of
horizontal resolution and 480 lines of vertical resolution. However, reality has indicated that this is not always the
situation. For this reason, the
Calibrate function is used to determine the image offsets for the high-speed
video. The
steps for calibration are almost identical for both the 120 and 240 Hz modes.
Any of three options can be used to perform the calibration process,
however, the �Automatic� method is recommended.
These options are selected using the buttons in the lower portion of the
Calibrate menu.
Manual Calibration Option In
the �Calibrate� menu, the user specifies the row or column number (or both
in the case of 240 Hz) where the last high speed image appears in the normal
speed video. In the case of
120 Hz, the normal video consists of 2 high speed images either horizontal
scenes or vertical scenes. In the
case of 240 Hz, there are 2 rows and 2 columns of high-speed images per normal
image. The dialog displays 2 images, the 1st and last high-speed images for the
current normal image. Edit boxes display the current values for the row/column
offsets for the "Last" image. The idea is to have the top or the left
or both edges of the two displayed images appear identically. One can enter a
value for the offset[s] and click on the �Apply�
button to re-display the images with this new value. Digitize Calibration Option The
�Digitize� option is another
method for calibration. When this
option is selected, the user will be prompted to digitize the same image feature
in the two images. From this
information the program calculates the row and/or column offsets. Automatic Calibration Option Or
one can select "Auto" and
the program will automatically compare the two images pixel by pixel and
determine the row and/or column offsets. The
calculated offset is then entered in the Line Offset field. This
last option is the most reliable and is the recommended method.
Typically the calibration needs to be performed only once on a system.
The indicator that the 120/240 Hz is NOT calibrated is the presence of jitter
when advancing images. Save Calibration Settings This
information can only be saved to a file once. This usually happens in TRIM when
the trimmed file is saved. Therefore this information should be setup properly
before the trimmed file is saved. It can be changed temporarily but will revert
to the original values the next time the AVI is opened. To save permanently,
open the video file in the TRIMMER module, specify new values, and then save the
trimmed file without actually trimming any images.
OPENING A PREVIOUSLY CREATED VIEW 1.
Select the Old View command from the File
menu. . This can also be performed
in a single step by selecting the OPEN EXISTING VIEW icon from the Tool Bar.
The Open Existing View File menu will appear. 2.
Select the desired view file. When a view file is opened, the program
will prompt the user with this filename and whether to Open it.
Cancel can be selected to open another AVI/PCL file. Once
the Sequence information has been provided and one or more Views have been
created for each camera recording in the sequence, the digitizing process can
proceed. Beginning with the Fixed Point, each point should be digitized using
the mouse. The next point to be
digitized will be labeled in the View Window Status Bar.
When the current image is finished and the Status Bar indicates COMPLETE,
the image can be advanced by pressing the Right mouse button.
Continue this process until all the images in the image file have been
digitized. Each
View represents a digitized image from a particular camera view and as such
consists of two-dimensional coordinates. When
all views have been digitized, the Transform module combines them to form a true
three-dimensional image sequence. If only one view is digitized and transformed, the resulting
image sequence will be two-dimensional. The
digitizing process can be broken down into two general steps:
Control (or Calibration) and Body Joints.
Each step requires digitizing the Fixed Point.
There is no specific order to accomplish these two steps, however, it is
recommended that the user digitize the Control Points first. FIXED/PANNING POINTWith
every digitized image, there is one additional point that must be digitized
first; the Fixed Point (or Panning Point for Panning Camera views).
This is a point selected somewhere in the background of the film or video
image. The point must be stationary
(thus the name fixed point) and should be clearly visible in every frame.
Do not select a point that will be obscured by the subject during the
activity. The purpose of this point
is to provide a fixed reference against which all the other points in the image
are measured. This same point must
also be visible in the image with the control points. Position
the cursor to the selected fixed point and click the left mouse button.
A small box appears on the graphic display to mark the location of the
Fixed Point. The digitizing module
expects the Fixed Points from subsequent images to fall within this box which
represents the normal variation due to field interlace or vibration. Digitizing
a Fixed Point outside of this box will be considered an error by the computer.
In this manner, the system prevents inadvertent digitizing of incorrect
fixed point information. IMORTANT
INFORMATION ABOUT THE FIXED POINT 1.
The
Fixed Point must be the exact same point for the calibration and body joint
images �within� a single camera view. 2.
The
Fixed Point must be the exact same point �within� a view but can be
different �between� views. In
other words, Camera #1 must have the same fixed point in the calibration and
data images while Camera #2 can use a different fixed point. PANNING CAMERAS When
digitizing Panning Camera views, the Fixed Point will be replaced by the Panning
Point. Only one panning point
needs to be digitized in each image. As
the camera view is panned, the panning point will most likely need to be
adjusted as initial panning points move out of the image.
Panning points are specified using the PAN
POINT command in the CONTROL
menu. BODY JOINTSThe
term �Body Joint� is used in
this discussion, however, it should be noted that the digitized points do not
have to be on the human body. These
can represent any digitized points of interest as defined in the Sequence
Information menu. Digitizing
the actual body joints for the first image may now proceed. .
The next point to be digitized will be labeled in the View Window Status
Bar. Position the video cursor to
that joint and click the left mouse button.
The digitized point will appear on the graphic display.
Continue to position the video cursor to each point and click the mouse.
As this is done, not only will the point locations appear on the graphic
display, but a stick figure image of the subject will be constructed as
additional points are added. After
the last point in the image has been digitized, the word COMPLETE will appear in
place of the current joint name on the View Window Status Bar.
Attempts to digitize additional points will elicit a beep to signal that
an error has been made. If
a mistake is made while digitizing, either by digitizing the wrong joint or
positioning the cursor improperly, corrections of one or more digitized points
may be made by pressing the middle button on the mouse or selecting the Erase
icon from the toolbar. Each time
this function is selected, the last point will be removed or un-digitized from
the current image. Thus, to remove
the last three points, this function would be selected three times.
After removing the incorrect points, the correct points are then
digitized to complete the frame. Once
all desired images are completed, press the advance icon in the toolbar to
proceed to the next image. The
system is now ready for the second image to be digitized, with an additional
feature of the digitizing module immediately apparent.
The video cursor is now pre-positioned for each point to be digitized.
This is because the digitizing module learns to identify the body joints
as they are digitized. The more
frames digitized, the better the learning process will be.
However, the human eye is still superior to the computer in locating body
joints, so use the initial cursor location as an approximation and make fine
adjustments manually to achieve the best level of accuracy for digitizing.
As digitizing proceeds, only small adjustments should be needed, thus
repositioning greatly speeds the digitizing process.
Digitize the fixed point and all the body joints for the second image
just as with the first image, then select Advance. CONTROL (CALIBRATION) POINTSThere
is one additional operation that must be performed for each view that is
digitized. In addition to
digitizing the subject, the control points used to calibrate the image space
must also be digitized once for each camera view.
Although this discussion is being presented at the end of the digitizing
process, it is usually a good idea to digitize the control points FIRST, so that
they are not forgotten. This is
also required for Real-Time 3D Integration.
It is possible, however, to digitize control points at any time, from the
first digitized image to the last. STATIONARY CAMERASControl
Points for stationary cameras are digitized using the following steps: 1.
Follow
the steps listed in the �Creating A New Digitizing View File� section above. 2.
If
multiple views are open simultaneously, click the left mouse button on the name
located in the top section of the desired View Window to make this window
active. Be careful not to click the
mouse in the image portion of the window. If
this is done, the computer will think you are attempting to digitize this view.
Select the ERASE icon to remove any accidental digitizing. 3.
Select
the DIGITIZE command from the CONTROL
menu. The current video image will be removed from the active view
window. 4.
Select
the OPEN VIDEO command from the CONTROL
menu a second time. Then select AVI FILE. A menu will be
displayed to allow the user to select the AVI File for Control Points.
Click once on the desired file and a small preview window will display
the image. Select the OPEN
button to accept the file. NOTE:
Be sure to select a view file from the SAME camera or the wrong control
point information will be read 5.
A
panel of numbered images will be presented to allow the selection of the desired
image for digitizing. If you do not
see the desired image, select the NEXT
or + button to advance the images in
sets or one at a time. Double-clicking
on an image will toggle between an expanded and compressed image size.
Select the desired image with a left click of the mouse.
Then select OK to proceed. The
Digitizing module now allows the digitizing of Control points in a manner
similar to digitizing an image of the subject�s activity. First digitize the
Fixed Point. It is important to
select the same fixed point as used for the activity itself. Next digitize each of the control points in the exact order
that they were defined (the order that coordinate locations were entered) when
this sequence was created. It is
highly recommended to make a sketch or drawing of the control points from each
camera view and to number them so that they are not entered incorrectly during
digitizing. Save these drawings if
there will be additional sequences using the same control points.
As the control points are digitized, they will appear on the graphic
display as numbered points. When
all the points have been digitized, compare the display with the drawing to
ensure that the points have been digitized correctly.
Repeat the steps listed above to digitize the control points for all
desired views in the sequence. WARNING When
all the control points have been digitized correctly, follow the steps listed
below to return to digitizing body joints. 1.
Select
the FINISH command from the CONTROL
menu. 2.
At
this point, it is possible to continue digitizing images in the sequence or, if
digitizing is complete for each camera view, to leave the digitizing module. PANNING CAMERASDigitizing
the Control Points for Panning cameras is similar to stationary cameras except
that Panning cameras require two sets of control points, with Panning points in
between. Refer to the figure below.
The
Left and Right Control fixtures require a minimum of 8 points each (though 14 or
more are highly recommended). All
points should have Cartesian coordinates measured relative to a single origin,
though each set of control points will be digitized separately.
As with stationary cameras, the coordinate axes are based on the
right-hand-rule. It
does not matter if one digitizes the Left or Right set of control points first,
though it is recommended to establish a �standard� order for digitizing so
that essential items will not be forgotten.
This discussion will present the Left set of control points first. Control
Points for Panning cameras are digitized using the following steps: 1.
Creating
A New Digitizing View File and be certain to set the View Type to Panning
in the View Information menu. This
will identify the view as a panning camera view 2.
If
multiple views are open simultaneously, click the left mouse button on the name
located in the top section of the desired Panning View Window to make this
window active. Be careful not to
click the mouse in the image portion of the window.
If this is done, the computer will think you are attempting to digitize
this view. Select the ERASE icon to
remove any accidental digitizing. 3.
Select
the DIGITIZE command from the CONTROL
menu. The current video image will be removed from the active view
window. 4.
Select
the PAN LEFT command from the CONTROL
menu. This designates that the Left Control Points will be
digitized. The current selection is
designated by the checkmark next to the command. If this is already checked, proceed to the following step. 5.
Select
the OPEN VIDEO command from the CONTROL
menu and select AVI
FILE. A menu will be displayed to
allow the user to select the AVI File for the panning Control Points.
Click once on the desired file and a small preview window will display
the image. Select the OPEN
button to accept the file. NOTE:
Be sure to select a view file from the SAME camera or the wrong control
point information will be read 6.
A
panel of numbered images will be presented to allow the selection of the desired
image for digitizing. If you do not
see the desired image, select the NEXT
or + button to advance the images in
sets or one at a time. Double-clicking
on an image will toggle between an expanded and compressed image size.
Select the desired image with a left click of the mouse.
Then select OK to proceed. 7.
The
Digitizing module now allows the digitizing of Control points in a manner
similar to digitizing an image of the subject�s activity.
Digitize each of the control points in the exact order that they were
defined (the order that coordinate locations were entered) when this sequence
was created. It is highly
recommended to make a sketch or drawing of the control points from each camera
view and to number them so that they are not entered incorrectly during
digitizing. Save these drawings if
there will be additional sequences using the same control points. As the control points are digitized, they will appear on the
graphic display as numbered points. When
all the Left Control points have been digitized, compare the display with the
drawing to ensure that the points have been digitized correctly. 8.
Select
the FINISH command from the CONTROL
menu to save the Left Control Data. (NOTE: The steps listed above are now repeated for the Right control
points). 9.
Select
the DIGITIZE command from the CONTROL
menu. 10.
Select
the PAN RIGHT command from the CONTROL
menu. This designates that the Right Control Points will be
digitized. 11.
Select
the OPEN VIDEO command from the CONTROL
menu and select AVI
FILE. A menu will be displayed to
allow the user to select the AVI File for the panning Control Points.
Click once on the desired file and a small preview window will display
the image. Select the OPEN
button to accept the file. NOTE:
Be sure to select a view file from the SAME camera or the wrong control
point information will be read 12.
A
panel of numbered images will be presented to allow the selection of the desired
image for digitizing. If you do not
see the desired image, select the NEXT
or + button to advance the images in
sets or one at a time. Double-clicking
on an image will toggle between an expanded and compressed image size.
Select the desired image with a left click of the mouse.
Then select OK to proceed. 13.
The
Digitizing module now allows the digitizing of Control points in a manner
similar to digitizing an image of the subject�s activity.
Digitize each of the Right control points in the exact order that they
were defined (the order that coordinate locations were entered) when this
sequence was created. When all the
Right Control points have been digitized, compare the display with the drawing
to ensure that the points have been digitized correctly. 14.
Select
the FINISH command from the CONTROL
menu to save the Right Control Data. WARNING At this point, it is possible to continue digitizing images in the sequence or, if digitizing is complete for each camera view, to leave the digitizing module. DIGITIZING OPTIONSThere
are a number of optional features available in the Digitizing Module that have
been designed to augment or enhance the digitizing process.
Several other options require a more detailed discussion and have been
listed under individual headings (Automatic Digitizing, Panning Cameras etc.). IMAGE ORDERThe
VIDEO command is used to specify the display order for the odd and even
video fields. Depending on the hardware and software combinations used for
recording and displaying the AVI files, it is possible for the order of the
displayed fields to be reversed. For
this reason, the Ariel DIGITIZE program provides the option to specify the order
for displaying the AVI files. If it
appears that the images are �jerky� or are being displayed in a �zigzag�
manner, the field order probably needs to be reversed.
The order can be changed using the following steps. 1.
Select
the VIDEO command from the IMAGES
menu. 2.
Specify
Normal or Reverse Order by clicking next to the desired option.
The current setting is designated by the mark to the left.
OPENING MULTIPLE VIEW FILES1.
Select New View from the File
menu. 2.
Enter the View Information 3.
Open the corresponding image file. 4.
Begin the Digitizing process. In
the Digitizing phase of the analysis, certain joints may often be obscured from
a particular view. This situation
often meant that the joint had to be �estimated� with limited information.
The DIGI4 program allows up to four views to be opened and digitized
either simultaneously or individually. This
is a useful feature in cases of obscured joints.
While one view may have a joint that is not visible, other views will
show the same joint from a different perspective.
This allows a more educated estimate to be made for digitizing the joint
in the view where the joint is obscured. LOCKING MULTIPLE IMAGES1.
Select the LOCK command from the IMAGES
menu. When
two ore more images are opened simultaneously it is often helpful to have the
images advance and/or reverse at the same rate. The Advance, Reverse, First, Last and Select commands in the
Images menu affect all View Windows when the LOCK function is turned on.
When the LOCK function is turned off these commands only affect the
active window. The current status
of the LOCK function is shown in the Status bar. CORRECTING DIGITIZED POINTSPoints
that are digitized incorrectly can be corrected by one of three methods: 1.
Selecting the Correct command in the Images
menu. Each time the Correct command
is selected, the cursor will reverse one point. 2.
The middle button on the three
button mouse can also be utilized for correcting points. Each time the middle button is pressed, the cursor will
reverse one point. 3.
Selecting the Erase All command in the Images
menu. When the Erase All command is
selected, all digitized points in the current image will be erased. ENTERING MISSING POINTSPoints
that are unable to be digitized should be entered as Missing by selecting the Missing
command from the Images menu. An example of this function would be the case of a baseball
batter hitting a ball. If the ball
is digitized as one of the points it may move beyond the boundary of the image.
In this case the ball would be entered as Missing when it is no longer
visible. This command is useful for points that are missing in only a
few images. For points not visible
for extended periods, please refer to the help section on INVISIBLE POINTS. The
ARIEL DIGI4 software supports panning camera video data from either of two
sources: Utilizing the ARIEL
Panorama �Panning� head (hardware based) or simply panning the camera while
on a tripod (software based). The
procedure for digitizing the panning camera view is identical to the stationary
camera with the exception of the calibration process.
Panning camera views require a �left� and �right� calibration
device instead of a single fixture. 1.
Enter the View Information and set the View Type to Panning
in the View Information menu. This
will identify the view as a panning camera view.
Press OK to proceed.
2.
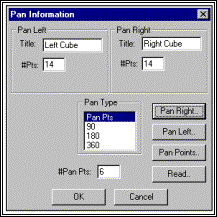
Enter the Panning Information.
Pan
Left/Right
- When digitizing a panning camera view, it is necessary to digitize a set of
pan/control points with the camera panned Left and a set with the camera panned
Right. The X,Y,Z coordinates must
be known for all control points. Additionally,
all coordinates must be relative to a single XYZ origin (0,0,0). Title
- Allows the user to specify an identification label for the Left and Right set
of panning control points. #Pts
- Used to enter the number of panning control points for each of the Left/Right
sets. Pan
Type
- Two types of panning views are supported by the DIGI4
program. The PAN TYPE is used to
specify which method is being used. Pan
Pts
- The Pan Points method requires a Left and Right calibration fixture with
points of known coordinates lying between the two fixtures. No external hardware is required to be attached to the
camera. When this option is used,
the user must specify the number of points between the two fixtures (#Pan
Pts). 90/180/360
- These numbers refer to the �Panning Range� when using the ARIEL Panorama
hardware. The Panning Range is set
by switches on the back panel of the Panning Unit. This option only requires a Left and Right calibration
fixture. Points between the two
fixtures are not used, thus #Pan Pts
is not available. Pan
Right/Left/Points - These buttons are selected to enter the X, Y and
Z coordinates for the corresponding fixtures.
All coordinates must be relative to a single origin designated as (0, 0,
0) and entered in the units specified in the Sequence Information menu.
Coordinates can also be READ from previously created files. 3.
Open the Image File Select
the Open PCX/AVI Images command from
the File menu.
When this option is selected the Open file menu box will be presented.
Select the desired image file by entering the file name and pressing the
ENTER key. 4.
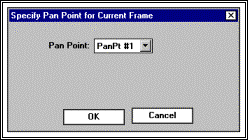
Begin the Digitizing Process. Beginning
with the Pan Point#/Bar, each point should be digitized using the mouse.
The next point to be digitized will be labeled in the View Window Status
Bar. When the current image is
finished and the Status Bar indicates COMPLETE, the image can be advanced by
double-clicking the Right mouse button. As
the camera view is panned, the Pan Points will have to be changed as it moves
out of view and the next Pan Point becomes visible.
The Pan Point is changed by selecting Pan
Point from the Control Menu.
Continue the digitizing process until all the images in the image file
have been digitized.
The
3D feature can be activated to simultaneously generate �*.3D� files while
digitizing multiple views of a sequence. As
each point is digitized for each of the active views, a graphical display is
created with position data for up to 6 curves, a 3D stick figure, or both.
Regardless of which type of 3D displays are selected, a *.3D file is
generated with a complete set of information for all joints plus the computed
Center-Of Gravity. These displays
are extremely helpful in verifying that accurate digitizing is being performed.
Generating the *.3D file in the DIGI4 module also eliminates the need for
executing the ARIEL Transformation module, thus decreasing the time required for
a complete analysis. REQUIREMENTS FOR 3D INTEGRATION REQUIREMENTS FOR CORRECT 3D OPERATIONFor
correct operation of the 3D algorithm, the following conditions must be adhered
to PRIOR to activating the 3D option.
Specific notification messages will appear if these requirements have not
been met. 1.
The CONTROL points must be digitized from each of the active views 2.
The SYNCH points must be properly designated for each of the active
views. It is recommended to CAPTURE
each view from the same starting image to synchronize the images by default.
The only limitation imposed is that the program will not handle SYNCH
points between images. UPDATING THE 3D FILE INFORMATIONWhen
the 3D option is active, a *.3D file is generated for each joint plus the CG
using the digitized information during the digitizing process.
If any changes are performed on points that have already been digitized,
the 3D calculations must be re-calculated to reflect the new changes.
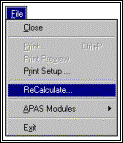
This is accomplished by the following steps: 1.
Select the ReCalculate command from the FILE
menu. When this option is selected,
you will be presented with the Time Limits menu.
2.
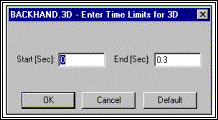
Enter the desired Start and End Time Limits for the 3D calculation.
The default values indicate the entire sequence where time matched values
exist. If you wish to use the
entire sequence for the 3D calculation, select the OK button. There
may be times when you wish to only consider a portion of the digitized data,
eliminating images at the beginning and/or end of the sequence.
In this case, manually enter the desired time range by typing in the
Start and End times. Then select the OK button. The
DEFAULT button will restore the Start and End times to the original values to
encompass the entire �time-matched� sequence.
ACTIVATING THE 3D FIGURE OPTION STARTING THE 3D FIGURE OPTION 1.
Select the FIGURE command from the 3D
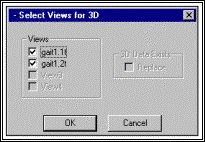
menu. 2.
Select the views to be used for generating the 3D information.
Views are selected/deselected using the left button of the mouse and
clicking the button to the left of each view name.
If a *.3D file already exists for this Sequence (by previously selecting
the 3D option or executing the Transform module), you will be prompted to either
Keep or Replace the data. Placing a
check in the button to the left of the REPLACE will replace the existing file
with the newly generated data.
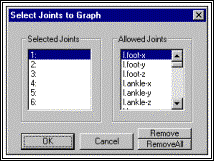
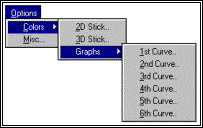
ADDING 3D GRAPH TO THE 3D FIGURE OPTION In
addition to the 3D stick figure, up to 6 graphs can be displayed simultaneously
during the digitizing process.
1.
Select the CREATE command from the GRAPH
menu. A window will appear for
Selecting the Joints To Graph.
The
Allowed Joints are displayed in the right side table. Up to 6 joints can be selected using the left mouse button.
When a joint is selected, the Joint Name will be placed in the Selected
Joints table. Joints can be removed
one at a time by highlighting the joint in the Selected Joints table and
selecting the REMOVE button in the lower right corner of the menu box.
Selecting the REMOVE ALL button will clear the entire Selected Joints
table. Once the joints have been
specified, select the OK button to display the graph(s) or the CANCEL button to
abort. If
the digitizing status of the current images are COMPLETE, the graph(s) will
appear in the display window. If
the current images are not digitized (or currently in progress)� the graph(s)
will be displayed only up to the current point.
The current digitizing status is displayed in the lower portion of each
View Window. 2.
After the display of the graph(s) appear, several options exist for
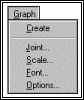
enhancing the display. They are all selected from the GRAPH menu. The
JOINT command is selected to change
any of the currently displayed joints. This
option allows the user to add, delete and/or change the currently displayed
joints. A maximum of 6 joints are
allowed at a single time for the graphing option. The
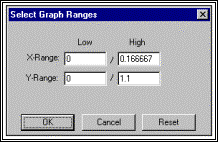
SCALE command is selected to change
the SCALE of the displayed graphs. When
this option is selected, a menu will appear to allow the user to set the Low and
High range for both the X and Y axes. The
RESET button will restore the X and Y range to the original settings.
The
FONT command is selected to change
the FONT of the labels displayed on the graph.
When this option is selected, a menu will appear to allow the user select
the Font, Font Style, Size and Effects of the text information on the graph. The
OPTIONS command has been reserved for
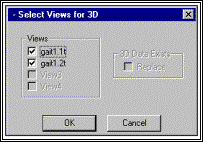
future enhancements to the graphical data. ACTIVATING THE 3D GRAPH OPTION STARTING THE 3D GRAPH OPTION 1.
Select the GRAPH command from the 3D
menu. 2.
Select the views to be used for generating the 3D-GRAPH information.
Views are selected/de-selected using the left button of the mouse and
clicking the button to the left of each view name.
If a *.3D file already exists for this Sequence (by previously selecting
the 3D option or executing the Transform module), you will be prompted to either
Keep or Replace the data. Placing a
check in the button to the left of the REPLACE will replace the existing file
with the newly generated data.
3.
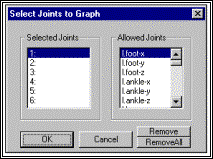
Select the JOINTS TO GRAPH from the displayed points.
The Allowed Joints are displayed in the right side table.
Up to 6 joints can be selected using the left mouse button.
When a joint is selected, the Joint Name will be placed in the Selected
Joints table. Joints can be removed
one at a time by highlighting the joint in the Selected Joints table and
selecting the REMOVE button in the lower right corner of the menu box.
Selecting the REMOVE ALL button will clear the entire Selected Joints
table. Once the joints have been
specified, select the OK button to proceed or the CANCEL button to abort.
ADDING 3D FIGURE TO THE 3D GRAPH OPTION In
addition to the graphical display, a 3D stick figure can be displayed
simultaneously during the digitizing process.
1.
Select the CREATE command from the STICK
FIGure menu. A window will
appear for displaying the 3D stick figure.
If the digitizing status of the current images are COMPLETE, the figure
will appear in the display window. If
the current images are not digitized (or currently in progress)� the image will
be displayed only up to the current point.
The current digitizing status is displayed in the lower portion of each
View Window. 2.
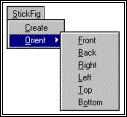
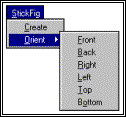
After the �stick figure� image is created, the displayed image can be
viewed from any orthogonal axis (Front, Back, Right, Left, Top, Bottom) by
selecting the ORIENT command from the
STICK FIGure menu. The
AutoDigitizing feature can be utilized with either the *.AVI or *.PCX video
formats, though AVI is the recommended format.
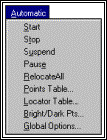
For best results, it is recommended that high contrast markers be used. STARTING / STOPPING AUTODIGITIZING STARTING THE AUTODIGITIZING FEATURE1.
Select
the START command from the AUTOMATIC
menu. You will be presented with
the Select Views for AutoDigitizing menu showing all active views. 2.
Select
the views for automatic digitizing by clicking in the box next to each desired
view. The checkmark indicates that
automatic digitizing will be applied. Blank
boxes must be manually digitized. 3.
Proceed
with the Digitizing process. The
Auto-Locate Properties menu will be displayed the first time each point is
digitized. One image for each view
must be completely digitized manually to initiate the automatic tracking
algorithm. NOTE:
If a point is digitized incorrectly, select the CANCEL button and
Re-Digitize the point. SUSPENDING THE AUTODIGITIZING FEATUREAutomatic
Digitizing can be suspended using one of two methods: 1.
Select the SUSPEND command from the AUTOMATIC
menu. Digitizing can be suspended
to examine or adjust any points during the AutoDigitizing process. OR 2.
Select the SUSPEND icon from the DIGI4
Toolbar. Automatic
Digitizing can be resumed by: 1.
AutoDigitizing can be resumed by selecting the START
command from the AUTOMATIC menu. STOPPING THE AUTODIGITIZING FEATURE1.
Select the STOP command from the AUTOMATIC
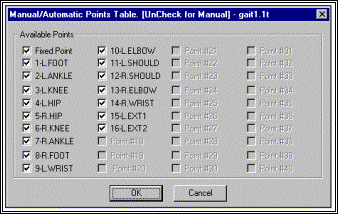
menu POINTS TABLE The
POINTS TABLE can be used to designate whether specific points should be
digitized automatically or manually. A
list of the Point Id�s is displayed in the POINTS TABLE.
Points that are marked with the X are to be digitized automatically
(depending on the marker contrast) while points that are not marked with the X
will require manual entry by the user. Points
can be altered at anytime during the AutoDigitizing process by selecting the
SUSPEND option. If the Auto-Advance
feature is not activated, points can also be altered when the current image has
been completely digitized.
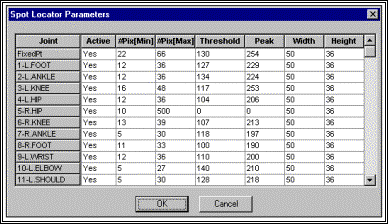
LOCATOR TABLEThis
table shows the parameters for each point used in the AutoLocating feature.
These are:
#Pix[Min]
This is the minimum percent of spotsize (#Pixels) that will be imposed on
the next image for this spot if relative, or absolute number of pixels if not.
This number is initially the same as those entered in the Global Options
but may be changed point by point in this table. #Pix[Max] This
is the maximum percent of spotsize (#Pixels) that will be imposed on the next
image for this spot if relative, or absolute number of pixels if not.
This number is initially the same as those entered in the Global Options
but may be changed point by point in this table. Threshold
This is the pixel brightness that a pixel must have to be considered as
part of a spot. Pixel brightness
ranges from 0 to 255. The higher
the threshold, the fewer pixels will be considered as part of a spot. Width/Height
The pixel width and height of a search rectangle centered around the
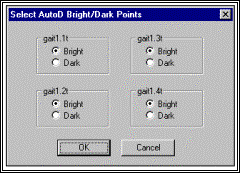
expected SPOT center. The detected SPOT must be entirely inside this rectangle. BRIGHT / DARK POINTS The
Bright/Dark command is selected to designate the AutoDigitizing points for each
view file. When this option is
selected, the following menu will appear. Each
view can be independently set for either Bright or Dark markers by selecting the
appropriate option under each view title.
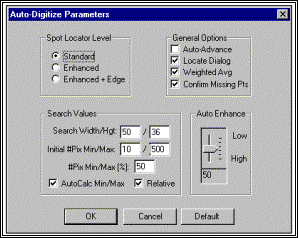
GLOBAL OPTIONS The
AutoDigitize Parameters box is listed below.
These parameters provide global options for use in the AutoLearn and
AutoDigitize features. Each item is
described below:
SPOT LOCATOR LEVEL Image
enhancement algorithms have been incorporated to the automatic digitizing
algorithm to aid in the process of locating markers. There are three levels of complexity as described below.
The initial default value for the autodigitize algorithm level is
�Standard�. This means the
program defaults to the algorithm previously implemented until the user changes
the level. This level is stored
permanently and will retain its value until the user actively changes it. This
is true even if the program is shutdown and the computer system is turned off.
NOTE: This value can only be
changed prior to starting the automatic digitizing process. Standard This
is the standard locating algorithm that has been used in previous versions of
APAS. No image processing is
applied to the image when the spot locating takes place.
This algorithm attempts to distinguish markers against the immediate
background based on a user adjustable threshold value. Enhanced The
Enhanced algorithm employs a series of image enhancement filters to the image
which make the markers more easily and reliably recognized.
The following series of filters is applied to the image area of interest
before the spot locating takes place: Median
followed by Gamma, with the Gamma factor being selected using the AutoEnhance
slider bar. NOTE:
Since the software is automatically applying a series of filters to the
image, it is very important that the user does NOT specify additional image
enhancement filters. The filters that are automatically applied while locating the
markers do not affect the image as it appears on the screen. Enhanced + Edge The
�Enhanced + Edge� algorithm employs the �Enhanced� algorithm described
above and additionally calculates the derivative of the image to detect any
edges in the image. This algorithm
detects all prospective marker spots in the image using �Enhanced� algorithm
and then rejects any markers that do not have well defined edges.
The enhancements are applied to the region of the image where the spot is
expected so one does not see the whole image transformed.
However, the before/after images shown in the Auto-Locate Properties are
indeed the filtered images. GENERAL OPTIONS Auto-Advance Auto-Advance
is used to automatically advance to the next image when all the points in the
current image have been completely digitized.
An X in the box activates the Auto-Advance feature while the unmarked box
deactivates the Auto-Advance feature. Locate Dialog Locate
Dialog, if activated, the program will display a dialog showing the
auto-location information as each point is traced during the learning phase of
AutoDigitizing. The user can modify
any of the parameters and re-locate in the dialog information. Weighted Average The
auto-digitizing software locates the center of a marker using a Weighted Average
by brightness. This option can be
turned on/off using the check box. If
selected, the program will weight each pixel according to intensity.
If not selected, all pixels above the threshold value are treated the
same. Confirm Missing Points
Confirm
Missing Points, if selected, the program will prompt the user to manually
digitize points that AutoDigitize fails to locate. If not selected, the program will automatically set these
points to MISSING. SEARCH VALUES Search Width/Height
Search
Width/Height specifies the size of the rectangle in pixels centered at the
expected location which defines the search area for spot locating.
Any spot must lie entirely inside this rectangle.
It must be large enough to allow for spot motion frame-to-frame, but if
so large that it includes many spots, the program may get bogged down sorting
out which spots belong to which points. Initial #Pix Min/Max
When
the software performs the initial locating of a spot, these numbers set minimum
and maximum limits on the size a spot can be during this initial locate phase.
If the spot is very small and one sets the minimum too high, the software
may reject an obvious spot because it does not contain a sufficient number of
pixels. This would also be the case for large spots and setting the
maximum too low. These are outer
limits and should be set with a large margin of error. Since the user points to the image location before this
initial locate operation takes place the default setting is Min#=2 and Max#=500.
If the spots are very small, the Min# should be set to 1. #Pix Min/Max [%]
#Pix
Min/Max [%] is used when the �Auto-Calculate Min/Max#� option is selected
and represents the percentage that a spot may grow or shrink when advancing to
the next image. For example, if
this is 50% and in one image the spot has 50 pixels, then in the next image the
spot cannot have more than 75 pixels or less than 25 pixels. This means that the software will reject any spot that is
outside these limits. If this
percentage is too large, the software may find extraneous spots that are closer
to the expected location. If it is
too small, the software may reject an obvious spot because lighting changes or
motion relative to the camera has resulted in the spot growing/shrinking by too
much. This is particularly
important for small spots where a few pixels of change may be a sizable
percentage. Auto-Calculate Min/Max
Auto-Calculate
Min/Max, if selected, the program will calculate the min/max# of pixels allowed
in a spot as a percentage (%) above/below the number of pixels in the spot
located in the learning phase of AutoDigitizing. The percentage (%) is specified by the user. Relative/Absolute When
ABSOLUTE is active (unmarked box) the minimum and maximum number of pixels is
static for each spot. These numbers
remain unchanged until the user explicitly changes the values.
If RELATIVE is active (marked box), then for every image, the software
dynamically calculates a new Min/Max# pixels based on the size of a spot in the
previous image. AUTO ENHANCE Low/High The
Auto Enhance slider bar allows the user to select the GAMMA value applied to the
image when using the �Enhance� or �Enhance + Edge� spot locator levels.
On the slider bar, a value of zero corresponds to a GAMMA[100] and
results in no change in the image. A
value of 100 corresponds to GAMA[200]. This
information is stored by the program and remains set until changed by the user. Digitized
points can be corrected or adjusted in any of several manners. CORRECTING DIGITIZED POINTS Points
that have been digitized incorrectly can be corrected by: 1.
Advance/Reverse to the image that contains the point(s) to be corrected. 2.
Use one of the three options below to reverse to the desired point(s).
Each time one of the options is selected, the current digitized point
will be erased and the cursor will reverse to the previous point. For example, in order to �back-up� three points, the
CORRECT option would need to be selected three times.
Then all three points would need to be digitized again. a.
Select the CORRECT command from the IMAGES
menu OR b.
Select the CORRECT icon from the TOOL
BAR OR c.
Press the MIDDLE button on the three button mouse 3.
Redigitize the desired point(s) MOVING DIGITIZED POINTS Digitized
points can be moved without affecting any other points using the Drag/Drop
feature: 1.
Place the cursor on top of the digitized point to be moved. 2.
Simultaneously press the CONTROL
key and the LEFT mouse button. 3.
Drag the point to the desired location on the screen and release the
mouse button. The
Drag/Drop feature can be aborted by Dragging the cursor off the image area and
releasing the mouse button. A
feature that is often helpful in both manual and automatic digitizing is the
ability to "mark" a point as invisible. For example, a golf ball might be digitized while analyzing a
golf swing. If the ball proceeds
beyond the boundary of the video field, it would be nice to
"eliminate" the ball from this point forward instead of using the
MISSING option in every image. This
can be accomplished using the INVISIBLE POINT options.
When points are labeled as "Invisible" the software will skip
the point and proceed to the next sequential point for digitizing. 1.
Select the INVISIBLE PTS command from the VIEW
menu. You will be presented with
the Invisible Points Table. All the
points in the current sequence are listed in the table. 2.
Points
should be designated as INVISIBLE by removing the checkmark next to the desired
point. AUTODIGITIZING & INVISIBLE POINTSWhen
points are initially labeled as Invisible and the Autodigitizing feature is
utilized, the user must be aware of the steps required to make the point visible
again. For example, if a gait
analysis is being performed and the heel marker is not visible for the first
several images, the heel point can be marked as invisible.
When the heel marker becomes visible again, the following steps should be
performed to resume autodigitizing with the heel point included. 1.
When the point becomes visible again, select the INVISIBLE PTS command
from the VIEW menu to mark the point as visible. 2.
When it becomes time to digitize the "new" point, digitize the
point with the "SHIFT" key pressed down while Left-Clicking the mouse.
This is the RE-LOCATE function. 3.
Proceed
with the digitizing process. Several
filters and adjustments have been added to the DIGITIZE module to enhance
detection of markers and aid in the
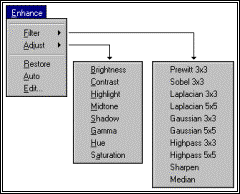
digitizing process. FILTER OPTIONSThe
FILTER options allow the user to apply image processing filters to the AVI
image. Filters are applied to the active image using the following steps. 1.
Use
the mouse to select the image to apply the filter.
If only one image is open, it is already active. 2.
Select
the FILTER command from the ENHANCE
menu. A list of available filters will be displayed. 3.
Select
the desired filter by left clicking the name with the mouse.
A list of available filters is described below. PrewittThe
Prewitt filter is an edge detection technique that is used to detect horizontal
or vertical edges. All pixels not
on the detected edges are changed to black. SobelThe
Sobel filter is an edge detection technique that is used to enhance edges in all
directions. All pixels not on the
detected edges are changed to black. The
usage is the same as Prewitt, but the algorithm is different. LaplacianThe
Laplacian (high-pass) filter is an edge detection technique that is used to
detect lines by weighting the difference between the center pixel and its
neighbors. There are three
omnidirectional filters and three bi-directional ones.
All pixels not on the detected lines are changed to black. GaussianThe
Gaussian filter is a low-pass spatial filter that is used to reduce random
noise. It performs a weighted sum
(center pixel highest weight) of each pixel�s neighborhood.
The result is normalized by the total neighborhood weight.
Neighborhood size can be selected as 3x3 or 5x5. As
the Gaussian filter removes noise, it has the side-effect of generally smoothing
or blurring images and reducing edge information. HighpassThe
High-Pass filter allows the high-frequency variability associated with noise, to
remain (pass through the filter) while removing the low frequencies
corresponding to the gradual overall variation in brightness.
Fine details in the frequency domain correspond to high frequencies.
As
the High-Pass filter enhances the fine details, it has the side effect of
enhancing noise. In
High-Pass filtering, the objective is to get rid of the low frequency or slowly
changing areas of the image and to bring out the high frequency or fast changing
details in the image. The
simplest method of implementing a high-pass filter is to take a pixel and
subtract it from its neighbors. If
the pixel is in an area of little change, the difference between the pixel and
its neighbor will be zero. However,
if the pixel is in an area of rapid change (such as an edge), the difference
will be large. SharpenThe
Sharpen filter is based on the Laplacian filter and includes/adds the original
image. MedianWhen
using the Median filter, each pixel is determined by the median value of all
pixels in a selected neighborhood. The
median value of a pixel neighborhood is that value in which half of the
population has smaller values and the other half has larger values. The
Median filter belongs to a class of edge preserving smoothing filters which are
non-linear filters. This filter
smoothes the data while keeping the small and sharp details.
In contrast to low-pass filters, the Median filter keeps edges and
completely removes single pixel errors (like hot pixels). ADJUST OPTIONSThe
ADJUST option allows the user to adjust various aspects of the AVI image. BrightnessThe
Brightness adjustment allows the user to vary the amount of light intensity at
each point in the image.
ContrastThe
Contrast adjustment is used to vary the range of light and dark values in a
picture. HighlightThe
Highlight adjustment is used to add luminance.
The lighter the pixels, the more luminance is added. MidtoneThe
Midtone adjustment is used to shift the middle of the luminance scale either up
or down. ShadowThe
Shadow adjustment is used to remove luminance.
The darker the pixels, the more luminance is removed. GammaThe
Gamma adjustment is used to compensate for the nonlinear response of the display
device. The light intensity
produced by display devices is not proportional to the input voltage.
This non-linearity follows an exponential function called �gamma.�
Gamma correction can be thought of as the process of compensating for
this non-linearity in order to achieve correct reproduction of intensity. HueThe
Hue adjustment allows the types of color to be varied.
Red, yellow, blue etc are hues of color or types of color.
Hue is the parameter of color that allows us to distinguish between
colors. SaturationThe
Saturation adjustment allows the intensity of a color to be adjusted.
For example, a lightly saturated red looks pink.
Fully saturated red is like the red of a crayon.
Not to be confused with brightness, saturation is the amount of pigment
in a color and not the intensity. Low
saturation is like adding white to the color. RESTOREThe
RESTORE option is used to restore the image to the original condition by
removing all filters and/or adjustments that have been applied.
Images can be restored to original condition using the following steps. 1.
Use
the mouse to select the image to restore. If
only one image is open, it is already active. 2.
Select
the RESTORE command from the ENHANCE
menu. AUTOThe
AUTO option is used to automatically apply the specified filters and/or
adjustments to all other images. This
command acts as a toggle switch and is �on� when the check mark appears next
to the command in the menu bar. When
this option is off, the specified enhancements will only apply to the currently
active image. When this option is
on, the enhancements will automatically be applied to all images in the file.
For example, when the forward or reverse command is given, the next image
will automatically have the same enhancements applied.
The AUTO function is selected/deselected using the following steps. 1.
Use
the mouse to select the desired image. If
only one image is open, it is already active. 2.
Select
the AUTO command from the ENHANCE
menu to activate this function. Select
the AUTO command again to turn it
off. EDITThe
EDIT option allows specified enhancements to be edited on an individual basis. When
this option is selected, a menu will be presented with the current list of
enhancements. Current video enhancements can be edited using the following
steps. 1.
Use
the mouse to select the image to edit. If
only one image is open, it is already active. 2.
Select
the EDIT command from the ENHANCE
menu. A menu box similar to the one shown below will be displayed.
Individual selections can be deleted by highlighting the desired item and
selecting the ERASE button. All the
selections can be removed by selecting the ERASE
ALL button. Select OK
to save the current changes or CANCEL
to exit the Edit menu without saving changes.
The menu is divided into four columns.
The first column shows the sequence of video enhancements that have been
applied to the currently active image. The
second column lists the specific Filter or adjustment that has been made. The third column list the value used with the Adjustment
command. Since the Filter command
has no specific value, an NA will be
displayed next to any filters. The
last column indicates the time required to perform the particular filter. NOTE:
Applying filters and adjustments can be computationally intensive and the
time required for each image can add up quickly!
The
Digitize module incorporates both static and dynamic Zooming options to enhance
the digitizing process and improve digitizing accuracy. ZOOMThe
ZOOM command is used to expand the selected image up to four times the original
size. Expanding single pixels into
many allows the Zoom function to achieve sub-pixel
accuracy for both manual and automatic digitizing. 1.
Select the ZOOM command from the VIEW
menu. You will be presented with a
list of Zooming values ranging from 0.5x up to 4x. 2.
Select the desired Zooming value. When
a zooming value has been selected, the entire image will zoom to the selected
size inside the View Window. It may
be necessary to use the scroll bars to readjust the image to the desired area.
Zooming factors can only be used on the active window.
The DIGI4 program will �remember� points that are digitized with a
zooming factor in all subsequent frames. 3.
Select
the 1x Zooming factor to restore the
image to the original captured size. 4.
Select
the RESET ALL command to remove all
Zooming commands. ZOOM WINDOWThe
ZOOM WINDOW command is another option available for improved digitizing
accuracy. This command is used to
open either a Static or Dynamic Zoom Window. 1.
Select
the ZOOM WINDOW command from the VIEW
menu. You will be presented with the option to choose Static or
Dynamic zoom and a list of Zooming values ranging from 1x up to 10x. STATIC ZOOM1.
Select
the STATIC command in the ZOOM
WINDOW options menu. 2.
Select
the ZOOM WINDOW command from the VIEW
menu a second time to specify the zooming factor.
You will notice a checkmark next to the Static command.
Specify the desired zooming value and a Zooming Window will be opened to
display the zoomed image. 3.
Initially,
the user will have to manually adjust the desired image in the Static Zoom
Window. This image can be adjusted
by pressing (and holding) the CONTROL
key on the keyboard and simultaneously Right-Clicking
the mouse on the desired location of the original image.
This point will now be centered in the Static Zoom Window and expanded
using the specified zooming value. The
desired point(s) can be digitized from either the original View Window or from
the Static Zoom Window. Digitize
the desired point and proceed to the next point in the digitizing process. 4.
Repeat
Step #3 above for all desired points. After
a point has been digitized using the Static Zoom Window, the APAS software will
remember the location and position the Zoom Window automatically for subsequent
images in the same sequence. The
user still has the option to adjust the image using the CONTROL-RIGHT CLICK
command. 5.
The
ZOOM WINDOW can be removed by clicking the X in the upper right corner of the
Static Zoom Window or by selecting VIEW,
ZOOM WINDOW and NONE. DYNAMIC ZOOM1.
Select
the DYNAMIC command in the ZOOM
WINDOW options menu. 2.
Select
the ZOOM WINDOW command from the VIEW
menu a second time to specify the zooming factor.
You will notice a checkmark next to the Dynamic command.
Specify the desired zooming value and a Zooming Window will be opened to
display the zoomed image. 3.
The
image displayed in the Dynamic Zoom Window is adjusted by changing the cursor
position on the original image. The
zoomed image can be �locked� in place for digitizing by pressing (and
holding) the CONTROL key on the
keyboard and simultaneously Right-Clicking
the mouse on the desired location of the original image. This point will now be
centered in the Dynamic Zoom Window and expanded using the specified zooming
value. The desired point(s) can be
digitized from either the original View Window or from the Dynamic Zoom Window.
Digitize the desired point and proceed to the next point in the
digitizing process. 4.
Repeat
Step #3 above for all desired points. After
a point has been digitized using the Dynamic Zoom Window, the APAS software will
remember the location and position the Zoom Window automatically for subsequent
images in the same sequence. The
user still has the option to adjust the image using the CONTROL-RIGHT CLICK
command. 5.
The
ZOOM WINDOW can be removed by clicking the X in the upper right corner of the
Dynamic Zoom Window or by selecting VIEW,
ZOOM WINDOW and NONE. CREATING A NEW SEQUENCE 1.
CREATE A NEW SEQUENCE FILE a.
Select FILE, SEQUENCE,
and NEW to create a new sequence file. b.
Select the Drive, Folder and specify a Name for the Sequence File.
NOTE:
Make certain the file name has the *.CF extension.
Select OK to proceed. 2.
ENTER SEQUENCE PARAMETERS a.
Enter Sequence Title, Units,
#Points, #Control, Type, Height
and Weight in the data fields. If Type is set to USER-DEFINED, you must select the SEGMENTs
button and define the point connections and segment parameters.
The READ button can be
selected to retrieve this information from a previously created file. b.
Select POINT ID�s button and
enter the point names to be digitized. Select
OK to proceed. c.
Select CONTROL XYZs button and
enter the Cartesian coordinates for the control points.
The READ button allows you to read coordinates from a previously created
file. Select OK
to proceed. d.
Select OK when all sequence
parameters have been completed. 3.
CREATE A NEW VIEW FILE a.
Select FILE, and NEW
VIEW to create a new view file. 4.
ENTER VIEW INFORMATION a.
Enter View Title, Frame
Rate, Camera ID, Camera X,Y,Z,
and View. Be certain to enter an accurate value for Frame Rate.
Select OK to proceed.
5.
OPEN IMAGE FILE a.
Select FILE, and OPEN
AVI IMAGES to open the desired image file that contains the view to be
digitized. Make certain that the image corresponds to the View
Information entered above. b.
Select Primary AVI File For Digitizing by clicking once on the desired
file. The file will open in a small
preview window in the lower right corner of the menu box.
Select OK to accept and open the file.
Double-clicking the desired file name will automatically accept and open
the file. 6.
OPEN ADDITIONAL VIEW FILES (OPTIONAL) a.
Repeat steps 3 through 5 above to open additional camera views.
Up to 4 views can be digitized simultaneously. DIGITIZE
CALIBRATION/CONTROL POINTS 1.
OPEN CORRESPONDING
CALIBRATION/CONTROL FILE a.
When more than one view file window is open at once, the window you are
currently working with is the active window. Make a
note of which View window is currently active in order to associate the
corresponding calibration file. b.
PANNING VIEWS ONLY:
Select CONTROL, PAN RIGHT to indicate that the Right calibration points will be
digitized. c.
Select CONTROL, DIGITIZE
to change to the Control Point mode. d.
Select CONTROL, OPEN
VIDEO, AVI File to select the AVI file for the control point image. e.
Select AVI File For Control Points by clicking once on the desired file.
The file will open in a small preview window in the lower right corner of
the menu box. Select OK to accept and open the file.
Double-clicking the desired file name will automatically accept and open
the file. Make certain that the
control file corresponds to the active
window from step a listed above. f.
Select desired Control Image Frame by clicking on the desired image.
Click OK to proceed. 2.
DIGITIZE CONTROL POINTS a.
Digitize Control Points as requested in the Status Bar of the
active window. Proceed until
the Status Bar indicates Complete. 3.
CHANGE THE ACTIVE WINDOW AND REPEAT FOR ALL OPEN VIEW FILES a.
Click the cursor in the next open View window and repeat steps 1 and 2
listed above to digitize the control points for each of the View files.
When the control points from all views have been digitized, you are ready
to exit the control point mode. b.
Select CONTROL and FINISH
to exit the control point mode and return to digitizing the data file.
The first image of the data file will automatically be displayed. c.
PANNING VIEWS ONLY:
Select CONTROL, PAN LEFT and repeat the steps 1b through 3b listed above to digitize
the Left calibration points. DIGITIZE DATA POINTS 1.
LOCK MULTIPLE VIEW FILES TOGETHER (OPTIONAL) a.
When more than one view file window is open at once, it is often helpful to LOCK
the images together. Select IMAGES
and make certain that the LOCK
command is checked. If not, select LOCK to enable the LOCK function.
The LOCK status is also indicated in the Status Bar of the DIGI4 window. 2.
DIGITIZE DATA POINTS a.
Digitize Data Points as requested in the Status Bar of the
active window. Proceed until
the Status Bar indicates Complete b.
Click the cursor in the next open View window and repeat step a
listed above to digitize the data points for each of the View files. c.
Advance to the next image in the View file(s) by one of three methods:
Double-clicking the right mouse button, selecting the advance icon in the
Tool Bar, or by holding the ALT key and simultaneously press the right arrow
key. d.
Repeat the Digitizing process until ALL points from ALL views are
digitized. 3.
EXIT THE DIGI4 PROGRAM a.
Select FILE and EXIT
to exit the DIGI4 program. Listed
below are the various menus for the DIGI4 program. Select the desired menu to see a description of the available
commands for each menu. FILE MENU COMMANDS
Sequence
The SEQUENCE command is selected to start a NEW sequence or retrieve an
OLD sequence. When this option is
selected, you will be presented with two commands: NEW
is selected to create a NEW digitizing SEQUENCE. OLD
is selected to retrieve a SEQUENCE that was previously created. New View
NEW VIEW is selected to begin a new view for digitizing.
Each time the NEW VIEW is selected, a new *.xt file will be created where
x is the sequential number of view for this sequence. For example, the first
time NEW VIEW is selected, a file will be created with the *.1t extension.
The second time creates a file with the *.2t extension etc. Old View
OLD VIEW is selected to retrieve a view that has been previously created
using the NEW VIEW command. Close
Closes the currently active file. Open PCX Images
Selected to OPEN a file saved in *.PCX format. Open AVI Images
Selected to OPEN an image file saved in *.AVI format. Print
Print the current file on the selected printer. Print Preview
Selected to check or examine the positioning on one or more pages.
When you give the Print Preview command, a new window will be open
showing the document position as it would appear on paper.
To close the Print Preview window, select the Cancel button to go to the
previous mode. Print Setup
Selected to examine or change the Printer, Orientation and Paper options
for the PRINT function. APAS Modules
Selected to open additional APAS modules while keeping the current
program open. When this command is
selected, the user will be presented with a list of APAS modules. Exit
Selected to EXIT the DIGI4 program and return to Windows. EDIT MENU COMMANDS
Copy
Selected to COPY the selected items to the clipboard. Cut
Selected to CUT the selected items and place them in the
clipboard. VIEW MENU COMMANDS
APAS Toolbar
Selected to toggle on/off the APAS toolbar.
When this option is active, the APAS toolbar will be displayed and allow
the user to select additional APAS modules while keeping the current program
open. The toolbar can be positioned to the desired position by
dragging it with the mouse. Sequence
SEQUENCE is selected to access the SEQUENCE information.
This command can be used for reviewing the SEQUENCE parameters,
changing/reviewing the Point ID�s or Control Point locations. ViewInfo
VIEW INFOrmation is selected to review/change the information associated
with the currently active view. PanInfo
PAN INFOrmation is selected to review/change the information associated
with the currently active �panning� camera view. Invisible Pts
INVISIBLE PoinTS is selected to designate specific points as
�invisible� during the digitizing process.
This command is often useful for points that may become obscured for
periods of time during digitizing. When
a point is designated as �invisible,� it will be skipped during digitizing.
When (and if) the point(s) become visible again, the invisible
designation can be removed and the point(s) will become active again. SynchPoint
The SYNCHronizing POINT command can be utilized to designate the
Synchronizing Point in each camera view. For
example, if a golf swing is being analyzed and the club head impact with the
ball is used for the Synch Point, at the image closest to the impact, you would
give the SYNCH POINT command and enter the Frame Offset from the current
position. Zoom
The ZOOM command can be issued at any time to enlarge a specified portion
of the image. When this command is
given, you will be presented with a menu of zooming values. Zoom Window
The ZOOM WINDOW command can be issued at any time to open a Static or
Dynamic zoom window to aid in the digitizing process. CONTROL MENU COMMANDS
View
The VIEW command is selected to VIEW the image of the control frame.
If the control points have been previously digitized, the digitized
points will be superimposed on the video image.
If the points have not been digitized, only the captured image will
appear. Digitize
The DIGITIZE command is selected to Digitize the control frame for the
active view. Read
The READ command is given to READ the digitized information for the
control frame from another sequence. This
command should only be used if you are certain that the camera is in the EXACT
same location with respect to the calibration fixture. Show Numbers
Selected to SHOW the Control Point Numbers on the display of the
digitized control frame. Pan Right
Selected to make the RIGHT PANning points active.
This option should be selected when digitizing or viewing the RIGHT PAN
calibration points. Pan Left
Selected to make the LEFT PANning points active. .
This option should be selected when digitizing or viewing the LEFT PAN
calibration points. Pan Point
Selected to designate the PANning POINT used for the current frame.
While digitizing the Panning view, the original PAN POINT may only be
visible for a short period of time. Select
PAN POINT to re-define the PAN POINT when the subsequent point is no longer
visible and you must change to another PAN POINT. Open Video
The Open Video command is given to select a secondary video file for
digitizing the control point locations. When
this option is selected, you must specify whether the file is PCX of AVI format.
The format is determined when capturing the images.
After the format is selected, you will be allowed to select the drive,
directory and file name to retrieve the image for digitizing..
The first image will be used for the CONTROL points only.
As soon as Advance/Reverse is selected, the primary image file will be
restored. Select Image
The Select Image command is used to access the Select Image menu to
specify a particular image for digitizing. Finish
The FINISH command is selected when the Control Points have been
digitized or viewed. When this
command is selected, the primary image file will be restored (if previously
opened) and the digitizing process can be started or continued. IMAGES MENU COMMANDS
Lock
The LOCK feature can be selected to toggle the LOCK status of the view
windows. When the images are LOCKed,
the commands to advance/reverse images affect all open images (regardless of
which window is currently active). When
this feature is set to Un-LOCK, the advance/reverse commands only affect the
active image (regardless of how many images are open).
The current status of the LOCK feature is indicated in the lower right
corner of the DIGI4 window. Time Match
The TIME MATCH command can be selected to �re-synchronize� the images
on the display. If the separate
view files have been advanced/reversed independent of each other, the TIME MATCH
command can be selected to adjust all open views to a synchronized point.
When this command is selected, all open images will be adjusted to the
view with the smallest time value. Time
values are determined by frame rate and the synch point. Video
The VIDEO command is selected to specify the image order of the MJPEG
video file. Calibrate
The CALIBRATE command is selected to �adjust� the horizontally and/or
vertically split video file image when using the JVC High-Speed camcorders. Advance
The ADVANCE command is selected to advance to the next image in the
captured file. Reverse
The REVERSE command is selected to reverse to the previous image in the
captured file. First
The FIRST command is selected to �jump� to the first image in the
captured file. Last
The LAST command is selected to �jump� to the last image in the
captured file. Select
The SELECT command is selected to jump to the desired image number.
When this option is selected, you will be prompted to enter the desired
image number. Correct
The CORRECT command is selected to correct previously digitized points.
The digitized location is erased and the cursor will reverse one point at
a time for each time the CORRECT command is selected.
All erased points will need to be redigitized to complete the current
image. Erase All
The ERASE ALL command is selected to ERASE all digitized points for the
current frame. This option is
useful when the entire image is to be re-digitized instead of selecting the
CORRECT option for every digitized point in the current image. Missing
The MISSING command is selected when a point to be digitized has moved
completely out of the image field. For
example, a ball that has been thrown or hit may be visible for only a few
frames. When the point proceeds out
of the image field and can no longer be digitized, this point should be marked
as MISSING. AUTOMATIC MENU COMMANDS
Start
Selected to activate the
AutoDigitizing feature. Stop
Selected to STOP the AutoDigitizing feature and resume with the
Manual/Semi-Automatic digitizing process. Suspend
Selected to pause the AutoDigitizing feature.
This option is often useful when the Auto-Advance feature is activated.
The SUSPEND command can be given to pause the AutoDigitizing and
�adjust� any of the desired points. The
SUSPEND command can also be issued by selecting the SUSPEND icon from the Digi4
Toolbar. Pause
Selected to pause the current image prior to advancing to the next image
when using the AutoDigitizing feature. This
option is often useful to confirm the accuracy of the digitizing. RelocateAll
Selected to RELOCATE ALL the points in the current image.
When this option is selected, all digitized information for the current
image will be erased and the cursor will begin at the first point of the image. Points Table
The POINTS TABLE is used to mark points for either Automatic or Manual
digitizing during the AutoDigitizing process.
By default, all points are marked for AutoDigitizng.
If you desire a point to be manually digitized, the point can be
�un-checked� using the mouse. Selecting
the joint again will mark the point for AutoDigitizng. Locator Table
The LOCATOR TABLE shows the parameters for each point used in the
AutoLocating process. Bright / Dark Points
The Bright/Dark Points command is selected to designate whether the
points for autodigitizing each view are Bright (against a darker background) or
Dark (against a lighter background). Global Options
The GLOBAL OPTIONS command can be given to access parameters associated
with locating points for the Auto-Locate and AutoDigitize features of DIGI4.
When this command is given, you will be presented with a table of options
that can be used to adjust the Auto-Digitizing Parameters. 3D MENU COMMANDS
The
3D feature can be activated to simultaneously generate �*.3D� files while
digitizing multiple views of a sequence. As
each point is digitized for each of the active views, a graphical display is
created with a position data for up to 6 curves, a 3D stick figure, or both.
Regardless of which type of 3D displays are selected, a *.3D file is
generated with a complete set of information for all joints plus the computed
Center-Of Gravity. These displays
are extremely helpful in verifying that accurate digitizing is being performed. Figure
The FIGURE command can be given to activate the �real-time� stick
figure option. When this option is
selected, a 3D stick figure will be displayed as the individual view(s) are
traced. A *.3d file is generated
while tracing thus eliminating the requirement of executing the APAS
Transformation module. This option
requires that each view have digitized control points and the SYNCH points
properly designated. SYNCH points
between frames are not accepted by the system. Graph
The GRAPH command can be given to activate the �real-time� graph
option. When this option is
selected, a graph with up to 6 curves will be displayed as the individual view(s)
are traced. A *.3d file is generated while tracing thus eliminating the
requirement of executing the APAS Transformation module.
This option requires that each view have digitized control points and the
SYNCH points properly designated. SYNCH
points between frames are not accepted by the system. GRAPH MENU COMMANDS
The GRAPH
menu commands are only visible after activating the GRAPH and/or FIGURE command
from the 3D menu. Create The
CREATE command can be given to activate the �real-time� 3Dgraph option when
the 3D stick figure option has already been activated. When this option is selected, the user will be prompted to
select up to a maximum of 6 desired joints for graphically displaying the 3D
position data. Joint
The JOINT command can be given to change any of the currently displayed
joints. This option allows the user
to add, delete and/or change the currently displayed joints.
When this option is selected, the Select Joints Table will be displayed.
A maximum of 6 joints are allowed at a single time for the graphing
option. Scale
The SCALE command can be given to change the SCALE of the displayed
graphs. When this option is
selected, a menu will appear to allow the user to set the Low and High range for
both the X and Y axes. The RESET
button will restore the X and Y range to the original settings. Font
The FONT command can be given to change the FONT of the labels displayed
on the graph. When this option is
selected, a menu will appear to allow the user select the Font, Font Style, Size
and Effects of the text information on the graph. Options
The OPTIONS command can be given to set the graphing options. STICK FIGure MENU COMMANDS
The STICK
FIGure menu commands are only visible after activating the GRAPH and/or FIGURE
command from the 3D menu. Create
The CREATE command can be given to activate the �real-time� stick
figure option when the 3D graph option has already been activated.
When this option is selected, the user will be prompted to select up to a
maximum of 4 desired views for graphically displaying the 3D stick figure data. Orient
The ORIENT command can be given to change the viewing axis of the stick
figure display. When this option is
selected, the user will be asked to select which viewing axis is desired.
The desired axis is selected using the left mouse button.
The system (by default) will display the XY plane as the FRONT view.
All other views are relative to this designation. OPTIONS MENU COMMANDS
Colors
The COLOR command can be given to change selected colors of the 2D / 3D
digitized stick figures and any of the 6 displayed graphs activated by the 3D
menu command. When the desired figure/graph is selected, you will be
presented with a chart of available colors.
Select the desired color for the 2D/3D stick figure and/or graph using
the Left mouse button. Misc The
MISC command can be given to change the prediction algorithm, change the shape
of the cursor and set several fixed point options. When this option is selected, you will be presented with the
following menu.
Three
options exist for the Prediction Algorithm:
Last Frame Only is selected
for the program to assume that each point is in the same position as the
previous image.
Last 2 Frames is selected for
the program to predict the expected location of the point by interpolating the
previous two frames of data.
Last 3 Frames
is selected for the program to predict the expected location of the point by
interpolating the previous three frames of data. Several
options also exist for selecting enhancements to the digitizing cursor: XOR Cross is
selected to change the color of the standard �cross-hair� cursor to a
combination of white and black. Occasionally,
the �cross-hair� is almost invisible against certain background
images. When
the �XOR Cross� option is selected, the cross-hair shaped cursor will
appear black when placed on top of light colored images and white when placed on
dark colored images. White Cross is
selected to change the color of the standard �cross-hair� cursor to white.
Occasionally, the �cross-hair� is almost invisible against �dark�
background images.
When this situation occurs, the �White Cross� option can be selected
to increase the visibility of the cursor against the dark background. Black Cross is
selected to change the color of the standard �cross-hair� cursor to black.
Occasionally, the �cross-hair� is almost invisible against
�light� background images.
When this situation occurs, the �Black Cross� option can be selected
to increase the visibility of the cursor against the light background Box
is selected to change the shape of the cursor to a small box shape.
The point to be digitized should be placed directly in the center of this
box. Fixed
Point Options are available for �proximity checks� of the fixed point. Draw Box
is selected to place an optional box around the digitized fixed point.
The fixed point will appear as all other digitized points when this
option is not selected. Verify Location
when marked, the program will insure that the digitized fixed point falls within
the region around the initial fixed point as defined in the Options dialog box.
If this is disabled, the program will allow the user to digitize the
fixed point anywhere on the image. Box Width/Height
is used to specify the width and height of the optional box centered around the
fixed point. These values represent
the number of pixels. Search Width/Height
is used to specify the dimensions of the area that the program will search for
the fixed point. ENHANCE MENU COMMANDS
Filter
FILTER is selected to allow the user to apply image processing filters to
the AVI image for enhanced digitizing. Adjust
ADJUST is selected to allow the user to adjust various aspects of the AVI
image Restore
RESTORE is selected to restore the image to the original condition by
removing all filters and/or adjustments that have been applied. Auto
AUTO is selected to automatically apply the specified filters and/or
adjustments to all other images. This
option is toggled on/off. A
checkmark indicates this option is active. Edit
The EDIT option allows specified enhancements to be edited on an
individual basis. WINDOW MENU COMMANDS
Cascade
CASCADE is selected to display the open windows in a cascading fashion. Tile
TILE is selected to display the open windows in a tile format on the
screen. Arrange Icons
The ARRANGE ICONS command is selected to automatically arrange the icons
in the currently active Windows group. View File Names
The View File names will be displayed for all the open view windows.
The check mark indicates the currently active window.
If the images are LOCKED
together, VCR commands will affect all open windows regardless of which window
is checked. HELP MENU COMMANDS
Index
Selected to provide an INDEX of Help related topics. Using Help
Selected to provide instructions on using the Help Windows. About Digi4
Provides information about the Digi4 program and lists the functions of
the Left (L), Middle (M) and Right (R) mouse buttons. [Go
to Lesson 3] [Go to index]
|
|
Prepared by Gideon Ariel, Ph.D. www.arielnet.com |