|
|
Calibration |
[FrontPage Include Component] |
|
|
|
|
|
|||||
|
NAVIGATOR: Back - Home > Adi > Services > Support > Manuals > Aces > Dos : |
|||||
|
|
|||||
| |||||||||||||||||||
|
Calibration
Categories
|
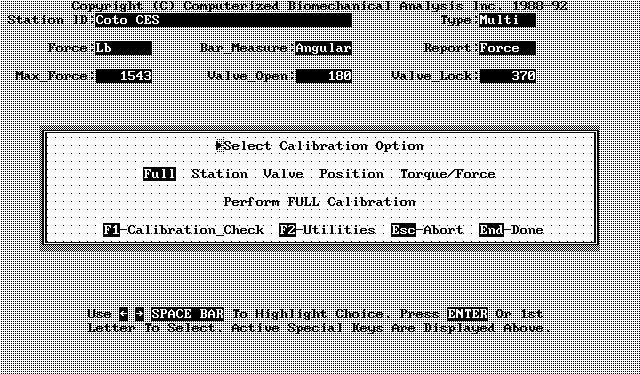
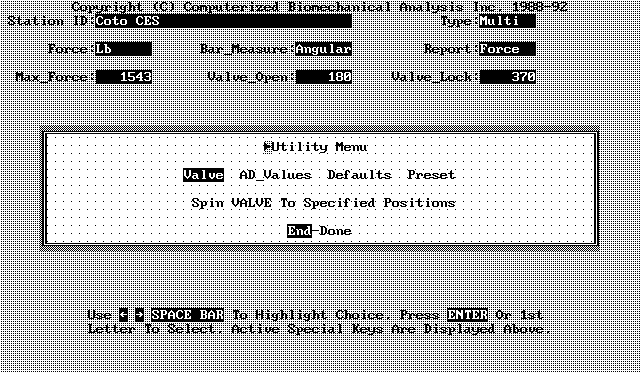
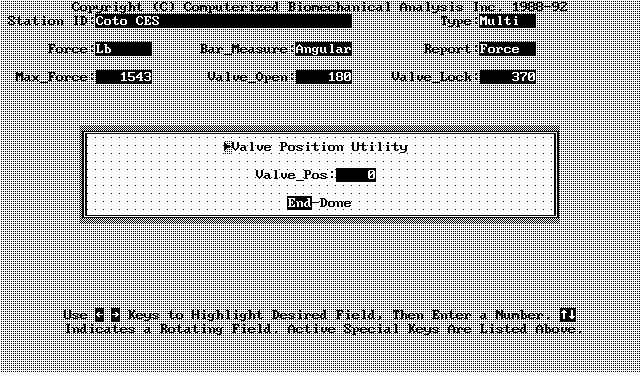
CALIBRATIONEven though the CES is shipped after being fully calibrated it is recommended that the calibration of the CES be checked after installation. Calibration is a crucial function to ensure the accuracy of all data. The CES maintains calibrated values under normal use conditions. There are three separate phases to Calibration which allow the user to ensure the accuracy of all data generated by the CES. These three phases allow for Hardware Diagnostics, Calibration, and Calibration Checks. Each of these phases allow for testing, measurement and, if necessary, adjustment of CES instrumentation. The calibration mode allows for proper adjustment of the system for accurate measurement and maintenance support. The same method of menu driven screens used with other modes of the CES will guide the user through the calibration and diagnostic procedure. The Ariel System menu offers a series of selections; Exercise, Program, Calibrate, Data Analysis and Report Gen. Type "C" or use the cursor to highlight Calibrate and then press "Enter" to begin calibration. The next screen is the Calibration Main Menu. The first thing that should be done is Hardware Diagnostics. Press F2 to call up the Utility Menu screen. 9.1 Hardware DiagnosticsHardware Diagnostics are an important first step in the performance of calibration, because it performs a check on the accuracy of the electronic range of the hardware. The accuracy of all the other data needed for a full calibration of the system cannot be guaranteed until this phase in the Calibration is complete. The Utility Menu will display three options. After Hardware Diagnostics are complete, pressing END will return the user to the the Calibration Main Menu.9.1.1 ValvePerform a stepper motor test to step the valve throughout its range and see if it travels all the way from locking the bar on one hand to totally releasing the resistance on the other. To test for proper functioning of the motor select Valve, press ENTER. After the Valve Position Screen appears follow these steps:
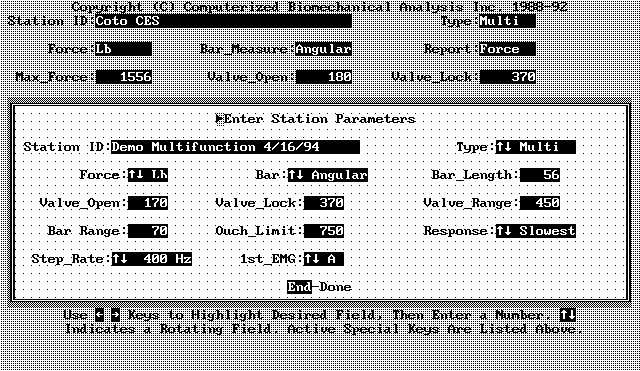
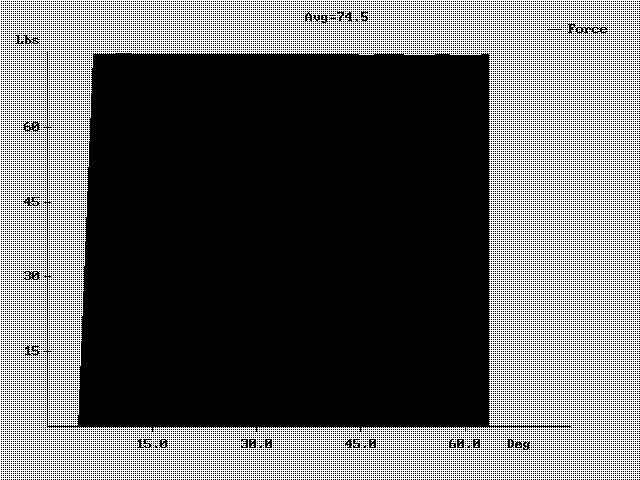
9.1.2 AD ValuesThe AD_Values monitors digital voltage information. This information is provided from the pressure transducer, in units of force, and the angular potentiometer in units that measure the position of the bar. The values for these two measurements are given in numeric form. The first value reports the average pressure (force) from a sampling rate of 16,000 samples per second. This value should be approximately 3500 500 units. The second value is the RMS (Root Mean Square) which represents the amount of change or variation form the average value.The average value for position reports the position of the bar relative to its lowest and highest ends of the range of motion. The range for the average value should be no less than -4090 to no more than +4090. This change should be sequential and linear throughout the range from low to high position and high to low. The first step in Hardware Diagnostic is to test the AD_Values in order to ascertain proper connection between the computer and the transducers mounted on the hydraulic pack in the exercise machine, and second, if the system is operated within the correct voltage limits. 9.2 Station ParametersStation Parameter is used to set the following information about the exercise station. It is also used to select system options such as measurements.
9.3 Position CalibrationThis option sets a relationship between the full travel of the bar and the values measured from the position transducer in the exercise station. A series of screens will instruct you to move the bar first to its lower limit and then to the upper limit. Follow the directions on the screen to perform the necessary calibration.
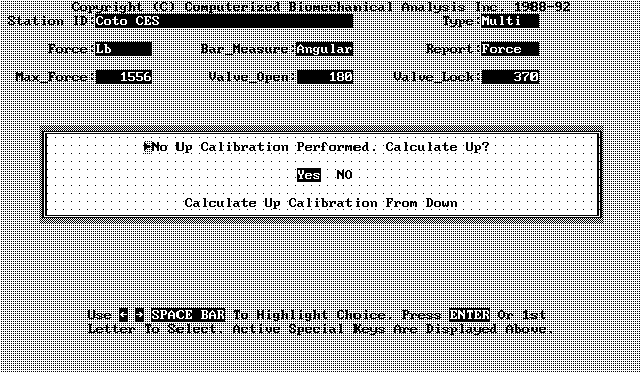
9.4 Valve CalibrationThis procedure sets the stepper motor step positions for the usable range of the hydraulic valve (see Station Parameters). A series of screens will instruct you to move the bar to a high position (for the Arm-Leg-Back, about 15-20 degrees forward of vertical upward). You'll be asked to hang weights on the bar (50 pound suggested) and then signal by pressing a key. The Ariel CES will then automatically determine the valve limits. The system will then report and store those limits in station parameters and instruct you to move the weights.
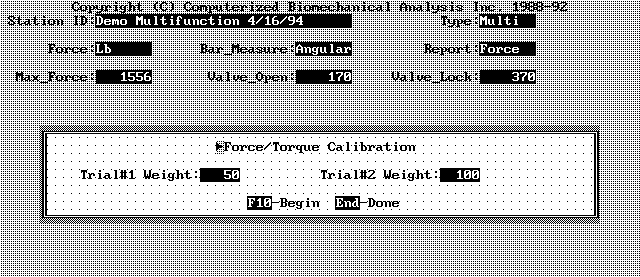
9.5 Torque/Force CalibrationForce calibration sets a correspondence between the force on the handles of the bar and the values measured from the pressure transducer on the hydraulic resistive mechanism o the exercise station.
9.6 System AccuracyThe analog measurement of transducer values on the Ariel systems have an accuracy limitation by the finite representation in a digital computer. Because data values must change by one bit (binary digit) hen represented digitally, any give transducer measurement could have a possible error approaching one bit-value.In practical terms, the absolute accuracy depends on the resolution of the conversion from analog values to digital values. On the Ariel CES, one bit-value typically represents 0.3 pounds of force, and about 0.01 of one degree of bar movement. These accuracy levels are entirely sufficient for the vast majority of resistive training and rehabilitation uses. It is possible to adjust the system for greater level of accuracy. 9.7 Calibration CheckThis F1-Calibration Check item on the Calibration Main Menu checks or verifies the current system Force Calibration. You will be asked to move the bar to the stop and Start positions. The bar will lock, and you will then be asked to hang a known weight on the bar.
9.8 Abort CalibrationThis feature permits you to erase or discard any calibration changes you made during this session. Press Esc key from the Calibration Main Menu to abort and you will return to the Ariel system menu display screen.This feature is handy when you are learning about calibration, as it lets you experiment with the calibration options without changing the system calibration. |
Pressure Transducer for calibrating force.| Angular Potentiometer for calibrating Position and Velocity.The force and position transducers have adjustable ranges (gain and offset adjustments) so the maximum forces can be set electronically to measure either higher or lower values than the current set up limits. These adjustments should only be done by an authorized Ariel technician, | The current maximum force limit that can be measured are always displayed at the top of the calibration menu screen. They are labeled "Max_Torque" or "Max_Force". 9.10 ResolutionThe approximate resolution for the pressure transducer is a 13 bit (1/4096), and for the Angular Potentiometer the resolution is up to 14 bit (approximately 1/8192). These resolution values represent a fixed percent of the value as given below:
9.11 System CheckoutsTo insure that your system performs accurately, it is important to periodically check you force and position calibration If the calibration differs significantly from the actual measured values, the appropriate calibration procedure should be performed. Your systems should also be recalibrated if the hydraulic resistor pack is changed in the exercise station, or if the analog interface board is changed in the console. The validity and the accuracy of the system is the responsibility of the operator or clinician. Ariel Headquarters will provide any support needed in the performance of a Calibration check. |
|
|
