Lesson 4
Trimming the Video Sequences
Trim Video
When capturing video from several views (cameras), there needs to be some kind of trimming to ensure that each view correspond to each other in the digitizing process. Also it is often necessary when capturing video to capture a time sequence that is longer than the on in interest. In both cases there is a need for some kind of trimming of the beginning sequence and the end of the video sequence. The RealCap module has a built in feature that enables this trimming process. (This is one of the feature that the RealCap has and the Capture module, to be covered latter, does not have. But, for a reason that will be discussed latter. There is also a dedicated trimming module to be used with the Capture module.)
After the capturing process has ended and no frames (images) has been dropped during the process, you are asked if you would like to proceed directly to the trimming of the video.
The basic idea with trimming is to select a synchronization image/frame which is unique to the movement of interest. This could be the release of a discus or a heel strike during gait analysis or a triggered light etc. In the case of GenLock trimming is not necessary unless you want to start from particular point. However, with GenLock the process is much simpler. Do you need a GenLock? Absolutely not. Use the money for other purposes. I will show you how you can use a "software GenLock" that will do just the same and will cost you nothing. It comes with the Transformation Module. This "Software Genlock" will allow you to synchronize multiple cameras views to allow less then 1 millisecond error. Considering the fact that at 60 Hz each field can produce up to 16 millisecond discrepancy between field, this is a remarkable way to handle the potential error with software rather then spending Thousands of dollars to be able to use hardware GenLock. However, it is up to you. You can use either one.
One may ask, what is the error that I am going to have if I do not use any GenLock. Is that significant? From my experience of analyzing thousands of sequences for hundreds of different events, I feel that when using sport activities it does not matter allot. Take for example a study thata we conducted at the Olympic Games in Atlanta at 1996. The conditions on the field were not suitable for high accurate analysis. We even had to use the athlete's body himself to be able to calibrate the field. After collecting the data and digitizing and filtering we were able to get better then 99 percent accuracy. Filtering the data will cause the raw data to be change more then any other factor. Therefore GenLock the cameras will not correct that. It will only assure that the cameras started at the same field and accurate within the field. To be up to 16 Millisecond off between the multiple cameras will not produce a significant error for most activities. Only when you try to determine an impact of a Golf ball on the golf club, or tennis ball on the racket surface may require this kind of accuracy. But for that you must have also cameras that collect data at over 5000 frames per second.
To be able to synchronize the multiple cameras views within one field, it is extremely important. You cannot allow more then one field discrepancy between cameras. This will create an error that might effect the results. For that reason you need the trimming capabilities. One may ask, well, how it was done before? when you did not have a GenLock or trimming capabilities. The answer to that is, that few years ago, you would have to capture frame at the time, and when you decided to synchronize on a particular event, such as heel strike, or ball impact on a racket, you would flag this particular frame as the synchronize frame and you would have to identify the same frame at each camera. This could be also an external event such as a flash light, or ball drop and contact with the ground, or, LED flash in front of the camera lens, or long time ago, a one second revolution clock in the background of the image. These were the old days, and I was there from the beginning. This how our old DOS APAS system used to work. This was before anyone else used computerized digitizing system. Yes, I was the first. In 1969 I published an article in the Ergonomics Journal about comparing knee joint angles utilizing sonar digitizer that was connected directly to the computer through time sharing system in Dartmouth College. This was the beginning of the APAS system. I was not there when Eadweard Muybridge collected his data utilizing multiple cameras to create a sequence. I am not so old... However, I can assure you that his accuracy was within one frame which means, up to 33 Millisecond or more error in synchronizing the cameras (It is pssible that his frame speed was only 24 frames per second). Even in this case, he had remarkable accurate results.
After using the synchronization image/frame, the next step is to select the number pre and post images. Meaning how many images has to be stored in the AVI file for the digitizing process.
When capturing a new
view the previous setting of sync image and pre and post number of images is kept in order
to keep the same setting for the pre and post. In this way you need only to trim the
first sequence and find the same sych point for all other sequences and the pre and post
frames will remain the same. Obviously, only the synch point could be in a different time
sequence since the cameras do not start exactly at the same time unless they are
GenLocked.
The following video file (trimming.avi, 5MB) will demonstrate the various options and will follow the text. This file utilize only the important frames. So in order for you to follow it with comfort you should play it with the MS-Mplayer frame by frame. The full trimming file is 12.5MB and can be downloaded here (trimming_example.avi 12.5MB). You should download the video file and play it as before from the MS Media Player so you can observe exactly the steps. How could you study better then that? You should notice that the Mplayer from Microsoft will play the trimming.avi trimming file at frame by frame. Not a field by field. It is only the APAS digitizing module that can separate the fields and play them field by field.
Using the Digitizing Module you can advance the video field by field, unlike using the MS Media Player that will only show you frame by frame. This is the uniqueness of the APAS system to allow this function. Use the RealCap and open an old file to trim and select the following file after you downloaded it to your computer. Then advance it field by field and you will see the frame number remain the same but the field counter Odd (O) and Even (E) change.
As you can see from the above figure, the Odd and Even fields are demonstrated. For
a better demonstration you can download the frame counter
here. (fieldT2.avi 2MB) You
can advance the sequence field by field with the Digitizing Module and read the Odd and
Even field to show you the seperation of the frame to its 2 fields at 60 hz.
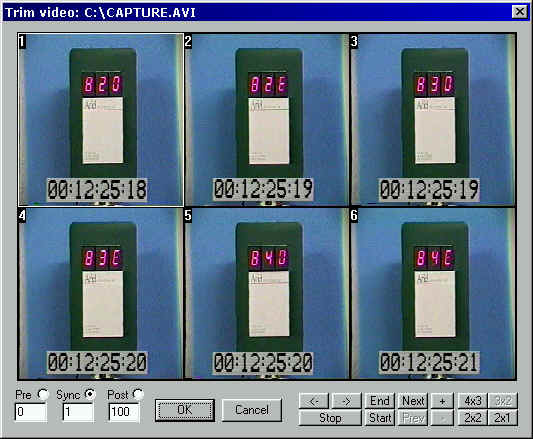
When the Trim dialog is on the screen navigation through the captured sequence can be don using the following buttons:
Next : Jumps a full page forward
Prev : Jumps a full page backward
Start : Jumps to the beginning of the video sequence
End : Jump to the end og the video sequence.
- : Steps one image forward
+ : Steps one image backward
-> : Playback of the current video in slow motion.
<- : Slow motion Playback in revers of the current video.
Stop : Stop playback mode.
The definition of a page is setup using the following buttons:
4x3 : 4 times 3 images in page (sum of 12 images in page)
3x2 : 3 times 2 images in page (sum of 6 images in page)
2x2 : 2 times 2 images in page (sum of 4 images)
2x1 : 2 times 1 images in page (sum of 2 images)
Selecting the Sync image: Selecting the sync image the Sync radio button must be click on. Navigate through the images and find the image you want and click the image.
Selecting the Pre number of images:
Selecting the Pre number of images the Pre radio button must be selected. When selecting
the image that has to be the first image in the sequence the number images is
automatically set. The number of images can also be set manualy using the edit box.
It is very important to remember that the Pre Number images is not an specific
image as in the case of the sync image but the number of images that has to go before the
sync image. It is a relative position field before the synch field image which is the
particular field.
Selecting the Post number of images: Selecting the Post number of images the Post radio button must be selected. Determining the Post number of images the same applies as for the Pre number of images describe above only that the Post number of images respons to the number of images that has to go after the sync image.
Capturing multiple view: In case where there is multiple views (i.e. in 3D motion analysis) the selection of pre and Post number of images is only necessary for the first view. After this has been setup only the selection of the sync image is necessary keeping the sam time frame for all views.
Trim Old video..
In the File menu there is an option called Trim Old Video where it is possible to trim a previous saved video. The trimming process is still the same but before the process can take place you will be asked to find the video to trim using a simple file open dialog box.
The next video file: trimming_left_and_right_views.avi (4.5MB) illustrates the trimming procedures for two captured files. The raw data files are:
1. gait1_left_camera_comp50_5sec.AVI
(2MB)
2. gait1_right_camera_comp50_5sec.AVI
(2MB)
You should download these files so you can follow the trimming procedure and learn it in detail. These files will be used latter for the digitizing tutorial.
You will note in these illustration how the original files were trimmed to yeild the following trimmed fiels:
1. gait1_left_camera_trimmed.AVI (1MB)
2.
gait1_right_camera_trimmed.AVI (1MB)
These trimmed files will be used to be digitized.
In the process of trimming you should see how a small light on the tripod was used to synchronize the two sequences. When the light came on by crossing the beam, it was marked as the synchronize field. Then the sequence was assigned 200 fields after the synch field. For the second view the synch field was slightly difference since the cameras did not started simultaneously. However, the light indicated the synch field and then again 200 fields were selected beyond this point.
By downloading all these files, you will have the data to digitize this gate sequence.
Summary
So far, you were introduced to the RealCap to allow capturing video and the inherent trimming functions. The same functions are presented also in the Capture and the Trimming Modules which are more robust with many more functions. However, for simple capturing and trimming in a single module the RealCap will do the job.
After you learn these 4 lessons you have a choice of learning the Capture Module or go directly to the Digitizing module. One reason to go now to the digitizing module is that this will allow you to digitize the video files that were presented. However, you always should go back to learn the more comprehensive Capture Module and the Trimming Module which allow 4 sequences trimmed simultaneously.
RealCap Quick Reference
Capturing Video without VCR synchronization
1. Open the Capture preferences. Make sure that the enable delay and VCR remote enable is clicked off.
2. Remember to set the capture time high enough to contain the whole sequence of interest including extra time for later trimming.
3. Find the sequence of interest on the video tape using either a VCR or Camcorder. Pause the VCR or camcorder just a fraction of time before the actual sequence starts.
4. Click the CAPTURE SEQUENCE speedbutton in the toolbar. A window appears in front of you asking for the que to start capturing.
5. Click enter button or use the mouse to click the OK button.
6. Click the pause/play button on the VCR or camcorder.
7. When the capturing terminates you will be asked to trim the video.
Capturing Video with VCR synchronization
1. Open the Capture preferences. Make sure that the enable delay and VCR remote enable is clicked ON.
2. Enable Auto Start under VCR remote control.
3. Set the delay of capturing to the approximate time it will take the VCR to reach optimum tape speed (This delay is individual for all VCR's. Try play with the delay and watch the captured Video sequence for any flickering and color defects. The delay is not stable and will change with time and heat of the VCR. Remember to set the delay high enough to avoid the bad images).
4. Remember to set the capture time high enough to contain the whole sequence of interest including extra time for later trimming. Both before and after the sequence of interest.
5. Find the sequence of interest on the video tape. Pause the VCR just a fraction of time before the actual sequence starts.
6. Click the CAPTURE SEQUENCE speedbutton in the toolbar. The whole capture sequence will be initiated automatically without any interference with the user.
7. When the capturing ends and no error has occurred you will be asked to trim the video.
Trim the Video Sequence
1. Click the Trim Video speedbutton in the toolbar (If you have just captured this automatically done).
2. Select the Sync Image. (The sync image is an image in the captured sequence that is unique to the whole sequence. The image is used to trim the video for correct length/time).
3. Select the Pre number of images that has go before the sync image. Remember that the Sync image is an image number and the Pre images is a count of images.
4. Select the Post number of images that has to go after the sync image. Also the Post number of images is a count not a specific image in the captured sequence.
5. Click OK
6. Find the place on the harddrive where the video must be stored. Type the new name and click Save. (Remember not to store the new file in the same name as the preallocated capture file. This will cause an error).
The Tutorial will continue with Lesson 5 which introduce the Digitizing Module.
[Go Back to Lesson 3] [Go to
Lesson 5] [Go to Home Page ![]() ]
]