|
|
Data Window |
[FrontPage Include Component] |
|
|
|
|
|
|||||
|
NAVIGATOR: Back - Home > Adi > Services > Support > Manuals > Apas > View : |
|||||
|
|
|||||
| |||||||||||||||||||
|
Data Window
Categories
| FeaturesWith the DataWindow you can display almost any kind of numerical data collected over time. For example velocity, acceleration, height of centre of gravity, joint moments, EMG, and so forth. When loading data into the DataWindow it is separated into channels. Fx data sampled from a forceplate Fx, Fy, Fz, Mx, My, and Mz is loaded in 6 channels.
The following types of datafiles can be used: 1. Text Files 2. Binary Files (6 byte real, 4 byte real, 4 byte integer, 2 byte integer, 2 byte word, byte). 3. APAS analogue files with the extension .ANA (EMG, forcedata and so on) 4. APAS stick diagram. With these files you can extract the velocity, displacement and the acceleration for the marker data. You can select the X, Y, Z or the resultant direction. 5. APAS stick diagram angle. With this option the APASview can display the joint angle of a stick figure.
Opening a DataWindow:To open a new instance of the DataWindow use one of two the following procedures: 1. The New DataWindow in the file command menu 2. The Window name - As default the name/title of the DataWindow will be the filename. To change this double click on the gray speedbar panel, next to the speedbuttons. The name can only be changed if data is loaded.
General configurationClick on To select a datafile in the DataWindow set-up: 1. Double click the Datafilename textbox. 2. Use the fileopen window to locate the datafile to load. 3. Exit the fileopen window with a highlighting of the and the OK button. As an alternative you can double click on the datafile and the file is selected. Hint: All types of datamedia can be used including network drives. DataFile type: This parameter indicates what type of data
APASview is to loaded. The following file types are available: 1. Binary (6 Byte PASCAL:Real C/C++:double) 2. Binary (4 Byte PASCAL:Single C/C++:float) 3. Binary (4 Byte PASCAL:Longint C/C++:int or long) 4. Binary (2 Byte PASCAL:Integer C/C++:short) 5. Binary (2 Byte PASCAL:Word C/C++:short) 6. Binary (1 Byte PASCAL:Byte or Char C/C++:Char) 7. Text 8. APAS .3D Velocity 9. APAS .3D Acceleration 10. APAS .3D Displacement 11. APAS .ANA 12. APAS .3D Angle The datafile types 1-6 are special filetypes for use with binary files. Normally these files are created from programs developed in PASCAL, FORTRAN, C and C++. Number of channels: This parameter is used to specify the number of channels within the selected datafile. The parameter can not exceed 16 channels. Selecting an APAS analogue file (extension .ANA) or an APAS 3D file (extension .3D) the number of channels parameter is extracted from the configuration file and the parameter can be ignored. Skip Factor: Often analog data are sampled at a higher frequency than image data. Therefor, to view a stickfigure sampled at 50Hz together with EMG-channels sampled at 1000Hz, it is necessary to reduce the EMG-data to 50Hz. This can be accomplished by setting the Skip Factor to a value of 4. In this way 4 EMG samples will be averaged consecutively to form one value. Kistler adjust Use this option if the data loaded must be corrected from Kistler tranceducer signals to normal forceplate data signals (Fx, Fy, Fz, Mx, My, Mz). Auto sync This option can be used if a stickfigure has been loaded into a StickWindow. This makes it possible to automatically calculate the skip factor for analog data associated with this stickfigure, like forceplate data signals. Ex. If a stickfigure with a sample rate of 50Hz has been loaded the Auto sync option will calculate a skip factor of 20 for displaying the forceplate data sampled with 1000Hz signals in synchronisation with the stickfigure. Window sync: The window sync parameter is used to synchronise the DataWindow together with other windows. This can be useful if a comparison of two different data-collections has to be made. Example: Window1 -----[]----[]----[]----[]----[]----[]----[]----[]----[]----[]----[]--- 1 2 3 4 5 6 …… Window2 -----[]----[]----[]----[]----[]----[]----[]----[]----[]----[]----[]--- 1 2 3 4 5 6 …… In window1 the first sample has to be aligned together with window2 sample number 2. This is accomplished by setting the Window sync to 1.
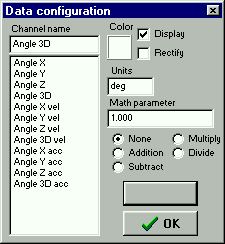
Runtime configuration:After loading data into the DataWindow it is possible to adjust the colors, rectification, units and so on directly using the DataWindow. Move the mouse to the channel that must be modified and click with the right mouse button.
The Channel name indicates the channel to be modified. To choose another channel just click in the channel list below and a new channel can be modified. The name can be modified. Color Click with the left mouse button on the colored rectangle. Use the color dialog to change the color of current data channel. Rectify The rectify parameter evokes a rectification of the numerical data. Display This option is used to hide or display a data channel in the window. The checkmark indicates if the channel is displayed. Units This text is used to indicate the format of the data signal. Fx. forceplate data vertical force in N (Newton's) or knee joint velocity in M/Sec. If data is loaded from APAS analog files the units will be extracted from the data file, but can still be modified. Data channel function/parameter This option is used to modify the values of the data channels. Fx. for normalising data to body weight. This feature needs a parameter and a operator.
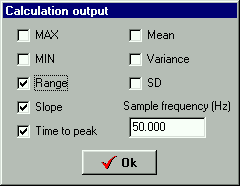
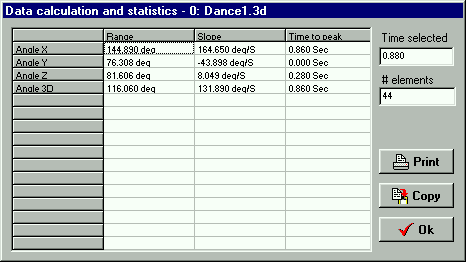
Configuration of the DataControlWindow using the DataWindowThe DataControlWindow start and stop parameter can be adjusted with the use of the DataWindow. Position the mouse at the start of the area of interest. While holding the left mouse button down move the mouse left or right, this will highlight (yellow) an area of the data signal. Releasing the mouse button the selected area will become the area of interest, and the start and stop parameter will automatically be adjusted. Press the Alt button and the left mousebutton on the DataWindow canvas to reset the DataControlWindow start and stop parameter to the current DataWindow maximum. Data modification and statisticsHold down the Ctrl key on the keyboard. Position the mouse at the start of the area of interest. Push and hold down the left mouse button and move the mouse left or right, this will highlight an area of the data signal. Releasing the mouse button will select the area for calculation and bring up a window where the type of calculation and statistics can be selected. The sample frequency in this window is used to set the time interval between the samples. This parameter is only interesting in non APAS file calculations. Clicking the OK button will bring up the calculated results.
The calculated output can be redirected to the printer or the clipboard for further analysis.
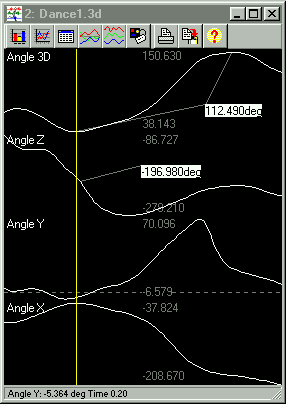
Presentation labelsThis function is used to create small labels on the canvas displaying information on data values, range, time or slope. Displaying data value labels
Displaying range, slope or time labels.The label is using to data values, and therfor a bit more tricky to create.
Deleting a label
Moving a label
PrintingUsing the
Copy to the clipboard:
|
|
|