|
|
Data Collection |
[FrontPage Include Component] |
|
|
|
|
|
|||||
|
NAVIGATOR: Back - Home > Adi > Services > Support > Tutorials > Gait > Chapter4 : |
|||||
|
|
|||||
| |||||||||||||||||||
|
Data Collection
Categories
|
4.2 Data collectionGeneralAs other laboratory data, gait analysis should be based on complete evaluation with history taking and physical examination. In addition to routine history taking and physical examination, examiners should focus on the specific neuro-, musculo-, and/or skeletal problems that cause gait alteration for the subject. History taking should includes preceding neurologic -CNS or PNS musculoskeletal disorders, and/or therapeutic intervention and its efficacy, level of ambulation, relieving or aggravating factors, what kind of walking aid used, and so on. Physical examination should include leg length discrepancy, range of motion (ROM) of all joints, joint deformities, muscle shortening especailly for the two jointed muscle, muscle tone, power and atrophy, and full neurologic examination with deep tendon reflexes and sensory examination. Observational gait analysis is a necessary step that should be done before instrument gait analysis. Gait velocity, stride/step length, cadence, foot and ankle, knee, hip, pelvis and HAT (head, arm, and trunk) should be carefully examined during walking. Any abnormal pattern or amount relative to normal value and any asymmetry should be noticed. During these steps of thorough examination, the examiner should bear these questions in mind.
Subject's conditionDressing - It would be the best to put off all the clothes except a shorter pants. For female, something to cover upper body is needed. But ASIS and PSIS level of trunk should be cleared to put markers on the exact bony landmarks. To achieve this, waist line of shorter pants is usually lowered with adhesive or Velcro tapes. It will ease subjects' embarrassment if this condition is when appointment is made. Because there are already too much interface between markers and underlying bones, which would be major source of errors, it is far better to put on no artificial interface, such as tight stocking or something. Shoes - On general principles, shoes or socks should be removed to analyze. But shoes can be put on in some specific situations such as to evaluate effect of shoe modification, orthosis/prosthesis which should be don with shoes. It should be reminded that markers attached on shoes do not represent the exact bony movement because of the relative motion between shoes and feet. Walking aid, prosthesis - There is no need to remove any walking aid (cane, walker, or crutch ...) or prosthesis for gait analysis, unless the purpose of the analysis is to examine gait without walking aid. Especially for APAS/Gait, which is based on video, hiding effect by walking aid cause no problem for marker tracking. There is some debate whether the inverse dynamic data from the gait with walking aid should be interpreted as shown itself. It would be correct to interpret the data as it is unless the force plate is hit by foot and walking aid at once. The prosthesis is always aligned to get the best result with shoes on. So, with no particular reason, the analysis should be done with shoes on. Anthropometry measurementBecause these data largely affects gait kinematics and kinetics data, precise measurement of body segments is very important. For kinematic data, error of anthropometric data will produce inaccurate joint center estimation and inaccurate LCS (local coordination system) based on bones. For kinetic data, the inaccuracy from kinematic data will cause problems. Moreover, anthropometric errors cause deviated segmental mass and center of body segmental mass. Marker placementThe error of marker placement is probably the largest source of error for instrumental gait analysis. And more important is that it is unpredictable. To place markers on the exact position, the examiner should know the principles of joint center estimation and segmental plane definition. And should learn the specific conditions for placing by heart. The most important thing to keep in mind is that the system detects the center of markers, not the attaching point!!! This is very important when placing markers. ASIS marker - The real bony position of ASIS is calculated by the k vector of pelvis marker based LCS. This vector is perpendicular line from midPSIS to the line between each ASIS. So, the ASIS marker should be placed to align <the line between center of ASIS prominency and center of marker> with <the k vector>. This is not easy for obese subjects. Lat epicondyle marker of femur - Place marker on just the center of mild prominence of epicondyle. This not so tall prominence can be identified easily if the subject flexes his knee a little. Med epicondyle of femur - Only for Sun marker. Same as lat epicondyle. Keep in mind that knee joint center is on the midpoint between the center of medial and lateral epicondyle markers. Line between center of markers should be aligned with the line between center of epicondyles!!! Lat malleolus of fibular - Place marker on just the center of mild prominence of epicondyle. Med malleolus of tibia - Line between center of markers should be aligned with the line between center of malleoli !!! Heel marker - The vector from the 2nd MT marker to heel marker becomes the longitudinal axis of foot. So, this vector should be parallel to the ground when the subject stands on the ground. To achieve this, you can get the position of heel marker by watching the foot laterally with your eyes lowered to the height of MT marker while the subject are standing. Or first, measure the thickness (thick_MT) of the 2nd MT joint area with caliper. Then the heel marker position would be thick_MT + <the distance from the surface of MT to the center of marker = marker diameter + thickness of mounting disk> from the ground. Thigh Wand and Tibia Wand - These wand markers are very important because knee and ankle joint centers and coronal plane of thigh and tibia are calculated from these markers. But they are very error prone. To get good wand position, imagine a perpendicular line from the marker on the tip of wand to the line between the center of hip and Lat epicondyle line. This perpendicular line is the direction of knee joint center from lateral epicondyle marker. The plane formed by the wand marker, hip joint center and lat epicondyle marker is the coronal plane of thigh. The similar situation is applied to tibia wand. Important thing is that the direction of stick (wand) has no meaning!!! The imaginary perpendicular vector is the key!!! Choosing Marker SetsModified Helen Hayes marker set seems the best and most widely used. But in some case when the hip joint center estimation would not be good enough, Bell's algorithm can be a good alternative for the original Davis' protocol. The Helen Hayes marker set and Modified Keith Vaughan's set use wand markers, which usually sway so much to cause jittering of joint angle graph especially when the subject walks jerkily such as spastic diplegic gait of cerebral palsy. In this case, Sun marker set would be far better because it needs no wand markers. Sun marker set has another advantage of defining the joint centers and anatomical plane of body segments more accurately. But there is no supporting data until now. Static TrialsA static trial is needed for Sun marker set and Helen Hayes marker set without real heel markers. Real heel markers cannot get if there are less than three cameras behind the subjects. If you have real heel markers that is digitized and transformed by more than 2 views of camera, you don't have to take static trial for Helen Hayes marker set. But if you would like to calculate with Sun marker set, you have to take static trial. Doing a static trial is very easy. The subject should stand still in the center of walkway and record video only for one second or less. Of course, synchronization is needed. Dynamic TrialsView and examine the ground reaction force View and examine the dynamic emg Redo if needed SynchronizationWays to synchronize video to analog signals Using the pretrigger function of the analog program GenlockWhat is genlock (it cannot be accomplished with camcorders) Frequent sources of errors in digitization and transformation1) Errors related to control frame (consider to relate with appropriate examples) i) Control point assignment
errors ii) Control point
coordinate errors iii) Different position of
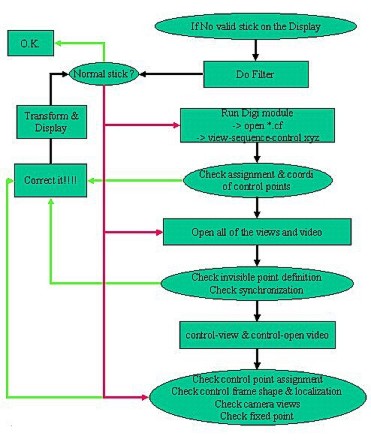
control frames among each of the views 2) Synchronization error 3) Invisible point error 4) Digitization error If you see deformed or invalid stick figures1) If you see an invalid stick figure (no stick figure at all or several points/lines appeared and disappeared)
2) If you see a generally deformed stick figure: a group or all of the points are involved in the deformation throughout the whole period of the sequence
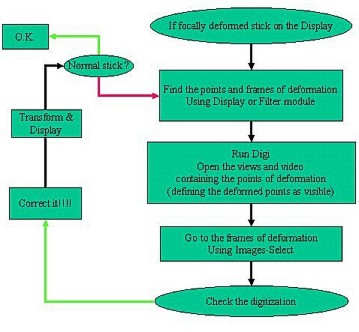
3) If you see a focal deformation: only one or two points are deformed in a short period
|
|
|