|
Digitizing


Categories


|
 Contact
us Contact
us |
|
General info
+1 949 858 4216 |
|
Sales & support
+1 619 992 3089 |
|
E-mail
Information
Sales
Support |
|
CHECK OUT
[FrontPage Include Component]
|
| |
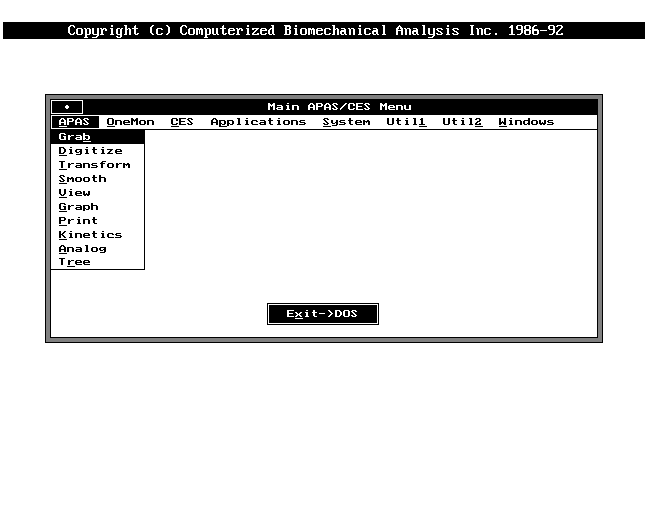
DIGITIZING MODULE
7.0 DIGITIZING PROCESS
Digitizing is the process of converting film or video image sequences to computer image sequences (stick figures). To produce computer images from film or video images one must convert the recorded patterns to numbers or digits, hence the term digitizing.
Each frame of film or video is a picture and contains a great deal of information. Usually the information is far more than is needed to analyze the motion of the subject. Therefore, the digitizing process becomes one of digitizing the subject rather than the entire frame. Human subjects consist of various body segment (limbs) connected at body joints. If the location and identity of each of the body joints are known then the location and orientation of each of the body segments (therefore the complete subject) can be easily determined. The APAS takes this approach to the digitizing and saving of images of subject motion; namely the determination of joint location for each body joint in each frame of the film or video recording.
7.1 CREATING A SEQUENCE
After capturing the specific frames using the Frame_Grabbing process, a sequence to contain the digitized information must be created. A Sequence is the basic unit of information in the analysis system. It corresponds to a single continuous activity that is filmed, digitized, and processed for analysis. Each sequence has a unique name by which it is identified and referenced so as to distinguish it from other sequences.
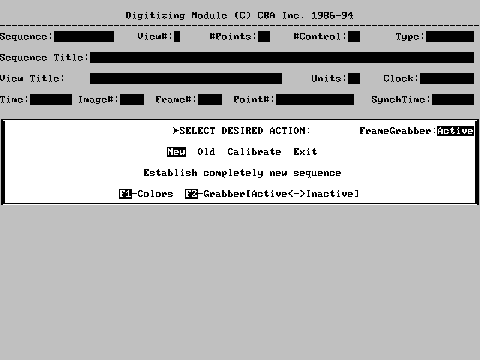
From the Main APAS Menu select Digitize. After confirming/accepting or changing the specified drive and directories, a new screen on the monitor will be displayed asking whether the sequence is New or Old.
7.1.1 New Sequence
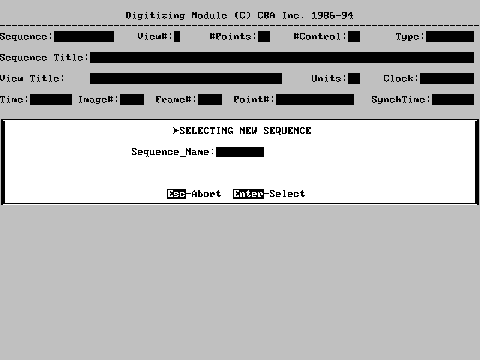
Select New and enter a Sequence Name. Up to eight alphanumeric characters can be entered for the file name. The digitizing module checks to see if a sequence using this name exists on the current directory. If this name is not in use, a new sequence is created. If this sequence name has already been used, a flashing message will appear and another name will be requested. Once a sequence has been created the information must be entered on the Sequence Information Screen.
When creating a new sequence, the name should describe the event being filmed as well as who is performing the actions. Because the user is limited to eight characters, abbreviations should be used and recorded elsewhere for cataloging purposes. (Example: Gait-JS is John Smith's gait sequence)
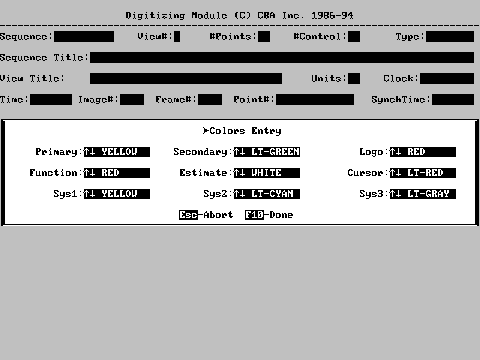
F1_Colors
The F1-Colors option is selected to change the Color Selections for the graphic display. Items can be set to any of the 16 available display colors. Color changes from this menu are saved when you leave the digitizing module so that you will not need to reset them for subsequent digitizing sessions. Select the desired color using the up and/or down arrow keys, then press the ENTER key to save any changes and advance to the next field. NOTE: REMEMBER THAT SETTING OBJECTS TO THE CURRENT BACKGROUND COLOR WILL CAUSE THEM TO "DISAPPEAR".
 | "Primary" sets the color for the current frame being digitized.
| "Secondary" sets the color for the additional (previous and subsequent) frames being displayed.
| "Logo" sets the color for the title that appears at the top of the graphic display.
| "Function" sets the color for the optional function strip (column of commands) that appears at the left of the graphic display.
| "Estimate" sets the color for digitized points that are entered as estimated points. This option is usually set to a color that is different from the "Primary" color to make "Estimated" points more distinguishable.
| "Cursor" sets the color of the digitizing cursor. It is recommended to select a cursor color with a high contrast to the background colors to aid in digitizing.
| | | | | |
The System options refer to the color scheme for menus when in the One Monitor mode. These items are not used in the two monitor mode.
| "Sys1" sets the color of the first letter of menu choices and the cursor color of specific menus of the current module.
| "Sys2" sets the color of the text located inside the menu box.
| "Sys3" sets the color of the menu box and the text (except for the first letter designated by Sys1) of the menu items.
| "F10" is selected when the desired color changes have been completed. You will return to the display options menu.
| | | |
7.1.1.2 Grabber [Active<->Inactive]
Grabber[Active<->Inactive] is selected to toggle between color and grayscale display of the image to be digitized. When the grabber is "Inactive", images are displayed on VGA using a grayscale. When the grabber is "Active", images are displayed in 256 color mode. NOTE: Images can be set to "Inactive" or "Active" for desktop systems, however, this must be set to "Inactive" when using the APAS Notebook computer. The current mode is displayed in the upper right corner of the menu box.
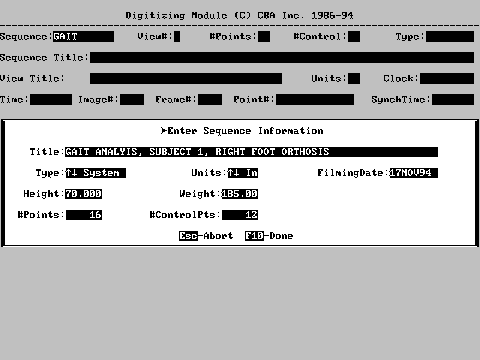
7.1.1.1 Sequence Information
The lower part of the screen shows a number of items of information that are associated with the sequence that has been created. Enter the items in the order they are presented, pressing ENTER after each item. After all of the sequence information has been entered F10 is pressed to continue.
- SEQUENCE TITLE - serves as a reminder of the subject matter for this sequence. Anything may be entered; event, subjects name, date, analysis, type, trial, number, etc. This information is for your benefit in identifying and recalling the contents of this sequence.
- Type - Type is selected when the type of point (body joint) or segment identifiers used are to be set or changed. The "Type" can be changed using the up/down arrow keys. "System" is selected when you wish to use the system default point and segment identifiers for this sequence. By selecting default identifiers all names, connections, and segment masses are defined and you simply select the points to be used by entering two character abbreviations. System identifiers are usually adequate for the majority of human body motion analyses. "User-Defined" is selected when you wish to define your own point and segment names, segment connections, and segment mass information. This is typically required when analyzing performance sequences that do not involve the human body (e.g. animal studies or formation analysis). Once you complete the definition of joints and segments for this sequence you may copy the information for additional sequences of the same activity that you wish to digitize. The "Type" will be displayed in the upper right corner of the screen.
- Units - the up/down arrow keys are used to examine or change the units of measurement for this sequence. The units that you may choose are MM (millimeters), CM (centimeters), M (meters), KM (kilometers), IN (inches), FT (feet), and MI (miles). The units that you select MUST correspond to the units of the control point coordinates for this sequence. These units will be used for subsequent data analysis and reporting for this sequence. For example, If CM (centimeters) were the units of measurement for the control points, then resulting displacements would be reported in centimeters. Velocity would be reported in centimeters/second and accelerations in centimeters/second/second. Alternately, if control point locations were measure in FT (feet), the corresponding units for displacement would be in feet. velocity would be feet/second, and acceleration would be feet/second/second. The choice of units should correspond to the size of the image space being studied. For example, typical human motion might reasonable be measured and reported in centimeters or meters, but not kilometers.
- FILMING DATE - the date that this sequence was recorded. This is an optional item provided for information purposes and is not required by the analysis system.
- Height - indicates the subjects height in the units specified in the "Units" field. Height is required only if the analysis is to induce any kinetic energy or momentum parameters of motion, otherwise a 1.00 is entered to continue.
- Weight - indicates the subject's weight based on the units specified in the "Units" field. If the units are specified in IN (inches), FT (feet) or MI (miles) then the weight is specified in units of Pounds. When the selected units are MM (millimeters), CM (centimeters), M (meters) or KM (kilometers) the weight should be specified in Kilograms. Weight is required if the analysis is to induce any kinetic energy or momentum parameters of motion, otherwise a 1.00 is entered to continue.
- #POINTS - the number of body joints and external points that will be digitized in each frame of the video recording. These typically correspond to body joints and/or external points related to the subject's motion (e.g. club, rackets, balls thrown or struck, etc.). It is best to decide on the number of points prior to starting the analysis system by viewing the video image and sketching a rough "stick-figure" with the desired points marked. Do not count the fixed point or panning bar as a data point.
- #CONTROL PTS - the number of control points that will be used to calibrate this sequence. Selection and measurement of control points is best done at the time the video is recorded. Your control points should be clearly visible from each camera view used in this sequence, should have known locations relative to some point of origin, and should roughly correspond to the area of space in which the activity being studied will occur (i.e. the area occupied by your control points should not be much larger or much smaller than the area occupied by the subject). For a three dimensional analysis, at least six non-coplanar control points are required. For a two dimensional analysis, at least four non-collinear control points need to be specified. Do not count the fixed point or the panning bar as a control point.
7.1.2 Old Sequence
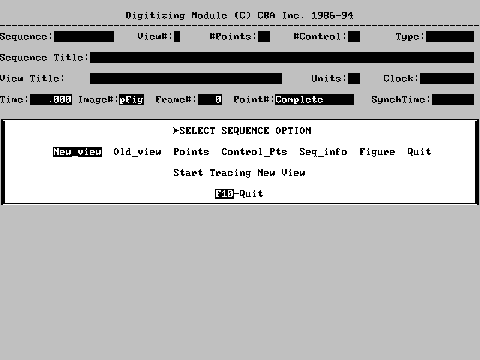
If an Old file is chosen a screen listing the sequences in the current directory will be displayed. Once the old name is chosen then the Sequence Option Menu, will be displayed.
Changing Sequence/Control Point Units
Each time a new sequence is created, the units from the previous sequence are displayed. When the units are changed a menu will be displayed for Converting Control Points to the new units. "Yes" indicates that you wish to convert the control point location coordinates from the old units to the newly selected units. If you change units after correctly entering your control points, you MUST request this conversion for results to be reported in the correct units. "No" indicates that you do NOT wish to convert the control point location coordinates from the old units to the newly selected units. The only case where you would NOT convert the control point locations would be if they were entered initially with the wrong units and you are now correcting this error.
7.1.3 Defining Body Joints and Control Points
After a new sequence has been created, the individual body joints and external points must be identified or defined so that the analysis system will know what the subject looks like. After entering the sequence information the computer will display a screen asking for the Point Identification Source.. The selection of Sequence Type determines how body joints and segments will be defined for the sequence.
7.1.3.1 System Vs User-defined
The choice of System option allows the specification of body joints from a predefined standard list of names. The User-defined sequence type requires that the user enter a name for each joint being digitized. The user must use the two letter abbreviation shown in the Point ID Definitions Table. The System option should be used whenever human subjects are being digitized. User-defined would then be used for non-human subjects, such as analysis of race horses or when marking specific points on the body that are not listed in the Point ID Definitions Table. For example: each metacarpal phalanged joint for a hand analysis. A sequence may initially be defined using System joint names, then the sequence type can be changed to User-defined to specify the names of certain non-standard joints and segments.
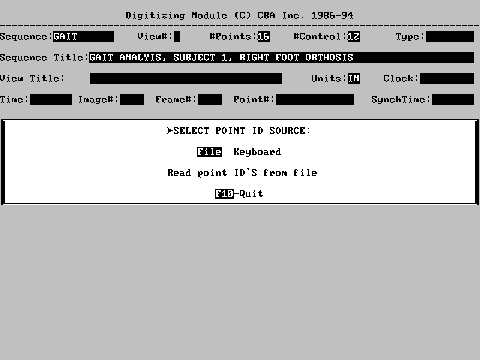
7.1.3.2 File Vs Keyboard
The joint names can be entered by using the keyboard or copied from another sequence file that has the same body joint definitions. The Keyboard option is used whenever a new activity type is used for crating a sequence. The File option is frequently used when a number of sequences are digitized of the same activity. If more than one tennis player or golfer is being analyzed then the same point Identifiers could be used for each file.
7.2.3.2.1 Keyboard ID Source
The Point ID Definitions Table lists the definitions of the normal human body joints plus additional; external points that may be used when digitizing rackets, golf clubs, or other objects used by human subjects.
Point identifiers are numbered in the order that they are to be digitized. For example; the first point might be the right foot, the second point should be the right ankle followed by the right knee for the third point, and so on. For each point an ID or name must be entered and ENTER pressed to advance to the next point.
For the System option, a list of valid two-character point ID's are shown on the color monitor. For the User-defined sequence any name may be entered, as the system places no restriction on user defined names.
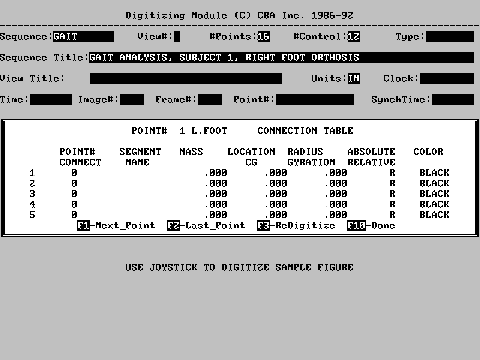
7.2.4 Point Connections
The Connection Table requires a sample frame to be digitized, in order to create a representative stick figure of the subject to be digitized and to specify any non-standard segment names and segment connections.
In the System option sequence this Point connects is optional and F10 may be pressed twice to continue. If the User-defined option is being used then this step must be completed in order to specify how the points are to be connected and the names of the segments that connect them.
The goal is to create a representative figure on the display to show relative point locations and point connections so it is not necessary to digitize an actual video image. Using the mouse, digitize a location for the current point. After digitizing the point it may be connected to a maximum of five previously digitized points. For each connection a segment name must be entered. For example; if the first point is the right ankle and the second point the right knee, then after digitizing the second point a connection to the first point would be specified and this segment would be called the right shank.
Prior to digitizing a sample figure, the menu offers to select a grabbed file where one video image can be used for the digitizing.
| MASS - distribution information that may optionally be entered for each segment if center of gravity and kinetic data is required for analysis. Mass information may be entered in Relative or Absolute terms. Relative Mass is entered as a percentage of the total body mass. Absolute Mass is entered in weight units (kilograms or pounds).
| LOCATION CG - percentage of the distance between the previous point and the current point that define the segment. This information is always entered in Relative terms.
| RADIUS GYRATION - entered in the same format and terms as the segment CG information.
| | |
For System defined sequence, the connecting segments and information will automatically be defined according to the equations by Dempster.
The mouse is used to select each joint and the F1 key is pressed to advance to the next point.
After all points, segments and connections, have been established the graphic display will show a completed stick figure. If the stick figure segment lines cannot be seen clear against the background of the video a new color may be needed. If corrections or additions must be made the F1-Next point key or F2-Last point key may be used to advance or back-up to the desired point. To correct previously digitized joints, the F3-redigitize key may be used to re-digitize the sequence. When all information is complete the F10-Done key is selected to save the joint and segment specifications.
7.2.5 Control Points
The final step in the sequence creation is the definition of the control points used to calibrate the image space. The number of control points has already been specified in the Sequence Information Screen and now the actual coordinate locations of each of the points must be entered.
7.2.5.1 File Vs Keyboard
File is selected if the control point locations for this sequence are identical to the locations used for an existing sequence. In this case, the location values are read from a sequence file.
- NOTE
- In the case of control points, the existing sequence does not have to be of the same activity as long as the control point locations are the exact same.
For example, suppose a large cube is constructed with the corners marked to serve as control points. The coordinate locations of each of these corners are measured relative to one corner that is selected as the origin. Now a number of different activities, golf swing, tennis serve, bicycling, are filmed using the same cube as the control points for each activity. When these sequences are created, the control point coordinate locations need only be entered once, in the first sequence. Thereafter they may be copied from the original sequence since the dimensions of the cube remain unchanged. Simply, if the dimensions of the calibration object have not been changed the X, Y, Z coordinates may be entered from an existing file.
Keyboard is selected when control point coordinate location values are to be entered using the keyboard. This option must be used the first time a set of control point locations are specified. In addition to coordinate values, the units of measurements for these values must be specified
7.2.5.2 Control Point Locations
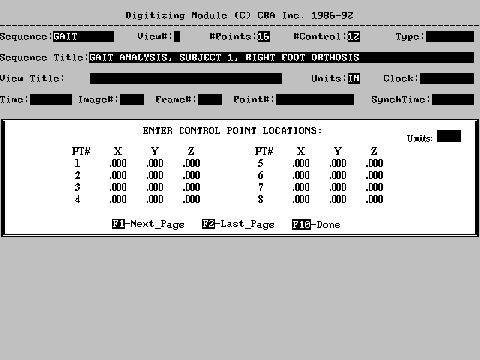
After selecting the units of measurement, the control points must be entered on the Control Point Location Screen.. For each control point and each coordinate, the X, Y, & Z location values must be entered. To correct a previous value, the ENTER key is pressed until the cursor advances to that value. If there is a large number of control points, the F1-Next page and the F2-Last page keys may be used to continue entering the control points. F10-Done key is pressed when all values have been correctly entered.
The control point locations must be digitized in the order that they are entered into the system. It is a good idea to make a drawing showing the order the points are entered so no mistakes are made in digitizing the control points.
- CAUTION
- Any small error entered at this phase may cause very large inaccuracies in the analysis.
This completes the Creation of a New Sequence section.
7.3 DEFINING VIEW AND DIGITIZING RECORDED ACTIVITIES
Once the sequence information has been provided, individual Views must be created for each of the camera recordings in this sequence. Views are digitized camera images and as such consist of two-dimensional body joint coordinates. When all views have been digitized the analysis system will combine them to form a true three-dimensional image sequence. If any one view has been digitized only two-dimensional image sequence can be generated.
- NOTE
- The order the control points are entered determines the sequence in which the digitizing occurs. If the bottom left corner of the cube is entered as point #1 then that corner must be digitized first.
7.3.1 New-View
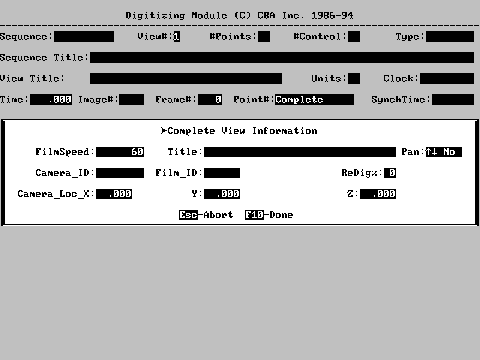
Selection New-view from the Sequence Option Menu will cause the digitizing module to create a new camera view for this sequence. A number of items of information pertaining to this view will be requested from the View Information Screen.
| Film Speed - the film or video rate in frames/second. This value is required and must be entered as accurately as possible for the camera used to record this view. For standard playback video, the value of 30 would be used. A value of 60 can be set when the VCR is capable of playback field by field (60 fields/sec). For cameras, especially high speed cameras, it is recommended that an external timer or internal timing marks be used to verify film speed. Do not trust the speed setting on the film cameras, as experience has shown that the true film speed may vary by as much as 10% from this value. Also high speed cameras require time to accelerate to full speed. In filming, make sure to allow sufficient time for camera acceleration before recording the sequence to be analyzed. Video camcorder shutters are accurate and a standard NTSC camera will record exactly 60 fields per second.
| Title - like sequence title, this is anything that is entered as a reminder of the contents of this view. Usually specific views (side, front, back). This will be helpful later in the Transformation Module by allowing information about the views to be matched correctly.
| Camera Id and Film Id - optional items that can be used to record the type of equipment and medium used for recording. These items are for information purposes only and are not required by the analysis system.
| Re-Digitize% - this optional item may be specified if the analysis system is to measure the amount of random digitizing error associated with each body joint. When a value other than zero is entered for this item, the digitizing module will ask to re-digitize that percent of the total number of film or video frames. For example, if the value 10 is entered, the digitizing module will signal with a beep at the completion of each ten percent of the digitized frames and request that those frames be digitized again. The actual choice of frames is made on a random basis to prevent the person digitizing from knowing beforehand which frames will be re-digitized. The difference in location between the first and second attempts at digitizing each point is used to determine a random error value for that point. These error values are then averaged, by point, for all frames re-digitized in this view.
| Error values are not a measure of accuracy or how well one digitizes, but rather a measure of consistency in repeated attempts at digitizing the same point. This information can later be used by the Smoothing Module to determine the degree of smoothing required to remove random variations due to digitizing of that point. Re-digitizing takes extra time during the digitizing process, but it can often save time during the smoothing process. When choosing values for Re-Digitize% the goal should be to have 10 re-digitized frames in order to produce good error estimates. Thus, if there were about 100 frames in this sequence, a value of 10% would be used; while if there were only 50 frames a value of 20% would be used.
| Camera Loc (X, Y, Z) - location of this camera in the image space measured in the coordinate system of the control points. This item is normally omitted, as the transformation utilized by the analysis system does not require that the location of the cameras be known. Camera location would only be entered to perform a consistency check on the transformation. In this case, the measured camera location could be compared to the location computed by the transformation process. The difference between the actual and the computed camera locations can be an excellent indication of the accuracy of the calibration system.
| | | | | |
When all view information has been entered F10-Done key is pressed to accept the data.
7.3.1.1 Digitizing Mode
The final item of information that must be provided is the type of digitizing equipment to be used. Video selects the video digitizer used with video monitor and playback unit. External selects a rear-projection type digitizer used for film sequences.
When the digitizer type has been selected, the module enters Digitizing Mode and the monochrome display shows the Digitizing Commands.. When video digitizer is selected the following screen will ask for the grabbed file which contains the video images for this view. The next screen displays the grabbed file information. Manual digitizing may be continued by pressing may key or the auto-digitizing option may be selected by pressing F1.
The auto-digitizer requires that the first two frames be manually digitized. For auto-digitizing, reflective markers must be placed over each desired joint during filming. Additionally, the contrast between the markers and the background must be good. During the auto-digitizing mode, manual digitizing may be resumed by choosing F4-estimate. Once the first two frames have been digitized and auto-digitizing has been chosen the Auto-Digitizing table shows the following:
| Width and height - the size of the image markers in pixels.
| Score - measures of the contrast between the marker and its background with 100 being best contrast and 0 for the worst.
| Status - either manual or auto, indicating if the marker is suitable for auto-digitization.
| ESC - aborts the digitizer.
| PgUp/PgDn - The pageup and pagedown keys may be used to display additional markers (if any) which are not on the current page.
| F10 - continue digitizing.
| Ins - The Insert (INS) key can be pressed to toggle between the menu screen and the video screen. This option is displayed when in the one monitor system mode.
| | | | | | |
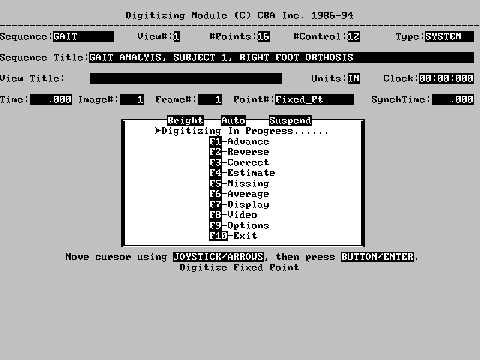
In addition to the sequence information, specific view information is also displayed. This includes the current film or video Frame# and Time (relative to the first digitized frame), the current digitized Image#, and the current Point (body joint) being digitized. Below this table of information the menu box lists a number of active function keys and the digitizing function associated with each key. These menu items are repeated on the digitizer (graphic display) screen and may be selected by digitizing the function name with the mouse or by pressing the function key.
| F1-Advance - moves to the next video frame for digitizing or viewing. This function is only allowed when the current point is the FIXED PT or COMPLETE. That is, it is not allowed to advance until the current frame has been completely digitized. Each time Advance is pressed the frame time and clock timer are incremented by one frame time. Thus, to skip the digitizing of a frame, F1-Advance is pressed, but only if no digitizing has been performed. Each time Advance is selected the last digitized frame data is saved.
| F2-Reverse - return to the previous image for digitizing or viewing. This function is only allowed when the current point is the FIXED PT or COMPLETE. It is the same as F1-Advance in that it may not reverse until the current frame has been completely digitized.
| F3-Correct - removes the most recently digitized point from the display and allows it to be re-digitized. This function is explained more in Section 7.3.1.3.
| F4-Estimate - is selected when the next point to be digitized cannot be clearly seen in the film or video image and must be estimated. When this option is selected, the estimated point will be digitized and this information will be used during the subsequent transformation from digitizer coordinates to 3D coordinates to improve the accuracy of the resulting data.
| F5-Missing - is selected when the next point to be digitized is not in the field of view of the film or video recording. When this option is selected, the next point will be marked as missing and it will not have to be digitized. Missing points and segments connecting to missing points are not shown on the display. The analysis system will attempt to determine the location of missing points when smoothing is performed on this sequence by interpolation or extrapolation.
| F6-Average - is selected when the next point to be digitized cannot be accurately seen but an estimate of the point location by averaging two or more digitized attempts is preferred. Select the Average function before each repeated attempt to digitize the point. Digitizing the point without first selecting Average ends the averaging mode. The average of all the locations you digitized will then be displayed as the current point.
| F7-Display - is discussed in detail in Section 7.3.1.6.1.
| F8-Video - is discussed in detail in Section 7.3.1.6.2.
| F9-Options - is discussed in detail in Section 7.3.1.6.3.
| F10-Exit - ends the Digitizing Mode. This function can only be selected when the digitizing of the current frame has been completed. The program will return to the digitizing selection menu.
| | | | | | | | | |
- CAUTION
- Advance must be selected after the last frame is digitized in order to save the data for that frame, prior to Exiting.
7.3.1.2 Selecting a Fixed Point
With every frame digitized, there is one additional point that must be digitized first; the Fixed Point. The purpose of this of this point is to provide a fixed reference against which all other points are measured. This point is selected somewhere in the film or video image, must not move (thus the name fixed point) and should be clearly visible in every frame. Don't select a point that will be obscured by the subject during the activity.
- NOTE
- This point must also be visible in the frame with the control points.
As previously illustrated, the monochrome display now shows the flashing message: "DIGITIZE FIXED POINT". This will appear at the beginning of each new frame. Position the video cursor to the point selected as the fixed point and press the ENTER key on the keyboard or mouse. A beep will sound to indicate the computer has properly registered this point.
In addition, a small box appears on the graphic display to mark the location of the Fixed Point. The digitizing module expects the Fixed Point from subsequent frames to fall within this box. The box represents a normal variation due to registration or vibration. Digitizing a fixed point outside the box will be considered an error by the computer. For the first three attempts, three beeps will sound and the point will be rejected. On the fourth attempt it will accept the digitized location as that of the fixed point. In this manner, the system prevents inadvertent digitization of incorrect fixed point information.
7.3.1.3 Digitizing the Body Joints
Digitizing the actual body joint for the first frame may now proceed. The monochrome display shows the Point Number and the Joint Name for the joint to be digitized. Position the video cursor to that joint and press the left key of the mouse or ENTER. Again a beep will sound and the point will appear on the graphic display. The monochrome display will now show the next point number and the joint name to be digitized. Continue to position the video cursor to each point and press enter. As this is done, not only will the point locations appear on the graphic display, but a stick figure image of the subject will be constructed as additional points are added. After the last point in the frame has been digitized, the word "Complete" will appear in place of the current joint name. Attempts to digitize additional points will elicit three consecutive beeps which signal that an error has been made.
If a mistake is made while digitizing, either by digitizing the wrong joint or positioning the cursor improperly, corrections of one or more digitized points may be made by pressing the F3-Correct key. Each time this function is selected the last point will be removed or un-digitized from the current frame. Thus, to remove the last three points, this function would be selected three times. After removing the incorrect points, the correct points are then digitized to complete the frame. Once the current frame is completed, press the F1-Advance key to go on to the next frame. When this is done, the stick figure will change color to indicate it is from the previous frame and the "DIGITIZE FIXED POINT" message will flash for the new frame. At the same time, the next grabbed frame will be advanced and displayed on the color monitor.
The system is now ready for the second frame to be digitized, with an additional feature of the digitizing module immediately apparent. The video cursor is now pre-positioned for each point to be digitized. This is because the digitizing module learns to identify body joints as they are digitized. The more frames digitized, the better the learning process will be. However, the human eye is still superior to the computer in locating body joints, so use the initial cursor location as an approximation and make fine adjustments manually to achieve the best level of accuracy. As digitizing proceeds, only small adjustments should be needed, thus repositioning greatly speed the digitizing process. Digitize the fixed point and all the body joints for the second frame just as with the first frame, then select Advance. Repeat this digitizing process for each frame in this view.
When the last frame in this view has been digitized, press the F1-Advance key in order to save the last digitized frame. Then, press the F10-Exit key. This will terminate Digitizing Mode and return the screen to the Sequence Options Menu.
7.3.1.4 Entering a Synchronizing Point while Digitizing
At some point during digitizing, the frame showing the synchronizing event will appear. It is very important to recognize this frame and it is recommended that it be located before digitizing is begun; perhaps when the starting and ending points are being selected. Make a note, if necessary as a reminder that an additional digitizing function must be performed with this frame. After digitizing the fixed point, press the F9-Option key. From the Digitizing Option Menu select Synch. The program now asks for a frame offset from the current frame for the synchronizing event. Determine as closely as possible the offset of the synchronizing event and enter it on the current display. If the event occurs exactly during the current frame, type 0 and press ENTER. If the event occurs halfway between the current frame and the next frame (for example the current frame shows the racket just about to strike the ball, while the next frame shows the ball just leaving the racket), type 0.5 (half frame) and press ENTER. Notice that the Synch time has been set in the upper part of the monochrome screen while the program has returned to the Digitizing Options Menu. Select Quit in order to return to the Digitizing Mode. This frame may now be digitized in the normal manner.
- NOTE
- It is a good idea to decide beforehand the beginning and ending frames to eliminate unnecessary digitized frames.
7.3.1.5 Digitizing Control Points
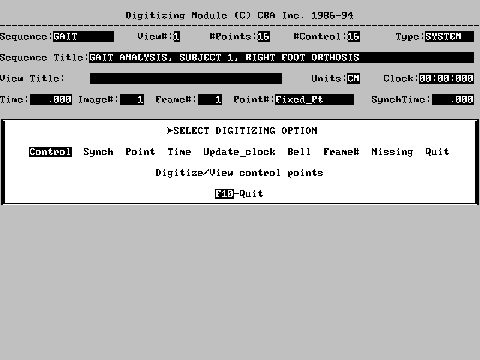
There is, however, one additional operation that must be performed for each view that is digitized. In addition to digitizing the subject, the control points used to calibrate the image space must also be digitized for each camera view. Although this discussion is being presented at the end of the digitizing process, it is usually a good idea to digitize the control points First, so that they are not forgotten. It is possible, however, to digitize control points at any time, from the first digitized frame to the last. From the Digitizing Mode press the F9-Option key. The the Digitizing Options Menu. will then be displayed on the monochrome monitor. Select Control for the Control Point Menu and then select Digitize option.
The Digitizing module now allows the digitizing of control points in a manner similar to digitizing of an image frame. First digitize the Fixed Point. It is important to select the same fixed point as used for the activity itself. Next digitize each of the control points in the exact order that they were defined (the order that coordinate locations were entered) when this sequence was created. It is best to make a sketch or drawing of the control points from each camera view and to number them so that they are not entered incorrectly during digitizing. Save these drawings if there will be additional sequences using the same control points. As the control points are digitized, they will appear on the graphic display as number points. Each point will be drawn in a different color to aid in distinguishing them. When all points have been digitized, compare the display with drawing to ensure that the points have been digitized correctly.
- CAUTION
- If the control points are entered wrong the resulting image sequence will be wrong and the data will be useless.
When all the control points have been digitized correctly, press the F1-Advance key to save the data and return to the the Digitizing Options Menu. Select Quit to return to digitizing. At this point is possible to continue digitizing frames in the sequence or if digitizing is complete for each camera view, to leave the Digitizing Mode by selecting F10-Exit.
7.3.1.5.1 Control Point Option
Earlier, the File option has already been introduced as a method of copying control point locations and/or body joint descriptions from existing sequence. This can save appreciable time when creating and digitizing a number of sequences of the same activity. The File option may also be used for digitized control point locations. If a number of consecutive sequences are recorded without moving the cameras, only the control points for the first sequence must be digitized. For each subsequent sequence the Read option on the control point menu may be selected and the digitized control point locations may be copied from an existing view file. This feature eliminates the need to rewind the film or video tape each time to locate and digitize the control points again.
- CAUTION
- Be sure to indicate a view file from the SAME camera or the wrong control point information will be read. Also, for film digitizing, be sure that the projector DOES NOT MOVE between the digitizing of the control points and the digitizing of each sequence that reads these control points. If any doubt exits, digitize the control points again rather than risk corrupted data.
7.3.1.6. Digitizing Options - F7, F8 & F9 Keys
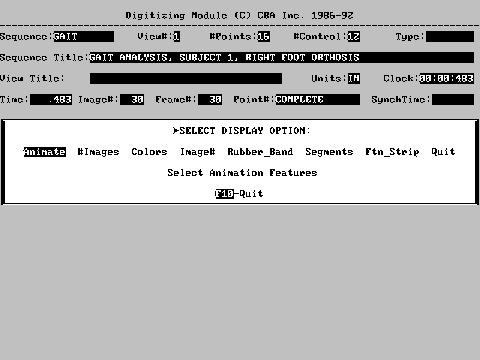
The F7-Display options key is used the change the presentation format of the stick figure on the color graphic display. The Display Options Menu is selected from Digitizing Mode by pressing the F7-Display key.
| Animate - allows examination of the digitized images in the current view through the sequential display of all the digitized frames. This option is useful in performing a quick check of the digitized views, as large digitizing errors will be readily apparent when the image is animated. When this option is selected, a menu of animation options is presented. The image may be animated in the Forward or Reverse directions and the rate of animation may be changed by setting the Delay between frames. This option is not intended to be a substitute for the Viewing Module animation feature which has many more capabilities. Multiple allows for simultaneous view of all the stick figure images.
| #Images - selects the number of stick figure images to be displayed along with the current frame image being digitized. By default, one previous and one subsequent frame images are displayed along with the current stick figure for comparison purposes. Comparison is helpful during digitizing, as sometimes body joints are difficult to locate, especially if they are obscured by another part of the body. The comparison images are displayed in a different color from the current image. The number of comparison images may be set to zero to display only the current image. It may be necessary to turn off the extra figures when they obstruct the video image view.
| Colors - allows the color of any of the items on the graphic display to be changed. Individuals may thus tailor the display to their own personal taste in colors or when the background color of the video image does not contrast well with the computer overlay display.
| Image# - is used to display any digitized image in this view. If there are a large number of frames, this option allows movement from one part of the view to another more quickly than by using the Advance or Reverse functions. This option can be activated only after advancing to the next frame and just before digitizing the fixed point.
| Rubber_band - enables a line segment connection between successive points. This function is useful in accurately superimposing the segment line over the actual video segment.
| Segments - enables or disables the display of connecting lines of body segments.
| Ftn_Strip - enable or disables the display of the function strip on the color graphic monitor.
| | | | | | |
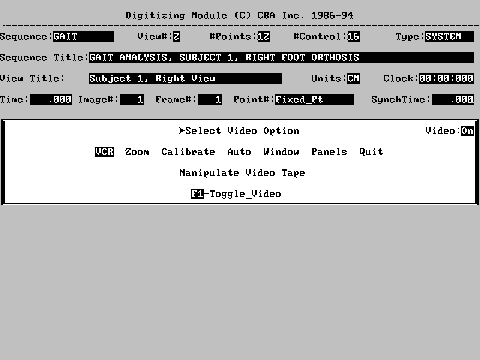
7.3.1.6.2 F8-Video
The Video options are used to select and control the video image processing. These are accessed from the Digitizing Mode by pressing the F8-Video key to select the Video Options Menu.
| VCR - is selected to display the VCR control menu. This option is only visible when the LIVE video option is selected to digitize directly from the videotape. When digitizing a GRABBED image the VCR option is not presented on the menu. This option allows the video image to be controlled and/or enhanced by the computer.
| Zoom - magnifies and/or translates the video image on the color graphics monitor. With the zoomed image, greater precision can be obtained when digitizing a point.
| Calibrate - calibrates the frame grabber. By digitizing the four corners of the screen it scales the screen size for calibration purposes.
| Auto - starts the auto-digitizing feature of the software. After manually digitizing the first 2 frames, the software will attempt to automatically digitize points in subsequent frames.
| Window - the auto-digitizer searches for a point's next position within a region about the previous known position of the point. Window is selected to specify the size of the search region.
| Panels - is an option for the ARIEL HS-120 high speed camera. This option is selected to "bypass" the default algorithm and manually determine the location of the Left and Right video panels. When this option is selected, the user will be asked to first digitize a stationary point on the Left panel and then the same point on the Right panel. This option is only visible when the "FILM SPEED" field is set to 120 in the View Information.
| F1-Toggle_Video is selected to toggle the video picture on and off. This option allows the user to "remove" the video image and display only "stick-figure" information. The current status is indicated in the upper right corner of the menu box.
| | | | | | |
7.3.1.6.3 F9-Options
The Digitizing options are used to select and control a number of features related to digitizing process. These options are accessed from the Digitizing Mode by pressing the F9-Options key to select the Digitizing Options Menu. Control and Synch are two digitizing options that have already been presented.
7.3.2 Old_view
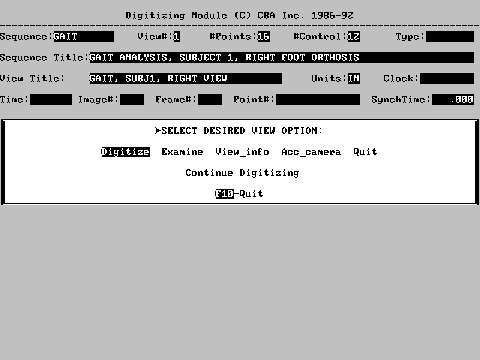
Old view is selected from the Sequence Option Menu when an existing camera view in a current sequence is to be examined or updated. When this option is selected a list of all view names for the sequence will appear on the screen. Use the arrow keys or the space bar to highlight the desired name and press ENTER. The View Option Menu lists four options that may be used for the current selected sequence.
7.3.2.1 Digitize
The Digitize option is selected when digitizing the selected view is to continue, i.e. adding new frames. The correct frame in the video or film sequence must be located to continue digitizing. It is best to have some time mark on the video or film in order to avoid error in this respect, as the digitizing system has no way of determining if the proper frame has been located. If the video or film has timing marks or a timer in the field of view the Clock Timer feature may be used. Refer to the help screen for Timer on the Options Menu.
If the video frames are grabbed into a file, the system will match them properly with the corresponding stick images.
When this option is selected the digitizer type must be indicated for use with this sequence after which the initial frame of this view will be displayed and the digitizing process Section 7.3.1.1 is followed.
7.3.2.2 Examine
Examine is selected when a previously digitized camera view is to be examined. Individual frames may be examined in this mode and data may be corrected or updated using the joystick and keyboard, but additional frames may not be digitized. This feature is intentionally provided to protect the integrity of digitized data where the possibility exists that additional digitizing would not have the same time or scale parameters as previous information. This is particularly true for film where the scale of projection may change between digitizing sessions.
When this option is selected the digitizer type must be indicated for use with this sequence after which the initial frame of this view will be displayed and the digitizing process Section 7.3.1.1 is followed.
7.3.2.3 View Info
The View Info option is selected when any of the items of information associated with the view is needed to be examined or updated. These include the one-line view title, the film or video speed in frames/second, and optional items such as the camera ID, film ID, re-digitizing percent, and camera coordinate locations.
7.3.2.4 Acc_Camera
The Acc_camera option is selected when compensation for a film or video frame rate that is not constant throughout the digitized view is needed. This typically occurs with high-speed film images when insufficient time has elapsed for the camera to reach full speed. To use this option some type of periodic timing mark or counter must be visible in the film image. This timing mark information can be used to correct the time value for the sequence of digitized images.
When a view is initially digitized with an accelerating camera, a film speed that approximates the actual speed should be entered. The value entered is not important in that the time values will be corrected later on, however a suggestion is that the film speed approximate the initial camera speed closely. Then the entire sequence is digitized in the usual manner ignoring the incorrect film speed. Finally, review this film sequence and determine for each timing mark the corresponding from number (starting at 1). Fractional frame numbers are allowed if that level of accuracy can be measured. It is this information that will be used to correct the time values for this view.
The first thing to enter after Acc_camera has been selected is the time interval between timing marks. Following that a series of timing mark number and corresponding frame numbers are entered. Once finished, the program will recompute the time for each digitized image based on the image's frame number and the true time for that frame. For additional information please refer to the help screens for time mark and frame number entry.
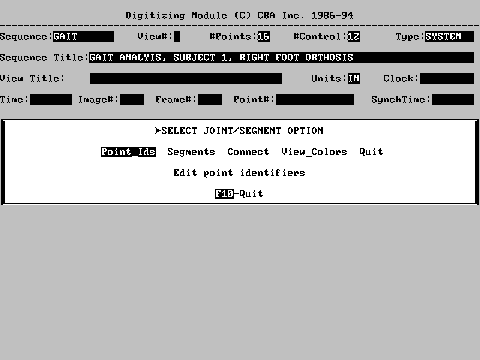
7.3.3 Points
Points is selected from the Sequence Option Menu when the definitions of points (body joints) or segments being digitized in this sequence are wished to be established, examined or changed. When this option is selected a Point Options Menu will appear on the display.
7.3.3.2 Point IDs
This option is selected when point identifiers are to be examined or updated. Point IDs are names that describe or identify each of the digitized points in a single frame. This option is similar to the Defining Point IDs process, Section 7.2.3.2.1.
7.3.3.3 Segments
Segments is used to define, examine, or update segment description information. Segments are defined by two end-points. For example, the segment "Right Thigh" is defined by the two points (body joints) "Right knee" and "Right hip". Segments have a name, connection information and optimal information for the total mass and distribution of mass in that segment.
When this option is selected a table of segment information is displayed on the lower half of the screen. The table contains the starting point (ordered by point number), the ending point, the segment name, the segment mass, the location of the segment's center of gravity and the segment's radius of gyration. In addition, there is a flag that indicates if the mass information is relative (R) or absolute (A). Relative mass information is entered as a fraction of the total body mass (one of the sequence information items). Absolute mass information is entered in units corresponding to the system units selection (kilograms or pounds). The center of gravity is always entered in "Relative" mode as a fraction of the distance from the starting point to the ending point.
7.3.3.4 Connect
Connect is selected to recalculate internal segment information from the system default joint and segment information. This option only works for type "system" point definitions and is used to undo changes that have been made to the segment table.
7.3.4 Control_Pts
Control_pts option from the Sequence Option Screen is selected to examine or update the control point information associated with the current sequence. This is done just like the Control Point Process described in Section 7.2.5.
7.3.5 Units
Units option from the Sequence Option Screen is selected when the units of measurement for the sequence is to be examined or changed.
- CAUTION
- The units selected Must correspond to the units of the control point coordinates for the sequence. These units will be used for subsequent data analysis and reporting for this sequence. If the units do not match units for the control point coordinates inaccurate data will be formulated. The choice of units should also correspond to the size of the image space being studied. For example, typical human motion might reasonably be measured and reported in centimeters or meters. In this instance the body weight will be defaulted to kilograms.
7.3.6 Seq_Info
The Seq_Info option from the Sequence Option Screen is selected to examine or update the six items of information relating to the sequence: the sequence title, the subject's height and weight, the number of points per frame, the number of control points and the filming date.
- CAUTION
- Be aware that if the number of points per frame or the number of control points are changed then the corresponding option from the Sequence Option Screen must also be selected to change the actual point id's or control point locations.
Also be aware that if one or more of the views have already been digitized with a given number of points, these views will have to be re-digitized if the number of points change.
7.3.7 Saving Digitized Data
This completes the discussion of digitizing options. A final point relates to the saving of digitized data. Digitizing is a relatively long process. What happens if the computer "crashes" (e.g. the power fails) in the middle of digitizing? The digitizing module saves the Data from the most recent completed frame each time Advance is performed. If the computer should crash, merely restart the system, access "Old" sequence and "Old" view, advance past the last frame and continue digitizing by starting the current frame again.
7.4 DIGITIZING QUICK REFERENCE
When creating a sequence for the 1st time.
- Select New sequence.
- Enter Sequence Title (up to 8 characters). Title should describe the event and who/what is completing the sequence.
- Enter sequence information. Describe what is being analyzed (who, what, where, when) Height, Weight, #Points, #Control Points, and Filming Date. Press F10 when done.
- Select System Defined joints to use the computer anthropometric data (joint names and connections) or select User Defined and create joint names.
- Select Keyboard.
- Type in Point IDs in the order they are to be digitized.
- Select a Grabbed File to use for a model for creating a stick figure. Press F10 when done.
- Mark the joints on the color monitor using the cursor, the monochrome screen will prompt for each joint. Press F1 to mark the next joint. Press F10 when done.
- Select Keyboard for control point location source.
- Select the desired Units for the sequence (if the units for the control points are different form the units entered in sequence information, height & weight, then that information must be changed).
- Enter control point locations XYZ in the order the cube will be digitized.
- Select New View.
- Enter Film Speed and Camera View (the rest is optional). Press F10 when done.
- Select Digitize.
- Select Video.
- Select the Grabbed File that corresponds to the current view title.
- Press any key to continue.
- Determine fixed point. Digitize figure.
- When finished digitizing the sequence, press F9-Options to begin digitizing the control points.
- Select Control from Digitizing Options menu.
- Select Digitize from Control Point Option menu.
- Digitize the same fixed point used in the sequence and then digitize the control points.
- Press F1 when done with control points.
- Press F10 to leave Digitizing Options menu.
- Press F10 to leave Digitizing Menu.
- Select New View to begin digitizing the next camera view.
|
