|
|
Manual Mode |
[FrontPage Include Component] |
|
|
|
|
|
|||||
|
NAVIGATOR: Back - Home > Adi > Services > Support > Manuals > Aces > Dos : |
|||||
|
|
|||||
| |||||||||||||||||||
|
Manual Mode
Categories
|
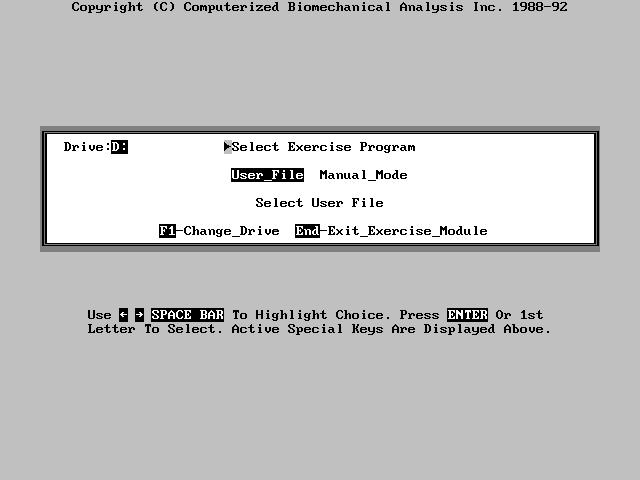
EXERCISEFrom Main Menu Window highlight "Exercise" and press "Enter". As explained in paragraphs 5.4 this will bring you to the Exercise Mode screen.7.1 Exercising from User_FileIf you have already programmed in a file and want to begin exercising, choose User_File and press "Enter". The next screen shows a listing of various files. Simply move the cursor with the arrow or mouse keys to highlight your choice and press "Enter". A new screen will appear showing the exercise parameters. The computer will not allow you to enter any of the fields to make changes. The only way to change a field of any of the exercises is to the Exercise Mode and return to the Program Mode.At the bottom of the screen will be the following options:
7.2 Manual Mode ExerciseIf you wish to just experiment with the system or perform a demonstration, highlight the Manual-Mode and press "Enter".
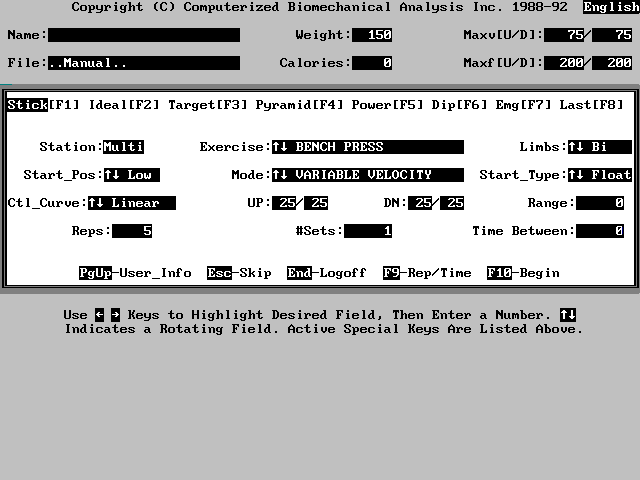
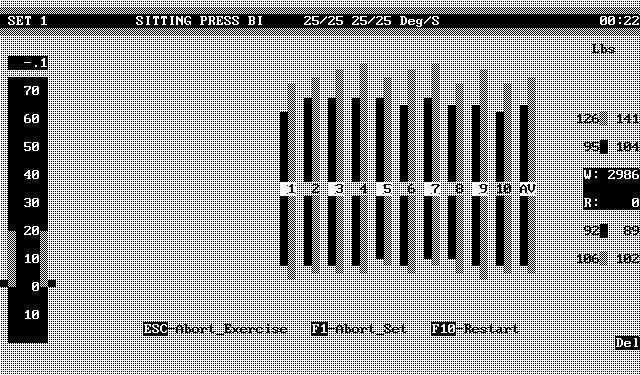
7.2.1 Manual Mode Exercise ParametersThe Exercise Parameters display in the Manual Mode is similar to the parameters for the Programming Mode with only a few exceptions.The top two rows of the Exercise Parameters display are for personal data and may be entered by pressing the PgUp-User_Info key. Then the Users name, Weight and Diagnostic Values may be entered. The upper right corner will display the Systems of Measurement which will read either English or Metric. The Systems of Measurement can only be changed in Calibration mode, in the Station Parameters routine. 7.2.2 Basic ParametersThe exercise parameters are the same with the exceptions listed below:7.2.2.1 Station.In the Manual Mode the computer will not let you into this fiels. It may not be changed in any way.7.2.2.2 Exercise.User defined exercises are not an option in the Manual Mode.7.2.2.3 Plots.There is no option for plotting because the Manual Mode does not store any data for future use.7.2.3 Optional ParametersAll Optional Parameters, F1 to F8 operate the same with the exception of the Stick option.7.2.3.1 Stick [F1].The stick option will perform the same as in the Programming mode but the diagnostic curve for the exercise will appear after you have pressed F10 to begin the exercise. Once you have set your sticking point(s), press the F10 key and the exercise will begin.7.3 Starting an ExerciseAfter selecting all of the parameters for the exercise press F10 or button three on the mouse to begin.7.3.1 Setting The Range Of MotionThe name of the exercise will be displayed at the top of the screen. The motion of the bar will be indicated by a green column at the left of the screen. Small red letters at the right of the column will indicate the correct starting position for the exercise, by stating "Starting High" or "Starting Low". At this point the user should hold the starting position until the system signals the user to perform a repitition by beeping. (Six seconds are allowed for the user to assume the correct starting position.)If the user is in Autorange function, they must now perform one repitition to set the range of the exercise. Be certain to keep the range of motion well within the range of what is easliy achievable. If the range of the exercise is set too far the user will have difficulty in completeing one full stroke because the system does not consider a stroke complete until the end point of a stroke has been reached. The Exercise Information will be displayed on the graphic monitor. A portion of the green column will be shaded where the range of motion has been set for the exercise. A banner at the top of the screen will indicate the exercise type, the resistance or speed, and an elapsed time indicator. If you have moved beyond the starting point during the Autorange or if the bar isn't at the proper starting point for any other reason, slowly move the bar to the correct starting point. The screen will display the number 1 to the left of the highlighted box for your first repititon. The timer in the upper right hand side of the screen will start and the initial values for work and the limits of the exercise will appear in the Green box. 7.4 Audio FeedbackThe CES is equipped with an ausio feedback system that has an adjusting tone. The tone tells the user when they have reached full extension on the upstroke and the downstroke for the exercise they are performing. A low tone indicates that the user is slowing down and a high tone indicates that the user is actually speeding up. These tones serve as helpful feedback to the user who does not want to or is unable to view the screen during exercise.7.5 Visual FeedbackAs you exercise, thin red and blue lines wil appear at the right of the screen. the red bars show the maximum performance during each stroke and the blue lines show the average performance during each stroke. As the new bars appear at the right of the screen the old bars will be pushed to the left of the screen. The green box at the right of the screen will continue to display the quantity of work completed.7.6 Mechanical FeedbackAfter each full repitititon there is a slight release in the resistance of the bar, followed by a gradual breaking of the bar. This gives the user another indication that they have completed full extension or flexion of the exercise.7.7 CompletionThe exercise set will be completed when:
The system will play a brief tune to signal the completion of a set. At htis point the resisitance in the bar will be reomved. 7.8 SignalingOnce the user has looked at the exercise disply, they need only press a key on the keyboard to continue. Any key will do except for the escape key.Signaling can also be completed by pressing on the bar. Bar signaling can be performed by pressing the "Del" button. When this function is engaged the blinking box will change from black to white. By pressing the "Del" button again the Bar Signaling can be disengaged, and the blinking box will return to black. If the user is not able to position themselves in the starting position on time, merely pressing F10 will restart the exercise and allow the user five to six seconds to get into position. |
|
|
