|
Gait Analysis
Categories

|
 Contact
us Contact
us |
|
General info
+1 949 858 4216 |
|
Sales & support
+1 619 992 3089 |
|
E-mail
Information
Sales
Support |
|
CHECK OUT
[FrontPage Include Component]
|
| |
THE GAIT PROGRAM
16.1 INTRODUCTION
The Ariel GAIT program was created with the intention of providing kinematic and timing characteristics of sagittal gait movement. The program provides the user the ability to easily compare results with a user specified data base. These special characteristics of the GAIT program give the orthopaedic surgeon and the clinician the capacity to see how a patient is rehabiliting or recovering from surgery. It may also serve as a general instructional tool on improving gait movement.
The GAIT program allows users to design each report to their specifications, whether it be written data, color graphs, or exporting information to Lotus spreadsheets or text files.
16.1.1 User Friendly Application
Use of the GAIT program is directed through a system of menus and guides that will provide a clear set of options at every point in the operation of the program.
Selections may be made with the keyboard, mouse or the up/down arrow keys. The arrow keys highlight the desired selection and then "ENTER" is pressed to select the option.
16.1.2 Starting the GAIT program
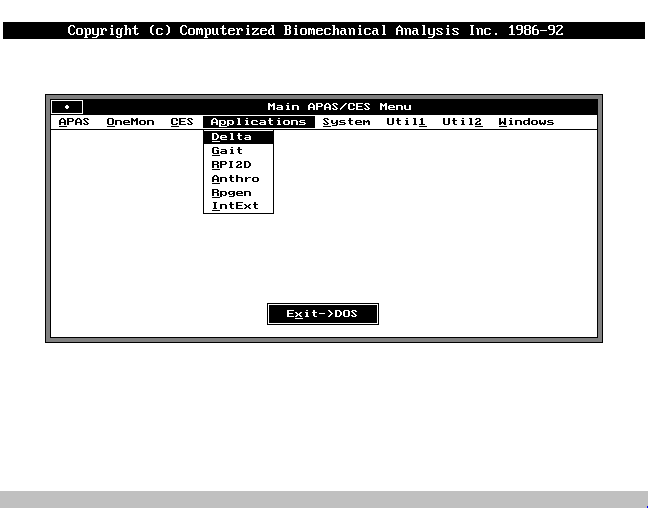
The GAIT program is entered from the Applications options from the APAS Main Menu. Once the GAIT program has been selected, the computer will display the user directory. The drive and directory, where the lift files are located, are entered before the computer will continue to the GAIT Main Menu. Enter the appropriate information in a similar manner to the following example: "D: \PASDATA\GAIT" (drive letter designation:\directory name\subdirectory if applicable).
16.1.4 The GAIT Main Menu
Once the user has entered the GAIT program, the program will then give the user the following options:
- Old - continue work with an "old" gait sequence.
- New - generate a new Gait program.
- Directory - allows change of drive and directory
- Exit - returns directly back to the APAS Main Menu.
16.1.4.1 Old
Selecting Old allows the user to continue work on or edit an old gait sequnce. The program will display a list of files to choose from. Selections can be made using the up &down arrow keys on the keyboard or by using the mouse.
16.1.4.2 New
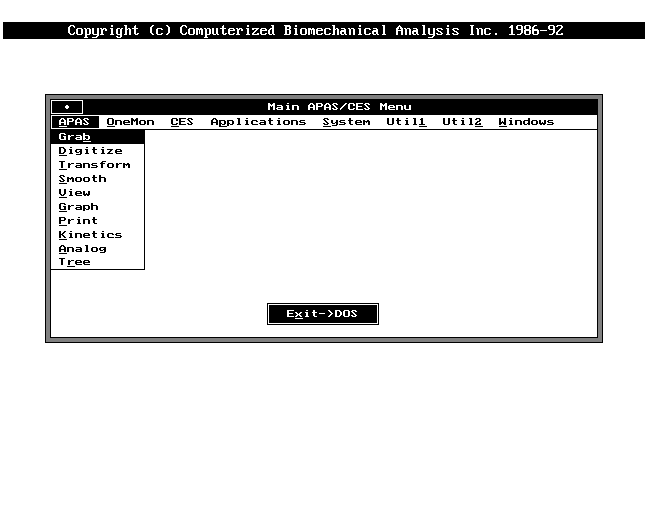
Once New has been selected, the program will display a list of files and ask for the right view. Selections can be made with the up & down arrow keys on the keyboard or the mouse. When the right view has been selected, the program will then ask for a left view from the same list of files.
Once the right and left view have been selected, the program will display the Parameters Screen. This gives the user some flexibility on entering important information about the subject such as the right & left file names, the parameter filename, the trial number, the date of when the study was done, the patient's name, his or her's age, sex, height (cm), weight (kg), and the patient's number. The Parameters Screen also allows the user to include information on the technician, the clinician, the physician, the reason for the study, whether there are orthoses/prosthoses uses or ambulation aids used, the walking speed, and any general comments.
Moving from each selection can be made by using the up & down arrow keys or the mouse. However, the information must be typed in from the keyboard and made valid by pressing "Enter". The user can leave parameters by pushing return at the bottom of the parameters list (general comments). However, if the user has not entered a sex for the subject, the program cannot proceed beyond parameters.
16.1.4.3 Directory
The user must designate the exact location where the appropriate gait file can be found. The first entry is the letter designation of the drive. The second entry on the second line is for the directory name followed by a \ (backslash) and subdirectory name (if any).
If the user selects a drive and directory that the computer cannot locate, it will tell the user that the designated drive and the directory do not exist. Click OK with the mouse and the GAIT program will return to the Gait Main Menu.
16.2 OPTIONS
Once an old or new file have been selected, the Gait Options Menu will display the following choices:
- Input - Selecting Input will direct the program to another menu with the choices of Parameters, Norms, Sequence, and Previous.
- Events - Selecting Events will direct the program to another menu with the choices of Next, Previous, Select, First, Last, S_F, S_B, Event, Options, and Quit.
- Calculate - calculates the results of an individual gait study.
- Display - allows viewing of the results of a completed gait analysis, as well as a comparison versus a selected norm.
- Hardcopy - prints out various items found in the Display option.
- Export - exports gait files to Lotus.
- Quit - exits the Gait Program and returns to the Main APAS Menu.
16.3 INPUT
The Input Option is selected to change, manipulate or input the data files and determines what the file will look like.
- CAUTION
- Sever manipulation of the normative data will have adverse effects on the comparison between the normative data and any specific file being used.
Selecting Input in the GAIT options menu will direct the user to an Input Menu with the following options of:
 | Parameters
| Norms
| Sequence
| Previous - directs the program back to the previous menu, the GAIT options menu.
| | | |
16.3.1 Parameters
Parameters option is selected to edit or add any parameters or input information that may have been forgotten when the New File was first created.
16.3.2 Norms
This option allows the user to "input comparative gait norms". Essentially, this allows the user to input into the GAIT program's calculations another gait file and display graphed comparisons between the current gait study and a normal gait study. The advantage of this option becomes apparent when the user reaches the Display Option (Section 16.6) and can see the actual differences between their own gait study and the norm the user has selected.
Once the Norms options has been selected, the Norms Screen displays the following options:
| File retrieves Normal gait data from file.
| Keyboard allows Normal gait data to be entered from the keyboard
| Editallows Normal gait data to be edited
| Previous - returns the user to the Input menu.
| | | |
16.3.2.1 File
This option allows the user to create normative comparison data from a file. Once File has been selected, the program will display a list of files to choose from and after a file has been selected, the program will return to the Gait Options Menu.
16.3.2.2 Keyboard
The Keyboard option allows the user to create their own normative data from the keyboard. Once this option has been selected, the program will ask the user to select an output normal file name and the number of points to input per data curve. Entries are made from the keyboard.
Once this is completed, the program will present the following selections:
- Params - enters temporal/spatial norms for the file. This includes the text describing the normals used, the range of motion and maximum extension & flexion for the hip, knee, and ankle joints. It allows the user to enter the data regarding the mean angular velocity for those joints as well as the stride length (cm), the walking velocity (cm/s), the cadence (steps/min), the percent stance, the midstance percent cycle, the percent swing, and the midswing percent cycle.
- A_Hip - enter the normal curve for the hip flexion and extension in degrees.
- A_Knee - enter the normal curve for the knee flexion and extension in degrees.
- A_Ankle - enter the normal curve for the ankle flexion and extension in degrees.
- V_Hip - enter the normal curve for hip angular velocity (in degrees per second).
- V_Knee - enter the normal curve for knee angular velocity (in degrees per second).
- V_Ankle- enter the normal curve for ankle angular velocity (in degrees per second).
- Exit - returns to the Gait Options Menu.
16.3.2.3 Edit
The Edit option is used to change or edit a normative data file and saves such to a new file. After selecting the file to be edited, the program lists the fields that may be changed. These are the same fields of data that are presented in the Keyboard section.
16.3.3 Sequence
This option returns the user back to the the Gait Options Menu to acquire an old file or create a new file if they feel it necessary.
16.4 EVENTS
Events is selected to label certain events in the gait study. Once this selection has been made, the Events Screen Menu will present the following options:
- Next - advances to the next frame.
- Previous - returns to the previous frame.
- Select - goes directly to a particular frame. Once this option has been selected, the program will ask the user to enter the frame number, and once it has been entered, that program will display that frame.
- First - goes directly to the first frame in the gait study.
- Last - goes directly to the last frame in the gait study.
- S_F - scrolls forward through the entire gait sequence. The scroll forward option can be stopped by pressing any key or clicking the mouse.
- S_B - scrolls backward through the entire gait sequence. The scroll backward option can be stopped by pressing any key or clicking the mouse.
- Event - marks specific gait events.
- Options - enhance the viewing of the gait analysis.
- Quit - Returns to the Gait Options Menu.
This menu will also have two display windows. The top display will be for the right side frame and bottom display will be for the left side frame. Below the two windows, at the very bottom of the screen, will be information about the left and right side (left/right foot strke, left/right foot off, the left/right side first frame, and the left/right side last frame).
Information from for foot strike from two frames and for foot off from one frame of both sides are needed to complete a gait sequence.
The first seven options on the Events Menu Screen, Next, Previous, Select, First, Last, S_F, and S_B are used to manipulate the the display window below the menu. Select option will ask for a specific frame number. Event and options are explained in more detail in the following sections.
16.4.1 Event
Selecting this option will provides a list of the following selections:
- RFS (LFS) - marks the current frame as the one where the right/left foot strikes the surface.
- RFO (LFO) - marks the current frame as the one where the right/left foot leaves the surface.
- First - marks the current frame as the first frame in the gait analysis sequence. This gives the capability to eliminate any frames that are considered extraneous.
- NOTE
- Caution should be exercised when selecting this option because once frames are eliminated, they cannot be retrieved.
- Last - marks the current frame the last frame in the gait analysis sequence. Again, this gives the capability to eliminate any frames that are considered extraneous.
- NOTE
- Caution should be exercised when selecting this option because once frames are eliminated, they cannot be retrieved.
- Previous - returns to the Events Screen Menu.
16.4.2 Options
Selecting Options will give the user the following choices:
- Side - changes sides for event labeling.
- T_Delay - sets a time delay between frames during scrolling. This slows the scrolling down and may help the analyst to better study the gait subject. Once it has been selected, the program will ask the user to enter the amount of time delay.
- Trajectories - traces the movement of body joints during the gait sequence. Once this option has been selected, the program will display another menu from which the user can select the joint they would like to trace. The options consist of: the shoulder, pelvis, hip, knee, ankle, heel, toe.
Once a joint(s) has been selected, the program will display a menu consisting of colors to select to label the selected joint. The menu consists of the following colors: blue & light blue, green & light green, red & light red, yellow, and white. The program will also list the previous option which will return the user to the trajectory joint selection menu.
- Clear - clears the screen of all trajectories.
- Previous - returns the program to the Events Screen Menu.
16.5 CALCULATE
Once all inputs and events have been completed, the next step is to calculate the results of the individual gait study. This is done automatically by the Calculate Option from the Gait Options Menu. If the program does not seem to be responding, it is most likely that the results have already been calculated. If the results have been calculated, they will show up in the Display section of the program. Also, if the user has already completed the events and the calculations, and then inputted the normative data afterwards, they should select Calculate again. Otherwise, the normative data will not appear in the Display option. If the events have not been labeled, the program will tell the user this, and not allow the file to be calculated.
16.6 DISPLAY
The Display Screen Menu provides viewing of the gait analysis results. Once it has been selected, the program will then give the user the following options while displaying the selection below the menu:
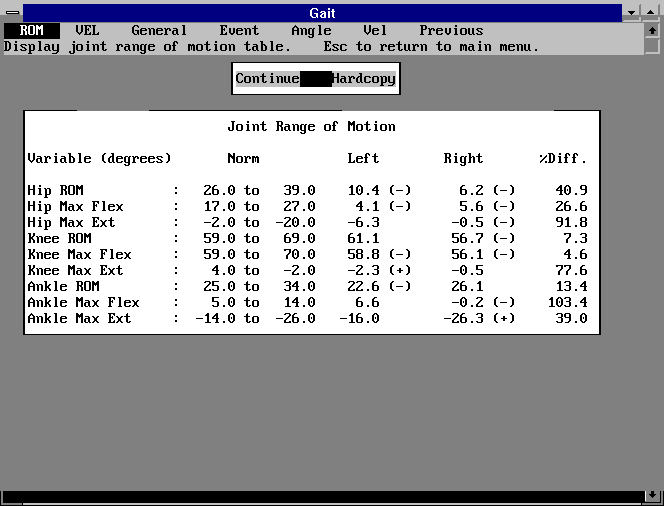
- ROM - display the Joint Range of Motion table in degrees for the range of motion, and maximum flexion & extension for the hips, knees, and ankles.
- VEL - displays the Joint Angular Velocity table. The table will display in degrees per second the mean angular velocity, the maximum flexion velocity, and the maximum extension velocity for the hip, knee, and ankle joints of both sides of the body. As with the Range of Motion table, the Velocity table will display a percentage difference between the left and right joints. Again, just as with the range of motion table, the velocity table will also display how the data compares to the norms by displaying plus or minus signs. If normative data has not been selected or calculated, it will not appear in the table and there will be no percentage differences.
- General - displays a gait data summary for different variables such as the range of motion and angular velocity (degrees/second) for the hips, knees, and ankles. The General option also includes a summary on stride length (in CM), walking velocity (cm/s), cadence (steps/minute), stance period (in seconds), percent stance, midstance percent cycle, the swing period (in seconds), the percent swing, and the the midswing percent cycle. The summary displays the normative data, the left and right sides, and the percentage difference between each side for these categories.
- Event - this selection is the same as Section 16.4 Events.
- Angle - displays graphed curves of angle values for the left & right hips, knees and ankles. If a normal file has been implemented, the program will display how the normative curves compare to the gait subject.
- Velocity - displays graphed curves of the the angular velocities in degrees/second for the left & right hips, knees, and ankles. As with the the Angle option, this selection will display how the normative curves compare to the gait subject if a normal file has been implemented.
- Previous - returns the program to the previous menu.
For each of these categories, the table will display a percentage difference between each side. The table will also mark a plus or minus sign by each category that falls below or exceeds the normative data. Again, if a normative file has not been selected or has not been calculated in (see section 12.5), the individual file has nothing to compare to, and there will be no plus or minus signs.
In order to leave viewing the table, select "continue". In order to print out the table, select "hardcopy". These selections must be made with the mouse.
16.7 HARDCOPY
The Hardcopy Menu provides the following selections:
- Table - prints out all the summary tables, Range of Motion, Velocity, General, and Event.
- Plots - print out all the Angle and Velocity curves.
- All - print out both the summary tables and the plots.
- Previous - returns to the Gait Options Menu.
|
