|
|
Sample Session |
[FrontPage Include Component] |
|
|
|
|
|
|||||
|
NAVIGATOR: Back - Home > Adi > Services > Support > Manuals > Aces > Windows : |
|||||
|
|
|||||
| |||||||||||||||||||
|
Sample Session
Categories
|
ACES - A sample exercise sessionThis section illustrates
through a sample session, how the ARIEL CES system is used. The purpose of this
session is to acquaint the user with the steps to be followed in signing on to
the system and in performing an exercise. The specific types and modes of
exercise will be discussed in more detail in later sections. STARTING THE COMPUTERTurn the �master�
switch on to boot-up the computer and supply power to the monitor and stepper
motor. In a few minutes, the computer monitor will display the Microsoft Windows
desktop. Double-click the CES_System
icon located on the Microsoft Windows desktop. The CES and Program software
modules will be displayed. The CES icon is selected to perform an exercise
session in either the Manual or Program mode. The Program icon is selected to
create the pre-programmed exercise session. Each of these modules will be
discussed in detail in later sections. Types and modes of exerciseThe previous section
introduced a few of the types and modes of exercise available on the Ariel CES.
This section will consider in more detail the various types of exercise that may
be performed, as well as the different training modes that may be used with each
of the exercise types. The sample session showed
how a typical subject would train from a pre-established program stored in a
user file. This is the simplest method to exercise on the CES. In this section
we will introduce another mode of operation - MANUAL mode. As the name
implies, this mode is useful for demonstrating the many and varied capabilities
of the system. Manual mode is initiated by selecting the Manual Mode
button from the Log On menu. This will open the Exercise Parameter menu.
Keep in mind that the
full compliment of exercise types and modes discussed in this chapter may be
performed from the program mode as well as from the manual mode. EXERCISE TYPESWhen using the manual
mode, the system prompts the user to select an exercise type from a list of
available choices. An exercise type is selected by clicking on the desired
exercise. You will notice that
there are one or more exercise types listed as User Defined. The Ariel CES
allows the user to define custom exercise types, or re-define existing types to
tailor your system to specific requirements. An exercise type is a
name that is associated with an individual exercise. As such, it informs or
reminds the user of the type of exercise that will be performed. It usually
implies a certain body position and orientation, such as with the Bench
Press/Pull, and often indicates which muscles or muscle groups will be trained,
such as with the Biceps/Triceps. However, the Ariel CES cannot tell if you are
actually performing the exercise type selected, although it is to your advantage
to do so. There may, of course, be times when a variation on some exercise is
desirable to achieve a particular training effect. All exercises are
bi-directional which means that resistance is controlled on both the up stroke
and the down stroke. This permits the training of complimentary muscle groups
such as biceps/triceps and quadriceps/hamstring in a single exercise if so
desired. All exercises are assumed to start with the upstroke or upward movement
of the bar except for the Squat which is assumed to start with downward motion
first. Default starting positions may be changed when exercise types are defined
or redefined. EXERCISE MODESAfter selecting the
exercise type, the next step is to select the exercise mode. The exercise mode
refers to the particular physical aspect of the exercise that is measured and
controlled by the exercise system. A discussion of each mode follows. VARIABLE RESISTANCE
is the mode most similar to traditional weight training. In this mode, the
resistance or force level at which the user must push to move the bar is
maintained at some pre-selected value. In addition to maintaining a constant
resistance, the ARIEL CES can be programmed to vary the resistance as a function
of bar position in any pattern that the user may desire - thus the name Variable
Resistance. It is a well-known feature of anatomy that the mechanical advantage
of most muscles changes as the associated body joint is flexed or extended. The
variable resistance mode allows an exercise to compensate for this change,
becoming progressively easier or more difficult and thus maintain a more
constant muscular exertion through the entire range of movement. In VARIABLE VELOCITY
mode, the velocity or speed at which the bar is permitted to move is maintained
at some pre-selected value, regardless of how hard the user pushes against it.
In addition to maintaining a constant velocity, the ARIEL CES can be programmed
to vary the velocity as a function of bar position in any pattern that the user
may desire - thus the name variable velocity. Velocity mode exercise has a
distinct advantage over resistance mode exercise - one does not need to know the
strength level of the subject to set up this exercise, nor is any
�adjustment� necessary as the subject trains and increases in strength. The
user always pushes as hard as he or she can against the bar, and the computer
controlled hydraulic resistance automatically adjusts to maintain the desired
bar velocity. WORK TRAINING
is a velocity mode exercise with an additional feature. Rather than specifying
the number of repetitions to be performed, work training specifies the total
amount of work to be performed. Work is defined as the product of the force on
the bar times the distance the bar is moved, and thus is proportional to the
energy expended during exercise. Work training exercises, when performed at a
continuous pace with a reasonable high amount of work, have a cardiovascular
training effect as well as a muscular training effect. FATIGUE TRAINING
is a velocity mode exercise with an additional feature. Rather than specifying
the number of repetitions to be performed, fatigue training specifies the degree
of muscular fatigue to be achieved during exercise. Fatigue is measured by
comparing the average force for each repetition (upstroke portion) with the
highest average force measured for all repetitions. This measurement is
expressed as a percent of the highest average force, so that your fatigue level
starts at 100%, and drops as your average force level drops. For example, a 75%
fatigue exercise would continue until the average force produced in two
consecutive repetitions was 75% or less of the average force for the strongest
repetition. Fatigue training is a desirable mode for exercises designed to build
endurance. The goal is to continually increase the number of repetitions
performed before a certain degree of fatigue is reached. A DIAGNOSTIC
EVALUATION is not actually a mode of exercise, but rather a method of
measuring a user�s maximum capabilities for that type of exercise. These
measurements are used in a variety of ways by the ARIEL CES. This �mode�
will be discussed in more detail in a separate section below. There is an additional
mode of exercise that is not selected from the exercise mode menu. This is the
TIMED EXERCISE. A timed exercise is an exercise performed in either the variable
resistance or variable velocity mode, with the amount of exercise specified by a
period of time rather than by a number of repetitions. The selection of a timed
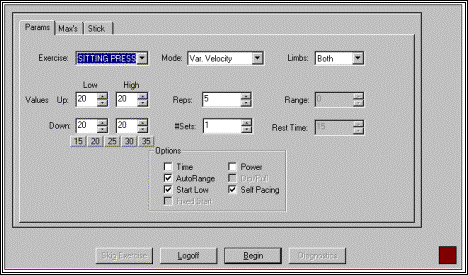
exercise will be explained in the next section. EXERCISE PARAMETERSAfter specifying the
exercise type and mode, the next step is to specify the exercise parameters.
Exercise parameters include the actual magnitude of resistance, or velocity for
this exercise, the amount of exercise per set (expressed in repetitions, time,
work, or fatigue), the number of sets and time between sets, the bar range, and
four additional exercise options. These parameters appear with an initial value
that is either an estimate by the exercise program, or the values that you set
previously, provided that you have not changed the exercise type. You may enter
new values for the exercise parameters by typing them at the keyboard and
pressing the TAB key to advance to the next field. The blinking cursor indicates
the current parameter being entered. If you wish to skip a parameter, just press
the TAB key. After you enter or skip the last parameter, the cursor will cycle
back to the first data field again. Make changes or corrections by re-entering
the parameter in question. To �back-up� to the previous parameter, the
Shift-Tab keys can be pressed. The first four parameters
describe how the motion or resistance of the bar will be controlled for the
upstroke and the down stroke. If this is a VARIABLE VELOCITY, WORK,
or FATIGUE mode exercise, these values are bar velocities in the units
for which your system is set (usually degrees/second). If this is a VARIABLE
RESISTANCE exercise, these values specify bar resistance in the appropriate
units (pounds or kilograms). You will notice that there are two values for BAR
UP and two values for BAR DOWN. The first value is for the low point of the
range of motion and the second value is for the high point of the range of
motion. Intermediate values are automatically computed to cause a smooth
transition in values from low to high. Entering the same value for both selects
constant velocity or resistance throughout the range of motion. A series of 5
buttons ranging from 15 to 35 allows the user to set all four values with a
single click. The next parameter, #
Reps, specifies the number of repetitions to be performed in a single set of the
exercise. The default value of 5 has intentionally been chosen to be low to
allow �experimenting� with different exercises. More typical values for
training exercises are 8 to 10. If the TIME option is active, this parameter
will change to TIME (SEC). This allows you to specify how long the exercise is
to continue in seconds, rather than how many repetitions are to be performed. For a work training
exercise, the reps/time parameter would be replaced by QTY WORK. The value you
would enter for this parameter is the quantity of work to be performed in a
single set of this exercise in the units selected for your system (usually
foot-pounds). Two thousand foot-pounds is a typical value for strength training
exercises, while values of 5000 to 10,000 foot-pounds are typical for
cardiovascular training sessions. For a fatigue training
exercise, the reps/time parameter would be replaced by % FATIGUE. The value
entered for this parameter is the strength level at which to terminate this
exercise, expressed as a percent of your maximum strength level (strongest
repetition). Values in the range of 65 to 75 percent are typical for strength
training exercises. Values below 50 percent usually result in prolonged exercise
sessions, especially for well trained subjects. The next parameter, #SETS/TIME,
specifies the number of sets to be performed, and the time (delay) between sets.
If time between sets is zero, then the user must signal with the bar to advance
from set to set. This is the normal mode of use. If the time is set to some
value, then after that number of seconds, the ARIEL CES will proceed to the
start of the next set. BAR RANGE
specifies the amount of bar motion in the appropriate units (usually degrees)
that is required for one full upstroke or down stroke of this exercise. Normally
one does not enter a value here, as the range of motion can vary considerably
from person to person and exercise to exercise. When the Auto Range option is
activated, the ARIEL CES will automatically measure your range of motion by
requesting the user to perform one repetition without bar resistance prior to
beginning the exercise. This is the AUTO RANGE facility and is the normal
mode of operation in manual mode. Once your range has been measured, it will
remain set until the exercise type is changed. SELF PACE
allows the user to advance to the next screen by simply moving the exercise bar.
This option is useful when exercising in the program mode since the user can
advance through a complete exercise routine without ever touching the keyboard.
When this option is activated, a colored square will appear in the lower right
corner of the color display. In order to advance the screen, the bar must be
moved up and then down past the original starting point. STARTING THE EXERCISEAfter the exercise
parameters have been entered, select the BEGIN button to start the
exercise. The monitor will display the user specified graphs. The system will
prompt the user to assume a comfortable starting position for this exercise. The
starting position is the position of the bar at which one would normally start
the upstroke (down stroke for the Squat) of your exercise. Hold this position
until prompted by the system to proceed (this time is set to approximately 6
seconds). If the AUTORANGE option
is selected, the system will prompt the user to perform one repetition of the
exercise in order to set the range of motion. There is no need to push hard or
move excessively fast. Just move the bar up and then back down (down and then up
for exercises starting at the top) an amount that is comfortable. Do not
overextend when setting the range of motion as you are moving the bar without
resistance. It will be harder to reach full extension when exerting with
resistance. The audible beep indicates when the bar has returned to the starting
position. The column at the left
will display the range of motion as a function of the full station range. If the
bar has moved beyond the starting point, the system will prompt the user to move
the bar to the starting point again. Once at the starting point, the monitor
will sound a beep to signal that the exercise has begun. The screen will display
the repetitions, the timer in the upper right corner will start, and the initial
values for work and the exercise limit will be displayed. Perform the exercise by
pushing up on the bar until you hear a high tone, and then pulling down on the
bar until you hear a low tone (again, exercises that start at the top will be
just the reverse). Make certain that the bar is moved in each direction until
you hear the tone. This indicates that the range has been completed. The user
may pause briefly between the upstroke and the down stroke, if desired. It is
not recommended to change bar direction suddenly with a jerking motion, as this
will cause an abnormally high force value to be measured on the bar. As the exercise
continues, one will notice that the high beep tone changes from repetition to
repetition. This is an audio �feedback� mechanism that can be used to
compare the average force or velocity for each repetition to the initial force
or velocity level. The higher the tone the higher the value, and the lower the
tone the lower the value relative to the first repetition. This allows the user
to monitor the performance level without the need to watch the monitor. The exercise is complete
when the specified number of repetitions has been completed, or the desired
quantity of work has been completed, or the desired level of fatigue has been
reached, or the specified time period has expired. The system will play a brief
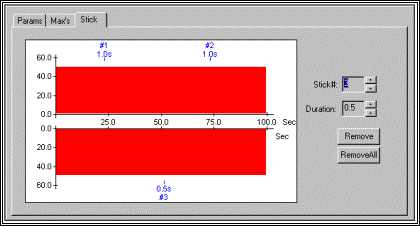
tune to signal the end of the set and the bar resistance will be removed. STICKING POINTSSticking points are
particular points in the user�s range of motion where the ARIEL exerciser will
abruptly stop the motion of the bar causing the user to change from an isotonic
to an isometric mode of training. After the user has pushed against the locked
bar for the specified time interval, the bar will again start to move in the
manner selected for that exercise. Sticking points are designed to build
strength at a particular point in the user�s range of motion. Sticking points may be
optionally added to any exercise by selecting the STICK menu tab from the
exercise parameter display. When selected, a sample exercise result curve will
appear on the monitor designating the user�s range of motion for both the up
and down directions.
Up to ten Sticking Points
are allowed for each exercise session. By default, the Stick # field will
default to 1. Set the stick point duration (in seconds) using the up/down arrow
keys in the Duration field. Next use the mouse to �click� on the result
curve where the first stick point should be placed. An arrow key labeled with
the stick point number and duration will be displayed on the result curve.
Additional stick points are entered by incrementing the Stick# and repeating the
procedure above. The illustration shows a one second stick point at one-quarter
and three-quarters through the range of �up� motion. An additional
half-second stick point has been applied midway through the range of motion in
the �down� direction. Individual stick points can be removed by selecting
the Stick# and then pressing the REMOVE button. All stick points can be
removed in a single process by pressing the REMOVE ALL button.
When the sticking points have been set, select the Parameter tab to return to
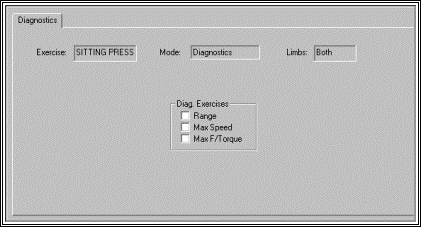
the exercise parameter menu. EXERCISE DIAGNOSTICSAs mentioned earlier,
exercise diagnostics measure certain aspects of the user�s performance for a
given exercise. Specifically, exercise diagnostics measure the Range Of Motion,
the Maximum Speed at which the user can move the bar throughout the range of
motion, and the Maximum Strength throughout the range of motion.
The user has the option
to select any or all three of the diagnostics (range, speed, strength) to be
performed by left-clicking the mouse to toggle the desired choices either on or
off. This information allows the ARIEL exerciser to optimally adjust to the
user�s particular training level for this exercise. Performing exercise
diagnostics is similar to performing a two set exercise (one repetition per set)
using the AutoRange feature. First, the system will prompt the user to move the
bar through the range of motion. Then with the range displayed, the user will be
prompted to perform one repetition with low bar resistance, moving the bar as
fast as possible. After viewing a graph of the results, the user is prompted to
perform one repetition with low bar velocity, pushing as hard as possible both
up and down. Again, the results will be displayed, after which the system saves
the results for future use. When exercising from a
pre-programmed user file, diagnostics will be performed once for each type of
exercise in the program the first time the program is performed. The diagnostic
results will be saved in the program for subsequent use during normal exercise
training. As an option, the user may specify that diagnostics be performed on a
regular basis (such as every tenth time that the program is performed) to allow
the program to be updated with new strength and speed information as progress is
made in the training. When exercising from the Manual mode, exercise diagnostic information is saved only until another exercise type is selected. Each time a new type is selected, the system chooses �standard� diagnostic values for that exercise. Personal values may be set by running the exercise diagnostics from the exercise mode display, then performing the desired mode of regular exercises.
See also
|
|
|