|
|
Software |
[FrontPage Include Component] |
|
|
|
|
|
|||||
|
NAVIGATOR: Back - Home > Adi > Services > Support > Manuals > Aces > Windows : |
|||||
|
|
|||||
| |||||||||||||||||||
|
Software
Categories
|
ACES - How to run the softwarePrior to performing the
exercise session, you should take the time to familiarize yourself with the
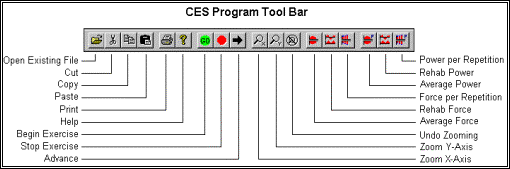
format and contents of the various screens listed below: THE CES TOOL BARYou can activate many
functions by selecting the icons located on the CES program tool bar. The
tool bar is located near the top of the window. Icons are pictorial
representations of commands or functions. You can access the following commands
by clicking the appropriate icon.
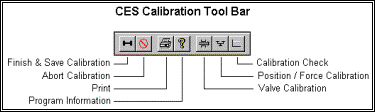
THE CALIBRATION TOOL BARDuring the Calibration
procedure, the main CES program icons are replaced with the calibration tool
icons. Most functions required for the calibration process can be activated by
either selecting the menu item or corresponding icon.
ACES Quick referenceMANUAL
MODE EXERCISE 1.
Double-click the CES-System icon from the Windows Desktop. 2.
Select the CES icon to open the Log On Menu. 3.
Select the MANUAL MODE button to open the exercise parameter menu. 4.
Enter the desired exercise parameters. 5.
Select the BEGIN button to initiate the exercise session. NOTE: If
the �Self-Pace� option is active, the exercise session can be initiated by
simply moving the bar. PROGRAM
MODE EXERCISE 1.
Double-click the CES-System icon from the Windows Desktop. 2.
Select the CES icon to open the Log On Menu. 3.
Select the USER button to open the �pre-programmed� userfile
for the exercise session. CALIBRATION
CHECK 1.
Double-click the CES-System icon from the Windows Desktop. 2.
Select the CES icon to open the Log On Menu. 3.
Select CALIBRATION, CALIBRATE to display the Station
Parameter menu. 4.
Select CHECK to initiate the Calibration Check and follow the
on-screen instructions. 5.
Move bar to the STOP (low) position and press the READY button. 6.
Move bar to the START (high) position and press the READY button.
This will lock the bar. 7.
Hang a �known� weight and press the READY button. The
�Calibration Check In Progress....Wait� message will be displayed on the
monitor. 8.
When the bar has fallen all the way to the STOP position, the
instructions will instruct the user to �Remove Weights� and �Please Stand
Clear� 9.
The Calibration Curve will be displayed on the monitor with the Average
Value printed above the curve. 10.
Close
the Calibration Curve window to return to the main calibration menu. 11.
Select
FILE, FINISH to return to the CES Logon menu. FULL
CALIBRATION PROCEDURE 1.
Double-click the CES-System icon from the Windows Desktop. 2.
Select the CES icon to open the Log On Menu. 3.
Select CANCEL from the Log On Menu. 4.
Select STATION and set to the desired machine. 5.
Select CALIBRATION, CALIBRATE to display the Station
Parameter menu. 6.
Enter the desired information in the Station Parameter menu *: Site Name,
Station, Units, Bar Measure, Resistance Measure, Bar Length and Range. The Valve
Open and Lock will be determined automatically in the next step. 7.
Select VALVE to display the Valve Calibration menu. Select OK
and then follow the on-screen instructions. 8.
Move bar to the START position and select the READY button. 9.
Hang specified weight on the bar and press the READY button. The
�Valve Calibration In Progress� menu will be displayed. 10.
Remove
weights when prompted by the on-screen instructions. 11.
Select
the OK button when the Valve Calibration Complete message is displayed.
This will return control to the Station Parameter menu. The next step is Force
calibration. 12.
Select
FORCE to display the Force Calibration menu. 13.
Enter
the two weight values to be used for calibration. Maker certain that the
�Calculate Up Calibration� is selected. Select the OK button to
proceed. 14.
Move
the bar to the Lowest position and select the READY button. 15.
Move
the bar SLOWLY to the High Position and press the READY button. 16.
Move
the bar to the STOP position and press READY. 17.
Move
the bar to the START position and press READY to lock the bar. 18.
Hang
the weights specified for Trial #1 and press the READY button. The Force
Calibration In Progress message will be displayed on the monitor. 19.
When
the bar has fallen all the way to the STOP position, remove the weights and
press OK. 20.
Move
the bar to the START position and press the READY button to lock the bar. 21.
Hang
the weights specified for Trial #2 and press the READY button. The Force
Calibration In Progress message will be displayed on the monitor. 22.
When
the bar has fallen all the way to the STOP position, remove the weights and
press OK. 23.
The
Force Calibration Complete message will be displayed on the monitor. Select the OK
button to return to the main calibration menu. 24.
Select
FILE, FINISH to return to the CES Logon menu. * These are only required to
be selected once. The program will remember the current settings unless changed
by the user. FILE COMMAND MENU (CES MODE)
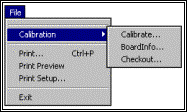
Calibration Selected to perform
calibration functions. When this item is selected, a new menu will appear to
allow calibration of the CES exercise station, examination of analog board
information and diagnostics for the CES transducers. Print Print the current file on
the selected printer. Print
Preview Selected to check or
examine the positioning on one or more pages. When you give the Print Preview
command, a new window will be open showing the document position as it would
appear on paper. To close the Print Preview window, select the Cancel button to
go to the previous mode. Print
Setup Selected to adjust the
printer settings prior to issuing the PRINT command. Recent
Files Displays a list of the most
recent files that have been used by the CES software. Exit Selected to EXIT the CES
program. FILE COMMAND MENU (PROGRAM MODE)
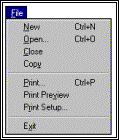
New Selected to create a new
user file for programming the desired exercises Open Selected to open an
existing user file for viewing and/or editing. Close Selected to close the
active user file. Copy Selected to copy the
exercises from the active user file to a new user file. This command will NOT
copy any of the collected data. This command is used to generate identical
exercise sequences for a number of users with a minimum number of keystrokes. Print Print the current file on
the selected printer. Print
Preview Selected to check or
examine the positioning on one or more pages. When you give the Print Preview
command, a new window will be open showing the document position as it would
appear on paper. To close the Print Preview window, select the Cancel button to
go to the previous mode. Print
Setup Selected to adjust the
printer settings prior to issuing the PRINT command. Recent
Files Displays a list of the most
recent files that have been used in the CES Program module. Exit Selected to EXIT the CES
Program module. EDIT COMMAND MENU
Undo Selected to Undo the last
change and restore the item that was deleted, replaced or changed. This command
restores your display to the way it was before the last edit. Cut Select the CUT command to
remove the selected item and temporarily copy it to the Windows Clipboard. The
item is placed in the clipboard so that it can be Pasted into another area of
the same application or into another Windows application. To avoid losing this
item, you should Paste it before performing additional editing. Copy Selected to Copy the
currently selected items to the Windows clipboard. This feature can also be
activated using the keyboard by simultaneously selecting the Ctrl and C keys. Paste Select the PASTE command to
insert a copy of the item currently in the Windows clipboard. This item could
have been cut or copied from almost any Windows application. VIEW COMMAND MENU
Zoom-X The ZOOM-X command is
selected to zoom the X-axis of the currently active graph. The Zoom command can
be selected numerous times to maximize the resolution of the graph. Zoom-Y The ZOOM-Y command is
selected to zoom the Y-axis of the currently active graph. The Zoom command can
be selected numerous times to maximize the resolution of the graph. No Zoom The No ZOOM command is
selected to remove all zooming commands on the currently active graph. EXERCISE COMMAND MENU
Parameters Selected to set the
exercise Parameters for the next session. These include exercise type, mode,
values, range and more. Begin Selected to start the next
exercise session. End Selected to end the current
exercise session. Options Selected to set the various
Options for the current exercise session. When this command is selected, a new
menu will be presented to allow the user to select which graphs will be
displayed during the exercise session as well as adding analog data channels for
electromyography (EMG). Restore Selected to Restore the
exercise display. GRAPHS COMMAND MENU
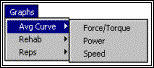
Avg
Curve Selected to plot graphs as
a function of time. When this option is selected, a new menu will be displayed
to allow three types of plots; Force/Torque, Power, and Speed. Rehab Selected to plot graphs as
a function of position. When this option is selected, a new menu will be
displayed to allow three types of plots; Force/Torque, Power, and Speed. Reps Selected to plot graphs as
a function of repetition. When this option is selected, a new menu will be
displayed to allow three types of plots; Force/Torque, Power, and Speed. TABLES COMMAND MENU
Statistics Selected to display summary
statistics from the exercise session. EXPORT COMMAND MENU
New Selected to create a New
export file. Export files are in ASCII (*.txt) format. Open Selected to open and
existing export file. Close Selected to close the
active export file Save Selected to Save current
view data to the active export file. WINDOW COMMAND MENU
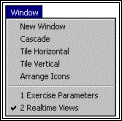
New
Window Selected to open another
window for the active document. Cascade Selected to arrange all
programs that are window sized in an overlapping CASCADE. This will not arrange
a program that has been minimized to an icon. Tile
Horizontal Selected to re-size the
program windows to fit side-by-side on the screen. Since Windows will include
all programs that are window sized in the tile setup, it is best to minimize all
programs that are not currently being used so it will not take up space on the
screen. Tile
Vertical Selected to re-size the
program windows to fit top-to-bottom on the screen. Since Windows will include
all programs that are window sized in the tile setup, it is best to minimize all
programs that are not currently being used so it will not take up space on the
screen. Arrange
Icons Selected to automatically
ARRANGE ICONS in a straight row. The use has no control over where the icons are
placed. HELP COMMAND MENU
Index Selected to provide an
INDEX of Help related topics. Using
Help Selected to provide
instructions on using the Help Windows. About
CES (CCesW) Provides program
information, version number and copyright for the CES program. See also
|
|
|